The Dynamic Decision Table Editor provides much the same functionality as the static decision table editor in the Aion BRE development environment.
Decision tables are displayed in the Dynamic Rule Manager with the icon shown. This icon serves to identify decision tables in the Domain Workspace as well as representing the New Decision Table icon on the toolbar.
To create a new decision table
For more information about creating decision tables, see Create Decision Table.
To view or edit a dynamic rule:
Or, highlight the name of the rule in the Domain Workspace and choose Rule, Open from the Dynamic Rule Manager menu.
To view or modify properties of the decision table, click on the Properties tab of the decision table editor.
The Property page of the Dynamic Decision Table Editor appears as:

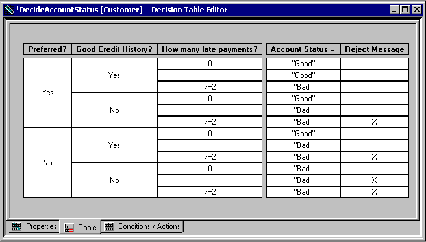
Conditions define the premises of a Decision Table rule. A Condition is composed of a Condition Name and a number of Test cells. Test cells display ranges or values specified in the Condition row.
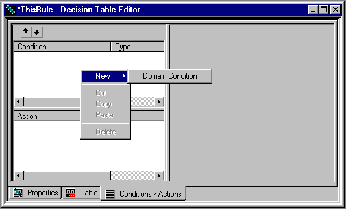
In the Dynamic Decision Table Editor, one can use only domain interface members, which are referenced through their labels. To add a Condition, select Domain Condition for the Condition pop-up menu.
Domain Condition allows you select a domain interface member from the Name drop-down list.
To define a dynamic decision table condition
Note: Real and integer values are displayed according to the country format Setting.
Test values for a condition are specified according to the following rules:
Note: Real and integer values are displayed according to the country format Setting.
Actions define the activities to be taken by the Decision Table rule if the conditions are met. Actions are composed of an Action and a number of Selector cells.
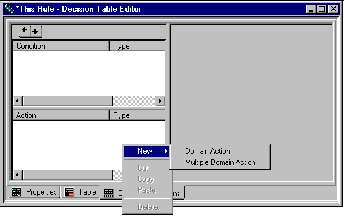
In the Dynamic Decision Table Editor, one can use only domain interface members, which are referenced through their labels. There are two types of Actions that can be selected from the Action pop-up menu.
What do these types of Actions represent?
Like Domain Condition, Domain Action allows you to choose a previously defined Domain Interface Action as the Action by selecting its label from the Name drop-down list. However, in the case of Domain Actions, there are two possibilities:
This option allows you to specify Domain Interface Actions in the Action Selector cells of a decision table. Thus, one row can be used to invoke different actions as long as these actions are mutually exclusive. In this case, you must create a name of the Action, as is done in the Specify Action style. The difference is that during decision table construction, an Action Selector cell of a Multiple Domain Action automatically transforms into a drop-down list when if it becomes the focus. The list consists of Domain Interface Member labels that may be selected for that cell. Valid Domain Interface Members are those that (1) are defined to be of type Action, and (2) do not require an input argument.
To define a dynamic decision table action
Domain Action-May be a domain interface Member that takes at most one input argument.
Multiple Domain Action-May take a list of different domain interface Members, none of which can have an input argument.
For a Domain Action, use the name of the domain interface Member to be executed when that Action is indicated in the decision table. For a Multiple Domain Action, enter a name of your choice.
If the domain interface member does not have an input argument, a checkmark appears in the Action cell when it is clicked.
If the domain interface member has an input argument, enter a value for that argument in the Action cell. This value is passed at execution time to the method that implements the domain interface member. The following conditions apply to entering values in Action cells:
Note: Real and integer values are displayed according to the country format Setting.
Clicking the Action cell displays a drop-down list containing domain interface Members that may be specified as the value for this Action cell. The first member of the drop-down list is blank in case you need to cancel a previously selected domain interface member.
Multiple Domain Actions only support domain interface members that do not have an input argument.
Note: It is possible to save incomplete and invalid rules. For example, this can occur when the:
This feature allows you to save your work and return to it later. When the table is invalid, the Active checkmark on the Properties page will be disabled if it is checked on.
If no selector cells for Actions are specified for a given combination of condition cells, the corresponding action cells are highlighted in the Decision Table Editor. (By default, highlighting is red.) This highlighting is a warning that there is a potential "hole" (that is, a possible outcome for which no action is specified) in the table logic. This could be valid if the combination of values is impossible, that is:
Has Driver License = TRUE
and Age < 16
A blank selector cell indicates that the decision table will invoke no activity for an Action for the combination of Conditions. To invoke a result for the decision table, the selector cell must be specified. Selector cells are specified in three ways depending upon the nature of the action.
Place an "X" in the selector cell by left clicking in the cell. Left clicking in the cell a second time may toggle the "X" off.
Type the value of the input argument in the selector cell. Rules for action selector values are:
Note: Real and integer values are displayed according to the country format Setting.
Select the appropriate action domain interface member from the drop-down list. To cancel the action for that combination of conditions, select the first element in the drop-down list, which is always an empty value.
The functions described below are the same in the static and dynamic rule editors. For more information, see Decision Tables.
To delete a rule from the rulebase:
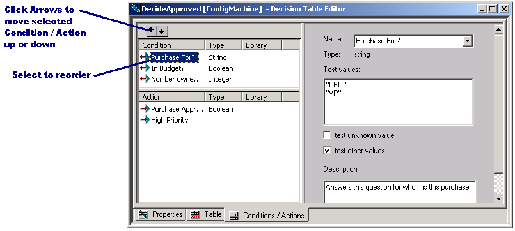
When the Conditions/Actions page is displayed, you can use the Move Up and Move Down arrows to change the order of Conditions or Actions in the generated decision table.
For step-by-step procedures for changing the order of Conditions or Actions, see Decision Tables.
Note: Aion also provides an automatic means to order conditions to achieve the minimal number of combinations of conditions. For more information, see Achieving Optimal Condition Order for Compressibility.
For step-by-step procedures for cutting and pasting conditions and actions, and for cutting and pasting sub-table contents, see Decision Tables.
You can control the appearance and/or behavior of a decision table on the Table page by right clicking in a non-table area of the page. A pop-up menu appears with the following options:
|
Menu Option |
Explanation |
Related Topic |
|---|---|---|
|
Show compressed |
See Compressing a Dynamic Decision Table |
|
|
Optimum condition order |
See Achieving Optimal Condition Order for Compressibility |
|
|
Toggle layout |
Changes display between landscape and portrait. |
Layout can be set on the Properties page, see Viewing and Modifying Dynamic Decision Table Properties |
|
Refresh |
Redraws the decision table according to the latest changes to the definitions of the conditions and/or actions. |
|
|
Auto refresh |
Toggles automatically refreshing of the decision table. Automatic refreshing cause the table to redrawn when it is redisplayed following any changes to the definitions of the conditions and/or actions. |
|
You can use the Decision Table Options dialog to set options that control how the editor displays decision tables. Select the Decision Table Options command from the File menu. For more information about setting these options, see Customizing the Decision Table Editor.
Note: The Domain Interface Filter group is not available in the Dynamic Rule Manager.
You can also select the font in which the Decision Table displays information. Select the Fonts command from the File menu.
Note: For more information about setting fonts, see the Fonts section of the "Creating and Editing Applications" chapter of the User Guide.
Compression is an edit-time feature concerned with making optimal use of screen real estate when displaying a decision table. Values are suppressed when those values are not relevant for distinguishing between different actions.
Compressing a decision table is done by right clicking on the background of the Table page and selecting "Show compressed" from the pop-up menu. For examples of compression, see Compressing a Decision Table.
Note: Actions of compressed subtables are not editable.
Aion allows you to manually specify particular parts of the decision table that you may wish to collapse temporarily so that you can focus on a particular area of a table. For step-by-step procedures for compressing and collapsing the decision table, see Compressing a Decision Table.
Note: Actions under manually collapsed subtables are not editable.
Aion also provides a sophisticated algorithm for determining the optimum order of the Conditions in your decision table to achieve optimum compressibility. For step-by-step procedures for compressing and collapsing the decision table, see Compressing a Decision Table.
For more information about determining the order of conditions to achieve greatest compressibility, see Achieving Optimal Condition Order for Compressibility.
The Dynamic Rule Manager also provides access to the Dynamic Rule Repository. The Dynamic Rule Repository supports a business rule process for maintaining business rules. (For more information about business rule maintenance scenarios supported by the Dynamic Rule Repository, see "Business Rule Maintenance Scenarios in the Dynamic Rule Management" chapter of the User Guide). The Dynamic Rule Repository is not Aion-related software and may not be available in all environments. Dynamic rule repository functionality is provided by means of a Source Code Control (SCC) compatible source code control program (such programs include Microsoft Visual SourceSafe and CA Harvest Change Manager). Dynamic rules can be saved as source code within the database of the source code control program. The Dynamic Rule Manager uses the standard SCC application programmer's interface (API) to provide a subset of the functionality of the source code control program for dynamic rules.
Advantages of using the Dynamic Rule Repository include controlling access to rules through the check-out/check-in protections offered by a source code control program. These protections prevent two business experts from changing the same rule at the same time.
To access the Dynamic Rule Repository, right click the name of a rule in the Domain Workspace. This action invokes a pop-up menu that opens up the source code control program API functions provided within the Dynamic Rule Manager.
| Copyright © 2009 CA. All rights reserved. | Send E-mail to CA about this topic |