
Protecting Full Systems › Create Full System Scenarios
Create Full System Scenarios
Full System scenarios create virtual disks from a physical Master server and store them on a virtual platform host. In the event of a switchover or failover, the virtual disk is used to create a virtual machine on the virtual platform host.
Full System scenarios are supported on the following virtual platforms:
- Hyper-V
Note: For Full System HA/DR scenarios, RHA does not support the Hyper-V CSV (Cluster Shared Volume) clusters.
- Citrix XenServer
Note: Review XenServer Configuration Limitations on www.citrix.com before using XenServer.
- ESXi/vCenter Server
- Amazon EC2
Note: Refer to the Arcserve RHA Release Notes or the Compatibility Matrix on Arcserve Support for supported versions.
While most Arcserve RHA scenarios require that you specify two hosts (a Master and a Replica), Full System scenarios require three:
- Master - this is the physical or virtual machine you wish to protect.
- Appliance - this is a virtual machine that acts as the Replica server (the Arcserve RHA Engine should be installed here). If you are using a Hyper-V virtual platform, this field does not apply and is not available (appears dim).
- Virtual Platform Host - this is the machine that hosts the Appliance VM acting as Replica server.
The following procedure applies to vCenter, ESX, and XEN Full System scenarios. For instructions on creating Hyper-V Full System scenarios, see Create Full System Scenarios - Hyper-V.
To create full system scenarios for all platforms except Hyper-V
- Start Arcserve RHA Manager. Select File, Create, New Scenario or click the New Scenario button on the toolbar.
The Welcome dialog opens.
- Click Create a New Scenario. Type a Scenario Group name or select one from the list and then click Next.
The Select Server and Product Type dialog opens.
- Select Full System, choose HA or DR and the desired Tasks on Replica. For more information about Tasks on Replica, see Assured Recovery. Click Next.
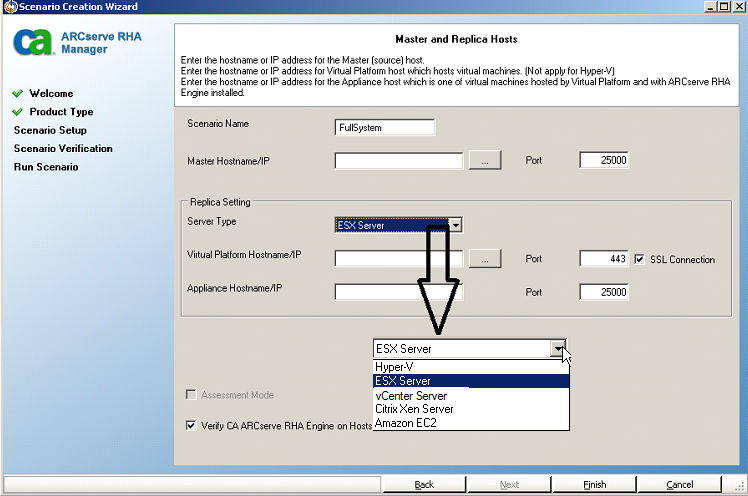
The Master and Replica Hosts dialog opens.

- Complete the screen as follows and click Next when done:
- Scenario Name: Type a Scenario Name. The default value is the scenario type, for example, Full System.
- Master Hostname/IP and Port: Specify the physical machine you wish to protect or browse to select one. Enter its port number.
- Server Type: Select the virtual platform of the machine that will host the VM, for example, ESX Server.
- Virtual Platform Hostname/IP and Port: Specify the physical machine running the virtual machine platform you selected in Server Type or browse to select one. Enter its port number.
- (Optional) SSL Connection: Click this option if you wish to specify an SSL port number instead. You may do so for all virtual platform types except Hyper-V.
- Appliance Hostname/IP and Port: Specify the virtual machine hostname or IP address of the VM to act as the Replica server in this scenario. If the server type is Hyper-V, this field is not available.
- Verify Arcserve RHA Engine on Hosts: Enable this option to confirm the latest version of the Engine is installed on all servers specified in the scenario.
Enter the appropriate credentials for the specified machines, if prompted.
- Wait while verification completes. If desired, you may install the Arcserve RHA Engine on any server. If errors occur, try resolving them by clicking Verify Again. Contact your security administrator if any RPC Services errors occur.
Click Next when the Engine is verified on hosts.
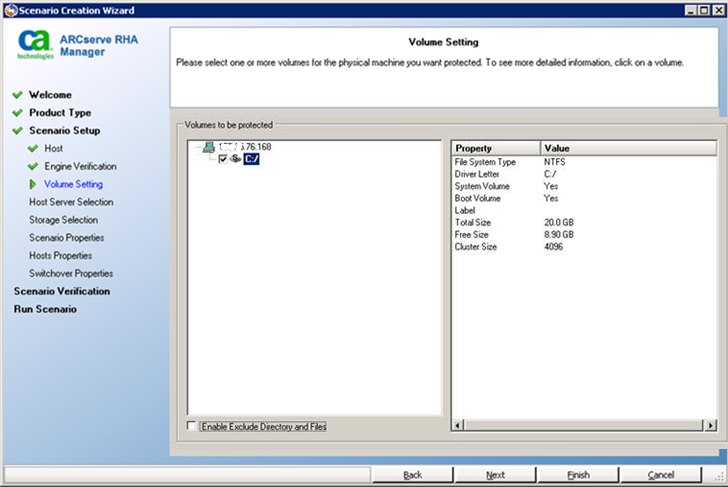
The Volume Setting dialog opens. Arcserve RHA auto-discovers the volumes on the specified Master server.

- Specify the volumes you wish to protect. (Optional) Enable the option, Enable Exclude Directory and Files. Arcserve RHA automatically filters pagefile.sys, hiberfil.sys, System Volume Information, Recycler, and Recycled files and folders by default for Windows. Click Next.
You may be prompted to enter credentials for the server.
The Resource Pool Selection screen opens.
- Click Next.
The Storage Selection screen opens.
- Specify where the virtual machine should be stored. Enable the option, Allocate and commit space on demand, if desired. Click Next.
The Scenario Properties dialog opens.
- Change properties, as desired and click Next. For more information, see the Arcserve RHA Administration Guide.
The Master and Replica Properties dialog opens.
- Change properties, as desired, and click Next. The following information is acquired: CPU number, memory size on VM, adapter information on the physical Master, and the Network Mapping List. You may also change these settings outside of the scenario creation wizard. For more information, see the Arcserve RHA Administration Guide.
- Wait while Arcserve RHA retrieves Switchover Properties.
- When the Switchover Properties dialog opens, expand the Network Traffic Redirection properties. On this dialog, be sure to edit the physical network mappings.
To edit Physical Network Mappings:
- Select Click to edit physical network mappings.
The Network Adapter Mapping dialog opens. If there is only one virtual network adapter in both the Master and Replica servers, they are mapped automatically. Click the drop-down in the Replica Network Adapter column and choose the adapter you wish to map to the adapter listed in the Master Network Adapter column.
Apply master adapter information -- (default) Choose this option if the Master Adapter is in DHCP mode.
Customize adapter information -- Choose this option to enable the IP Settings and DNS&WINS tabs.
- IP Settings -- You can add or remove IP Addresses, Subnet Masks and Gateways.
- DNS & WINS -- You can add or remove DNS IP Addresses, Primary or Secondary WINS.
Click OK to close the Network Adapter Mappings dialog and click Next to continue.
The Switchover and Reverse Replication Initiation dialog opens.
- Specify if switchover should be started automatically or manually. Reverse Replication cannot be specified in this scenario. Click Next.
- Wait while the Scenario Verification process completes.
If Scenario Verification lists any errors, you must resolve them to continue. If any warnings are listed, you should also resolve them to successfully continue. After making changes, click Retry to repeat verification. Click Next.
The Scenario Run dialog opens.
- Click Run Now if you wish to start synchronization and activate the scenario. For full system scenarios, choose Volume Synchronization. Click Finish to save current settings and run the scenario later.
Copyright © 2014 Arcserve.
All rights reserved.
 
|
|


