

|
|
|
You can use the manager interface to add nodes, or remotely deploy CA Recovery Point Server so that managed nodes can be used as backup or replication targets.
What Do You Want to Do?
This section contains the following topics:
Remotely Deploy CA Recovery Point Server from the Application
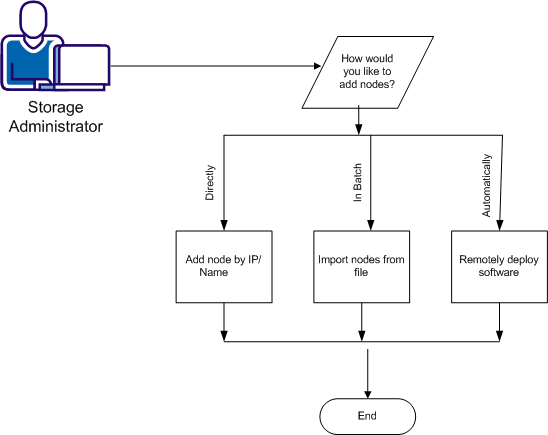
Adding nodes lets you manage policies and data stores as well as the installed products for all protected nodes from a single view for easier management. You can add nodes by IP address or host name, or from a file. In all options, provide the server name, user name and password.
You can also add nodes automatically using Deployment.
Follow these steps:
You can add nodes by IP/Name or import nodes from a file.
To add nodes by IP or Node Name, complete the following fields:
To add nodes from a file, complete the following fields:
The nodes are added to the Node Name list.
Note: To delete nodes from the Node Name list, highlight the node and click Delete from the Node category. To view logs for a node, expand All Nodes from the Groups list, select the desired node and click View Logs.
Next Steps:
The interface allows you to deploy CA Recovery Point Server to other nodes. The Deployment operation automatically adds nodes to the All Nodes group.
Follow these steps:
The server is added to the Deployment list.
Next Steps:
After you deploy software components to nodes, you can use those nodes as backup targets in a CA ARCserve D2D policy or as replication targets in a CA Recovery Point Server policy.
| Copyright © 2012 CA. All rights reserved. | Tell Technical Publications how we can improve this information |