

|
|
|
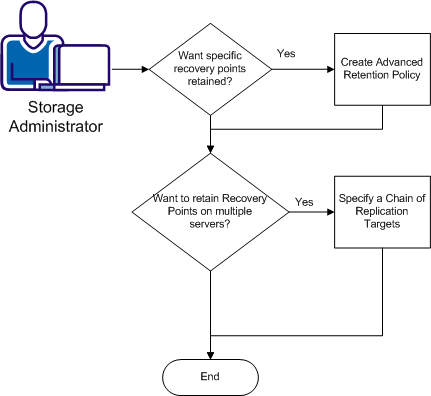
The policy-based protection designed into CA Recovery Point Server lets you construct complex RPO (Recovery Point Objective) Hierarchies.
Examples:
Prerequisites:
This scenario presumes that you have already added RPS nodes to the list, created data stores, and know how to create simple policies.
What do you want to do?
Retention settings specify the quantity, time period, and type of recovery points to store on the assigned server. Retention settings are required in all CA Recovery Point Server policies. Retention is continual; recovery points are kept only as long as they satisfy a retention setting and then they are merged/purged off the data store.
Number of Recovery Points to Keep - This setting directs the application to keep the most recent n recovery points, regardless of type. This setting protects your data from loss due to network outages or hardware failures during the backup or replication operation. When the value of n is exceeded and Advanced Retention Policies are not enabled, the oldest stored recovery point is merged/purged with the next oldest to form a new baseline. In this manner, the number of stored normal recovery points is maintained at the value that you set for n.
Advanced Retention Settings - These fields let you specify the number of Daily, Weekly, or Monthly recovery points to store on a long-term basis. You can set one or all of these values, according to your needs. Retaining seven daily backups gives you a week of recovery points, four weekly backups is a month of recovery points, and so on. The default values are 7 daily, 4 weekly and 1 monthly backups to retain. Recovery points are stored on a rolling basis only while they satisfy a retention setting. At times when a recovery point satisfies more than one retention setting, it is saved only once.
Note: You can combine normal and advanced settings as long as the total number of retained recovery points does not exceed 1344.
Example:
Perform backups every 6 hours. To simplify this example, specify 4 as the Number of Recovery Points to Save (N) so that one full day of backups is always kept, but note that the default value is 31. Keep the default values for the Advanced Retention Settings: Daily = 7, Weekly = 4, Monthly = 3.
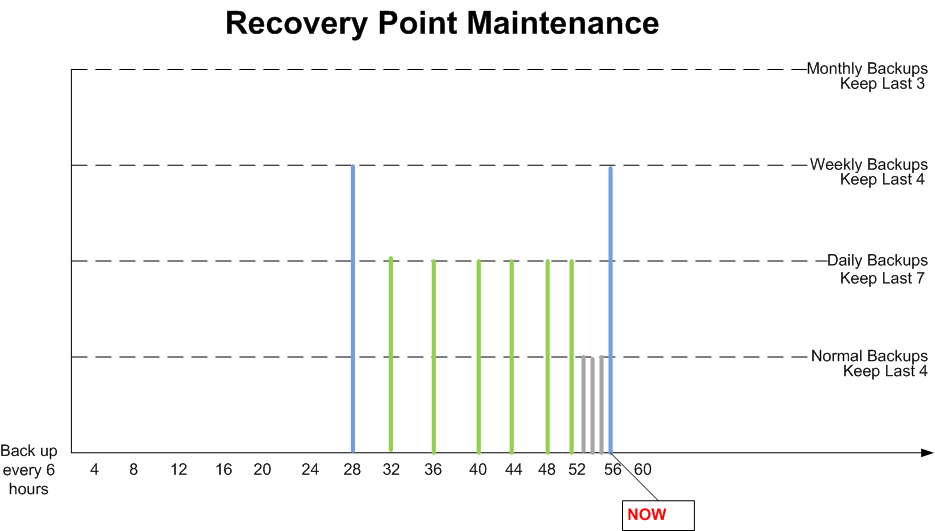
Normal backups occur every 6 hours and are shown as gray bars on the diagram. The value for N is set to 4 to keep recovery points for the last day but N can be set to any value up to 31. Daily backups are shown as green bars in the diagram and the number of daily backups to keep is set to 7. Weekly backups are shown as blue bars. The number of weekly backups to keep is set to 4. Note, a monthly backup is not shown because the current time is the end of week 2.
What Happens Next?
Prerequisites: This procedure assumes that you already know how to add nodes, and create policies and data stores.
Follow these steps:
Your advanced retention settings take effect with the next scheduled CA ARCserve D2D backup.
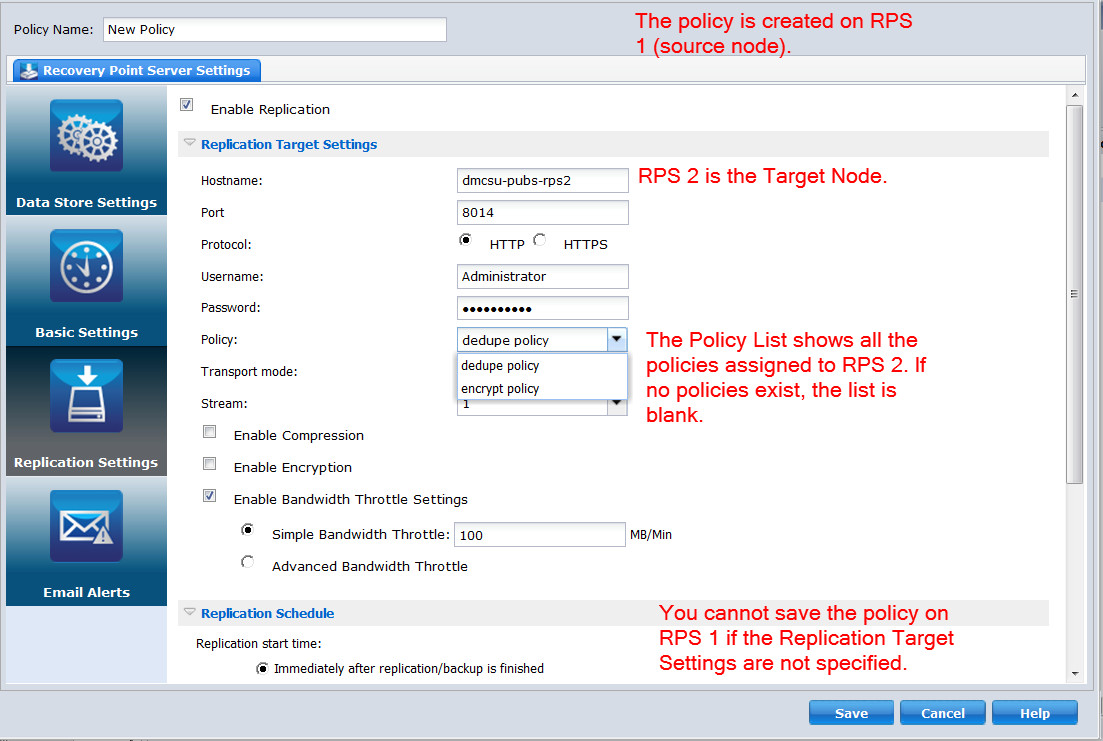
Replication, when enabled, lets you copy recovery points from the source node (the node where you are creating a policy) specified in one policy to a target node. Any target node can be the source node in another policy. By creating policies that specify other nodes and policies, you can define complex RPO hierarchies to satisfy your SLAs (service level agreements) for recovery.
Policies that you assigned to a target node appear in the Replication Target Settings Policy selection list when you create a policy on another node. If no policies are shown in the selection list, you cannot save the policy. Make sure you define policies on each target node first and work backwards to the source.
Example:
Suppose that you want to replicate the recovery points created when a server called D2D 1 performs a backup job. You have four nodes in your RPS Node list: RPS 1, RPS 2, RPS 3, and RPS 4. These nodes can be local or remote or even in the cloud.
Replication policies always require a source and a target node. Node pairs are in shaded boxes on the diagram. When you specify a target node in a source node policy, also choose one of the policies that were assigned to that target. If the target node has no policies, you cannot save the source node policy. Therefore, define policies on RPS 4, then RPS 3, RPS 2, RPS 1, and finally, D2D 1. The Policy Definition Steps shown in the diagram correspond to the process.

Follow this process:
Backup and replication jobs are triggered when the backup schedule defined in CA ARCserve D2D launches, or when you click Backup Now. The backup job stores recovery points on RPS 1, which then replicates those recovery points from RPS 1 to RPS 2. The policy on RPS 2 replicates to RPS 3. The policy on RPS 3 replicates to RPS 4. Replication is the blue arrow on the diagram.
Important Note about Global Deduplication -- If you enabled deduplication on any data store in the chain, do so for all data stores. You cannot perform deduplication on only one Source/Target node pair.
| Copyright © 2012 CA. All rights reserved. | Tell Technical Publications how we can improve this information |