

|
|
|
CA Recovery Point Server is a policy-based application that integrates with CA ARCserve D2D.
Create policies on the nodes you want to use as either backup destinations for CA ARCserve D2D jobs or as replication targets in other CA Recovery Point Server jobs.
A policy is comprised of the following settings:
Protection is triggered when you select Use RPS in the CA ARCserve D2D backup destination field and specify the policy that you want to use. The server you specify can be local, remote, or in the cloud (a service provider).
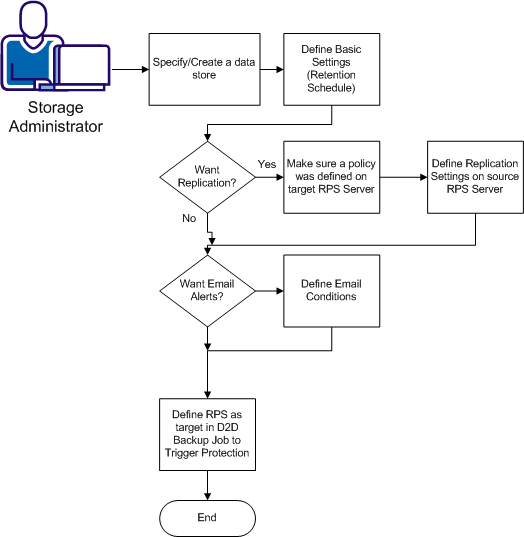
Create policies as illustrated in the diagram.
Follow these steps:
This procedure explains how to create new data stores directly from the New Policy dialog.
Follow these steps:
The New Policy dialog opens and shows the Data Store Settings screen by default.
Data Store Settings
Choose an existing data store from the dropdown list or create a new one. You can create a new one by completing the New Data Store fields or by choosing an existing data store from the list and clicking Clone.
Type a name for the data store you want to create. Tip: Use meaningful names that describe the options that you enabled.
Specify or browse to the shared folder where you want to store recovery points.
If you enable this option, specify the Encryption Algorithm and password. You can choose AES-128, AES-192, or AES-256. The default selection is AES-128.
Note: Each RPS data store uses its the encryption key specified here for locally managed data. For encryption over the network, consider using HTTPS protocol.
If you enable this option, choose the Compression Type. You can choose Standard or Max Compression. Max Compression saves the most space but uses more RAM. Standard Compression is the default selection.
If you enable deduplication, specify the following:
Next Steps:
The Basic Settings screen lets you enable catalog generation, set retention policies, and define the recovery points processing schedule. Retention settings are required in all policies.
The value you specify in the field called the Number of Most Recent Recovery Points controls merge/purge operations. The value for N can be any number. (31 is the default).
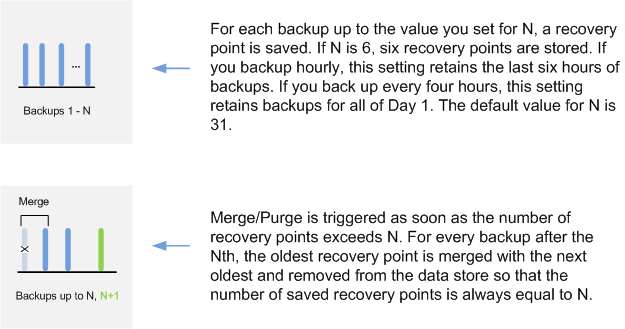
Tips for Setting the Number of Recovery Points to Keep
|
If you are backing up... |
Set the Value of n to |
To keep... |
|---|---|---|
|
Hourly |
4 |
4 hours of recovery points |
|
Hourly |
24 |
1 day of recovery points |
|
Every 4 hours |
6 |
1 day of recovery points |
|
Daily |
31 (Default value) |
1 month of recovery points |
Follow these steps:
The New Policy dialog opens.
Enable this option to generate the catalog at backup time. The catalog is required to perform granular Exchange restores.
Specify the number of most recent backups to always save. This value is any combination of full, incremental, and verify backup jobs. When the value is exceeded, the oldest backup is merged/purged if no advanced retention policy is met. The default value is 31.
For more control over retention, enable this option and specify the number of daily, weekly, and monthly backups to retain. Advanced Retention Policies let you establish complex RPO (Recovery Points Objective) hierarchies. The default values are 7 daily, 4 weekly, and 1 monthly retained recovery points.
Set the schedule that determines when to start processing recovery points. You can choose immediate processing, or specify the number of hours after a job is finished, as well as the specific time of day or week.
Your retention settings are saved.
Next Steps:
Replication settings are optional. Replication, when enabled, lets you copy recovery points from the source node specified in one policy to a target node, where other policies are assigned. By creating policies that, in turn, specify other policies, you can create complex RPO (recovery point objective) hierarchies to satisfy your SLAs (service level agreements).
Policies that are assigned to the target node appear in the Policy list on the Replication Settings screen. Choose a policy to apply. You cannot save replication settings on a source node when there are no policies on the desired target node. Define policies on your final target first and work your way backwards.
This procedure explains how to define replication settings on a source server. Before you begin, verify that policies have been assigned to the target server. To do so, find the target server on the Node screen and verify the Policy Count is not 0. If it is 0, assign policies to that server first and work backwards.
Follow these steps:
Enter the name of the CA Recovery Point Server node where you want to save the recovery points replicated from the source server. This value is always the next server forward in your series. For example, if you are creating policies on RPS2, specify the hostname of RPS3 as the value for this field.
Specify the Port, Protocol, Username and password for this server.
Select a policy from the list of policies that were assigned to the server you specified as the target. This policy could include additional replication settings.
Enable this option to specify a Simple or Advanced setting.
For Simple Bandwidth Throttling, specify the number of MB per minute. The default is 100.
For Advanced Bandwidth Throttling, click the Day and then click Add New Bandwidth Throttle to open the Add Bandwidth Throttle Settings dialog. Specify the Start and End Times and the MB per minute value. Click OK. The setting is added to the list. If you want, click Copy Bandwidth Throttle Schedule to extend an existing setting to additional days.
Next Steps:
| Copyright © 2012 CA. All rights reserved. | Tell Technical Publications how we can improve this information |