

Specify a Security Algorithm Name and Security Key to enable CA VM:Backup to perform the following functions:
The exception file that is used to restore data must specify the same security algorithm and security key that was used to encrypt the backup. The exception file is the only place where the security algorithm is recorded. If the security key is changed after the backup has run, you must record the original key so that the data can be decrypted and restored.
Note: Exception files that a previous version of CA VM:Backup created can show "?" in the Security Algorithm Name field. The "?" indicates that the algorithm name was not specified, but an encryption key was specified. Either the DES or the RC2 algorithm was assumed, depending on the country where CA VM:Backup was used. If the exception file is being updated, enter the appropriate encryption algorithm name over the "?".
Enter one of the security algorithm names that the following table lists, according to the cryptographic algorithm you prefer. The supported Security Algorithms are RC2, single and triple DES (Data Encryptions Standard), and AES (Advanced Encryption Standard).The AES, DES3, and DES Security Algorithms and Security Keys use the standards of the National Institute of Standards and Technology. The Federal Information Processing Standards Publications (FIPS PUBS) define these standards.
|
Name |
Definition |
|---|---|
|
AES |
Advanced Encryption Standard (AES) FIPS PUB 197. Capable of using cryptographic keys of 128, 192, and 256 bits to encrypt and decrypt data in blocks of 128 bits. |
|
DES3 |
Triple Data Encryption Algorithm (TDEA) FIPS PUB 46-3 A TDEA key consists of three DES keys (a key bundle). |
|
DES |
Data Encryption Standard (DES) FIPS PUB 46-3 A DES key consists of 64 bits. |
|
RC2 |
Functionally equivalent to DES. Previously, was only distributed to some international customers. An RC2 key consists of 64 bits. |
If you specify a Security Algorithm Name, specify a Security Key. If you leave either field blank, CA VM:Backup does not encrypt data during a backup job or cannot decrypt data during a restore job. Type the security key in the Security Key field, according to the Security Algorithm Name you specify.
The security key length depends on which algorithm you have selected. To determine the length of the security key for the security algorithm, refer to the following table:
|
Security Algorithm |
Security Key Length |
|---|---|
|
AES |
Four, six, or eight 8-digit hexadecimal words (128, 192, or 256 bits) |
|
DES3 |
Six 8-digit hexadecimal words (192 bits) |
|
DES |
Two 8-digit hexadecimal words (64 bits) |
|
RC2 |
Two 8-digit hexadecimal words (64 bits) |
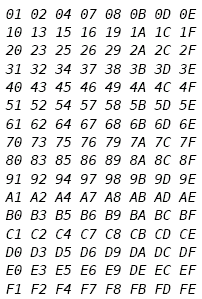
The DES3 and DES encryption algorithms require that each byte of the security key be of odd parity. Refer to the following matrix for a list of odd parity byte values that DES3 and DES security keys can use:
In this example, you create an exception file named EXCEPT2. This file tells CA VM:Backup to back up the following data:
Follow these steps:
WXCEABC1              Work with Exception File EXCEPT2                VM:Backup
--------------------------------------------------------------------------------
 Descriptive Comment: Example session exception file
Commands: OPtions, CMslist, CKdlist, FBalist, SFslist, DELlist
            Record                        Options
 Command    Type       Value              Modified  Include/Exclude List
 cmslist    userid__   mary 192_________    No      No list is defined.
--------------------------------------------------------------------------------
PF: 1  Help     2  ...      3  End       4  Return    5  Insert    6  Delete
PF: 7  Backward 8  Forward  9  File     10  ...      11  Print    12  Cursor
===>
IECMABC1      In/Exclude CMS Files for USERID MARY     0192           VM:Backup
--------------------------------------------------------------------------------
  You can delete all existing entries displayed below by entering
  DELete ALL on the command line.
   X Include or _ Exclude     Filename   Filetype
                              *_______   exec____
                              ________   ________
                              ________   ________
                              ________   ________
                              ________   ________
                              ________   ________
                              ________   ________
                              ________   ________
                              ________   ________
                              ________   ________
--------------------------------------------------------------------------------
PF: 1  Help     2  ...      3  End       4  Return    5  Insert    6  Delete
PF: 7  Backward 8  Forward  9  File     10  ...      11  Print    12  Cursor
Top of list
===>
WXCEABC1              Work with Exception File EXCEPT2                VM:Backup
--------------------------------------------------------------------------------
Descriptive Comment: example exception file
Commands: OPtions, CMslist, CKdlist, FBalist, SFslist, DELlist
            Record                        Options
 Command    Type       Value              Modified  Include/Exclude List
 *          USERID     MARY     0192        No      Include of CMS files
 options    account_   67890____________    No      No list is defined.
--------------------------------------------------------------------------------
PF: 1  Help     2  ...      3  End       4  Return    5  Insert    6  Delete
PF: 7  Backward 8  Forward  9  File     10  ...      11  Print    12  Cursor
===>
If user ID MARY is part of account group 67890, MARY's EXEC files will still be the only files that are backed up because the USERID record type precedes ACCOUNT in the list. If MARY was listed under ACCOUNT 67890, the account processing options would take precedence. In this case, MARY's 192 minidisk would be backed up physically with all others in the account.
SOPTABC1           Specify Options for ACCOUNT 67890                  VM:Backup
--------------------------------------------------------------------------------
(Clear an option's fields to use the setting in the job template)
  Backup Options:
    Catalog Detail:             _ File/Track/Block  _ Domain
    Report Detail:              _ File              _ Domain
    Incremental Detail:         _ File/Track/Block  _ Domain
    Backup Type:                _ Logical  _ CMS  _ CMSALLOC  x Physical
    CMS switch to Physical?     _ Yes  _ No    Attempts  _
    Number of Tries for Consistent View of a File Space  _
    Change Detection:      CMS: _ Date _ Hash
                      Physical: _ Hash _ None
    Additional Options (Y/N):   _ Pack _ Quiesce
  Restore Options:              Format:  _ only if files to restore
                                         _ even if no files to restore
  Security Algorithm Name:      ______
  Security Key:                 ________  ________  ________  ________
                                ________  ________  ________  ________
--------------------------------------------------------------------------------
PF: 1  Help     2  ...      3  End       4  Return    5  ...       6  ...
PF: 7  ...      8  ...      9  File     10  ...      11  Print    12  Cursor
===>
|
Copyright © 2014 CA Technologies.
All rights reserved.
|
|