

The event log store is the underlying proprietary database that contains collected event logs. The configuration options you set for the event log store service can be global or local, and affect the CA User Activity Reporting Module servers' storage and archival of events. The process for configuring the event log store includes the following:
This includes setting database size, basic archive file retention values, summarization rules, suppression rules, federation relationships, correlation settings, data integrity checks, and auto-archive options.
CA User Activity Reporting Module automatically closes active database files and creates archive files when the active databases reach the capacity you define for this service. Then CA User Activity Reporting Module opens new, active files to continue event logging operations. You can set auto-archive options for handling these files, but only as a local configuration for each CA User Activity Reporting Module server.
The event log store service handles database interactions such as the following:
The CA User Activity Reporting Module server automatically creates warm database files, called archive files, when a hot database reaches the Maximum Rows setting you specify in the event log store service. Hot database files are not compressed.
When you configure auto archiving from a collection server to a reporting server, the warm databases on the collection server are deleted after the databases are copied to the reporting server. The Max Archive Days does not apply here.
When you configure auto archiving from a reporting server to a remote storage server, the warm databases on the reporting server are not deleted after being copied to the remote storage server. Rather, these warm databases are retained on the reporting server until the Max Archive Days value is reached. Then, they are deleted. However, a record of these deleted, cold databases is retained so you can query the archive database for details, should you ever need this information for performing a restore.
When determining how to set Max Archive Days, consider your available disk space on the reporting server. You configuration for Archive Disk Space sets the threshold. If available disk space falls below the set percentage, event log data is deleted to make more room even when the Max Archive Days for that data has not elapsed.
When you do not configure auto archiving from a reporting server to a remote storage server, you must manually back up the warm databases and manually move the copy to a remote storage location at a frequency greater than the configured Max Archive Days. Otherwise, you risk losing data. We recommend that you back up archive files daily to avoid a potential data loss and to maintain adequate disk space. The event log store service manages its own internal cache for queries on archived databases to improve performance when running repeated or very broad queries.
Management of stored event logs requires careful handling of backups and restored files. The event log store service configuration provides you with a central place to configure and tune internal database sizes, retention, and to set auto archive options. CA User Activity Reporting Module provides the following scripts to help with these tasks:
Note: Use of these scripts assumes that you have established non-interactive authentication between the two servers using RSA keys.
The backup and restore scripts use the LMArchive utility to facilitate copying warm databases to or from remote hosts. The scripts automatically update the appropriate catalog files when the tasks finish. You can copy to remote servers or to other CA User Activity Reporting Module servers. If the remote host to which you send files is a CA User Activity Reporting Module server, the scripts automatically update the catalog files on the receiving server as well. The scripts also delete the archive files from the local machine to avoid duplication in federated reports. This ensures that data is available for query and reporting. Off-system storage is called cold storage. You can restore files moved to cold storage for queries and reporting.
The monitor script runs the backup script automatically using the settings you specify in the auto archive portion of the event log store service configuration.
You can perform both event collection and reporting on each CA User Activity Reporting Module server or you can dedicate different servers to collection and reporting. If you dedicate servers to collection, then automating hourly moves from collection servers to a reporting server is required; otherwise, it is not applicable. If you have no dedicated server roles, interpret the flowchart references "from reporting to remote storage" as "from a non-dedicated CA User Activity Reporting Module to remote storage."
A backup strategy implies having two copies of each database, where one is considered the backup. You can achieve this goal with or without auto archiving to a remote storage server. The backup strategy with auto archive results in the original databases on the remote storage server and the backups in an off-site location. The backup strategy without auto archive results in the original databases on the CA User Activity Reporting Module server and the backups on a remote storage server. Whether you can store the original databases on the CA User Activity Reporting Module where they were initially archived depends on the available space for long-term storage and storage policies. If these criteria are met, the decision rests on personal preference.

You can configure auto archiving between servers having different roles. For example:
Before configuring auto archiving from one server to another, configure non-interactive ssh authentication from the source server to the destination server. Non-interactive means that one server can move files to another server without requiring passwords.
Configuring non-interactive ssh authentication between two servers uses RSA key pairs, a private key and a public key. You copy the first public key you generate to the destination server as authorized_keys. When you configure multiple instances of non-interactive authentication to the same destination reporting server, you copy the additional public keys to unique filenames to avoid overwriting the original authorized_keys. Then you concatenate these filenames to authorized_keys. For example, you would append authorized_keys_ELM-C2 and authorized_keys_ELM-C3 to the authorized_keys file from ELM-C1.
The existence of non-interactive authentication between two servers is a prerequisite for auto archiving from the source to the destination server. A common scenario for configuring non-interactive authentication is one where multiple source servers dedicated to collection have a common destination server dedicated to reporting/management. This example assumes a mid-sized CA User Activity Reporting Module federation with one reporting/management server (hub), four collection servers (spokes), and a remote storage server. Names for servers in each server role follow:
The procedures for enabling non-interactive authentication for CA User Activity Reporting Module federation follow:
Configuring non-interactive authentication for a hub and spoke architecture begins with generating an RSA public key/private key pair on a collection server and copying the public key to its reporting server. You copy the public key file with the name authorized_keys. Assume that this key is the first public key copied to the specified reporting server.
To generate a key pair on the first collection server and copy the public key to a reporting server
su -
su - caelmservice
ssh-keygen -t rsa
chmod 755 .ssh
cd .ssh
scp id_rsa.pub caelmadmin@ELM-RPT:/tmp/authorized_keys
This creates the authorized_keys file on the reporting server with the content of the public key.
The second step of configuring non-interactive authentication for a hub and spoke architecture is to generate an RSA key pair on each additional collection server and copy it to the /tmp directory of the common reporting server as authorized_keys_n, where n uniquely references the source collection server.
To generate an RSA key pair on additional collection servers and copy the public key to a common reporting server.
su - caelmservice
ssh-keygen -t rsa
chmod 755 .ssh
scp id_rsa.pub caelmadmin@ELM-RPT:/tmp/authorized_keys_ELM-C2
This creates the authorized_keys_ELM-C2 file on the reporting server with the content of the public key.
scp id_rsa.pub caelmadmin@ELM-RPT:/tmp/authorized_keys_ELM-C3
scp id_rsa.pub caelmadmin@ELM-RPT:/tmp/authorized_keys_ELM-C4
In our scenario thus far, we have generated key pairs on each collection server and copied the public key portion to the reporting server as the following files:
Step 3 is to concatenate these files, move the resulting RSA public key file to the correct directory, and set directory and file ownership to caelmservice.
To create a combined public key file in the correct directory on the reporting server and set file ownership
cd /opt/CA/LogManager
mkdir .ssh
chown caelmservice:caelmservice .ssh
cat authorized_keys_ELM-C2 >> authorized_keys
cat authorized_keys_ELM-C3 >> authorized_keys
cat authorized_keys_ELM-C4 >> authorized_keys
cp /tmp/authorized_keys .
chown caelmservice:caelmservice authorized_keys
chmod 755 authorized_keys
755 means read and execute access for everyone and read, execute, and write access for the owner of the file
This completes the configuration of password-less authentication between the collection servers and the reporting server.
You can validate the configuration of non-interactive authentication between the source and destination servers of both phases of auto-archive.
To validate the configuration between the collection and reporting servers
su - caelmservice
ssh caelmservice@ELM-RPT
Being logged into ELM-RPT without entering a passphrase confirms non-interactive authentication between ELM-C1 and ELM-RPT.
The following procedure assumes the remote storage server is not a CA User Activity Reporting Module server and that you need to create new users, a group, and a directory structure that mirrors that of a CA User Activity Reporting Module server. You must perform this procedure before you send the key from the reporting server, since you use the caelmadmin account you create to communicate with the reporting server.
To create a file structure and set file ownerships on the remote storage server
Note: To use a different directory, be sure to specify that directory when you configure Remote Location for Auto Archive.
usermod -d /opt/CA/LogManager caelmservice
chown -R caelmservice:caelmservice /opt/CA/LogManager
chown caelmservice:caelmservice .ssh
After you configure and validate non-interactive authentication from each collection server to the reporting server, you configure and validate non-interactive authentication from the reporting server to the remote storage server.
For the example scenario, configuration begins with generating a new RSA key pair on the reporting server, ELM-RPT, and copying the public key as authorized_keys to the /tmp directory of the remote storage server, RSS.
To generate an RSA key pair on the reporting server and copy it to the remote storage server
su - caelmservice
ssh-keygen -t rsa
chmod 755 .ssh
scp id_rsa.pub caelmadmin@RSS:/tmp/authorized_keys
This creates the authorized_keys file in the /tmp directory on the remote storage server with the content of the public key.
You can set key file ownership and permissions on a remote storage server after you generate a key pair on the reporting server and copy the public key to that remote storage server.
To move the public key file to the correct location on the remote storage server and set file ownership
cp /tmp/authorized_keys .
chown caelmservice:caelmservice authorized_keys
chmod 755 authorized_keys
Non-interactive authentication is now configured between a CA User Activity Reporting Module reporting server and the remote host used for storage.
Confirm that non-interactive authentication is set between the reporting server and the remote storage server. For the example scenario, the remote storage server is named RSS.
To validate non-interactive authentication between the reporting CA User Activity Reporting Module and the storage server
su - caelmservice
ssh caelmservice@RSS
This logs you into the remote storage server without entering a passphrase.
The simplest scenario for configuring non-interactive authentication, a prerequisite for auto archiving, is one with two CA User Activity Reporting Module servers, one collection server and one reporting/management server, and a remote storage system on any UNIX or Linux server. This example assumes that the three servers being prepared for auto archiving are named:
The procedures for enabling non-interactive authentication follow:
The details for these steps are similar to those of the hub and spoke scenario. For a three server scenario, you skip Step 2 on additional collection-reporting pairs and skip the Step 3 instructions on concatenating the files to authorized_keys.
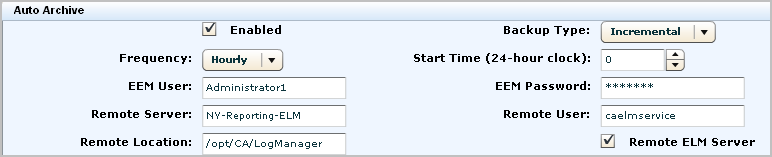
When using the collection-reporting architecture, you must configure auto-archiving from the collection server to a reporting server. This configuration automates the move of a warm database of collected and refined event log data to the reporting server where you can report on it. It is a good practice to schedule this auto-archiving to recur hourly, rather than daily, to avoid devoting an extended period of time every day for doing huge data transfers. Choose a schedule based on your load and whether it is better to consolidate processing or spread it out over the day. When databases are copied through auto archiving from a collection server to its reporting server, those databases are deleted from the collection server.
After you identify a local server with a lot of storage space, you can configure auto-archiving from the reporting server to this remote storage server. When databases are copied through auto archiving from a reporting server to a remote storage server, those databases stay intact on the reporting server until the time you configure as Max Archive Days has elapsed. At that point, they are deleted. The benefit of this phase of auto-archiving is to protect archived databases from being lost due to not being manually moved to a long-term storage location before auto-deletion.
Note: Before you configure a remote server to receive auto-archived databases, you must set up a directory structure on this destination server like that on the source CA User Activity Reporting Module server and assign various ownerships and permissions for authentication. Be sure to follow instructions described in "Set Key File Ownership on a Remote Host."
For this example scenario, assume you are a CA User Activity Reporting Module Administrator in a New York data center with a network of CA User Activity Reporting Module servers, each with a dedicated role, plus a remote server with a lot of storage capacity. Names of the servers used in auto-archiving follow:
Note: This example assumes the existence of a management server dedicated to managing the CA User Activity Reporting Module system of servers. This server is not depicted here because it has no direct role in auto-archiving.

To configure auto-archiving from a collection server to a reporting server and then from the reporting server to a remote storage server, use the following example as a guide:
The numbers on the following diagram depict two configurations of auto-archiving: one from the collection server to the reporting server and another from the reporting server to a remote server on the network.
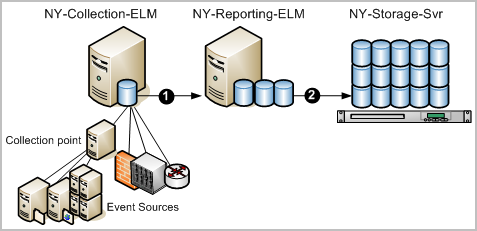
After such a configuration, that automatic processing works as follows:
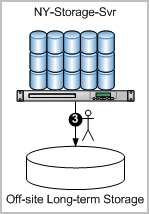
The reason for archiving is to keep event logs available for restoration. Cold databases can be restored if a need arises to investigate old events that have been logged. The manual step of moving archived databases from the on-site storage server to an off-site long-term storage location is depicted on the following diagram.
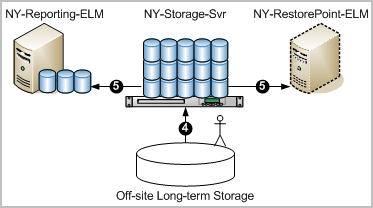
Note: You can now query and report on the restored data.
In an environment with separate CA User Activity Reporting Module servers performing roles of collection server and reporting server, you should configure the event log stores individually as local configurations. If you also choose to use the reporting server to handle failover traffic, you may want to set a higher value for the Maximum Rows field than that which is shown in the table. If you use your management server as a reporting server, consider that the management server does generate some event information itself in the form of self-monitoring events.
Note: You must configure each pair of servers that participate in auto archiving for non-interactive authentication for the auto archive configuration to operate properly.
The following table is an example, illustrating certain basic settings. The collection CA User Activity Reporting Module server is named CollSrvr-1. The reporting CA User Activity Reporting Module server named RptSrvr-1. For the example, there exists a remote storage server named RemoteStore-1 to store cold database files, and that the cold files are located in the directory, /CA-ELM_cold_storage.
|
Event Log Store |
Collection Server |
Reporting Server values |
|---|---|---|
|
Maximum Rows |
2000000 (default) |
Not applicable to auto archive. |
|
Max Archive Days |
1 (Not applicable to auto archive.) |
30 (Applicable to auto archive and when auto archive is not configured.) |
|
Archive Disk Space |
10 |
10 |
|
Export Policy |
24 |
72 |
|
Secure Service Port |
17001 |
17001 |
|
Auto Archive Options |
|
|
|
Enabled |
Yes |
Yes |
|
Backup Type |
Incremental |
Incremental |
|
Frequency |
Hourly |
Daily |
|
Start Time |
0 |
23 |
|
EEM User |
<CA User Activity Reporting Module_Administrator> |
<CA User Activity Reporting Module_Administrator> |
|
EEM Password |
<password> |
<password> |
|
Remote Server |
RptSrvr-1 |
RemoteStore-1 |
|
Remote User |
caelmservice |
user_X |
|
Remote Location |
/opt/CA/LogManager |
/CA-ELM_cold_storage |
|
Remote CA-ELM Server |
Yes |
No |
The auto archive options in this example move archive files (warm database files) on the collection server to the reporting server every hour. This keeps disk space available for incoming events. Both servers use an incremental backup to avoid having to move large volumes of data at any one time. After a warm database is moved to the reporting server, it is automatically deleted from the collection server.
Note: The 0 value for the Start Time does not have any effect when the backup Frequency is set to Hourly.
For EEM User and EEM Password, you specify the credentials of a CA User Activity Reporting Module user assigned either the predefined role of Administrator or a custom role associated with a custom policy that grants the ability to perform the edit action on the database resource.
For the reporting server, specify /opt/CA/LogManager for the Remote Location and caelmservice as the Remote User if auto archiving from the reporting server to the remote storage server. You create this path and this user when you configure non-interactive authentication between these servers.
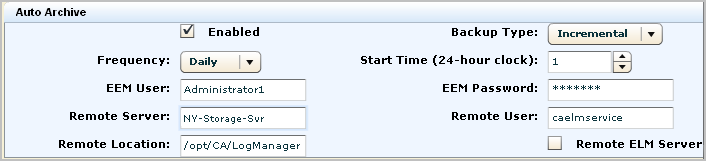
The auto archive options in this example move archive files on the reporting server to the remote storage server daily starting at 11:00 pm. After a database is moved to cold storage on the remote server, it is retained on the reporting server for Max Archive Days.
If auto-archive is not enabled, warm databases are retained based on thresholds configured for Max Archive Days and Archive Disk Space, whichever occurs first. Archived databases would be retained on the reporting server for 30 days before being deleted unless the disk space drops below 10%. In that case, the reporting server generates a self-monitoring event and deletes the oldest databases until available disk space is above 10%. You can create an alert to notify you by email or RSS feed when this occurs.
When a database is restored from a remote storage server to its original reporting server, it is kept for 3 days (72 hours).
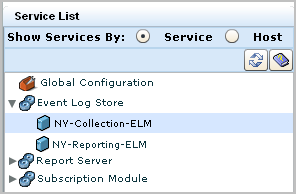
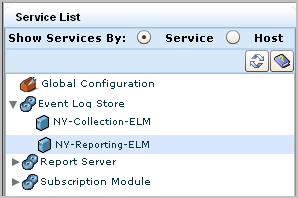
The Event Log Store configuration dialog allows you to set global options for all CA User Activity Reporting Module servers. You can also click the arrow next to the entry to expand the Event Log Store node. This action displays the individual CA User Activity Reporting Module servers in your network. Clicking on those server names allows you to set local configuration options that are specific to each server, if desired.
Users with the Administrator role can configure any CA User Activity Reporting Module server from any other CA User Activity Reporting Module server.
To set event log store options
The Log Collection subtab displays by default.
The default options provide a good starting configuration for a medium-sized network with moderate throughput.
Additional information about each field is available in the online help.
Note: The Federation Children and Auto Archive tables appear only when you display the local options for an individual CA User Activity Reporting Module server.
|
Copyright © 2014 CA Technologies.
All rights reserved.
|
|