

You can install an agent on either a Windows 32-bit system or a Windows 64-bit system.
If you install the agent on a Windows 64-bit system, CA User Activity Reporting Module can receive events from only integrations that are based on the following:
This section contains the following topics:
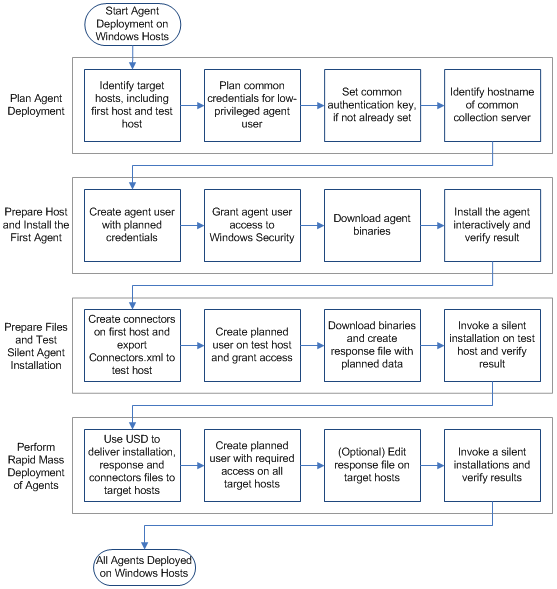
Workflow for Agent Installation on Windows
Agent Deployment Flowchart for Windows Platforms
Least-Privileged User Requirements
Installing an Agent with CA Software Delivery
Use the following workflow as a guide:
The following flowchart represents graphically the typical workflow for agent deployment to hosts with Windows operating environments.
While you can run the agent as a Windows Administrator user, it is a better security practice to create a least-privileged account for the agent to use. This user account is referred to as the agent-user. You can give the agent-user any account name you like, such as elmagentusr. Create an agent-user account and grant this account access to Window security logs before you install the agent.
Note: You will specify the agent-user name and password during agent installation. The install program automatically assigns the minimum-required privileges on the agent installation directory and the agent service to the agent-user you specify. If you choose to specify an Administrator account during installation, you can create the agent-user account later, grant it access to the security logs, and assign the required privileges by running the AgentAuthUtil utility.
The base requirements for the least-privileged agent-user are the following:
To create the agent-user account, grant this account required permissions, and install the agent, you must be an administrator on the Windows server. To perform other agent-related tasks, you must log on to the CA User Activity Reporting Module server with an Administrator account.
To install an agent, you must log onto the target server with Windows administrative privileges. The following sequence is the recommended way to prepare for installation and install the agent:
During installation, you enter the agent user account name and password, domain name, and the agent authentication key. If you exported the connector file, browse for and select it.
If you are a CA User Activity Reporting Module Administrator, you can set the agent authentication key or view the current setting.
To view or set the agent authentication key
The Log Collection Explorer displays in the left pane.
A toolbar appears in the main pane.
Note: The default value is: This_is_default_authentication_key.
Before installing the agent, you can create a new, low-privilege user account for the agent in the Windows Users folder. Although the use of low-privileged accounts is considered a best practice, it is not mandatory.
When you supply the agent user credential information during a manual install or in a response file, you can enter local credentials of the new agent user account.
To create a Windows user account for the agent
Important! Remember this name and password or record it. You will need it when you install the agent.
You will use the user name and password you set for this agent when performing the following tasks:
If you create an agent user account with a different agent-user name and password on other computers, you must update that data when preparing a response file for re-use.
Administrator-level access for the agent-user is not necessary or recommended. For access to local and remote WMI events, the agent-user should be a least-privileged user account which has the user right, Manage auditing and security log. (This user right is also known as the SeSecurityPrivilege.) You can set this user right for the agent-user in the Local Security Settings, Local Policies area.
To set the local security policy
The Select Users or Groups appears.
This action verifies that the user account name is populated correctly in the list.
You can place the agent installation program on the target Windows server in one of the following ways:
Directory for the Windows 32-bit agent: \CA\ELM\Agent\Windows_x86_32
Directory for the Windows 64-bit agent: \CA\ELM\Agent\Windows_AMD64
You must be an Administrator or have a role that grants you write access to the Administrative tab and Log Collection subtab of the CA User Activity Reporting Module interface.
To download the agent installer from CA User Activity Reporting Module
The Log Collection subtab displays the Log Collection Explorer in the left pane.
A toolbar displays in the main pane. The downward-pointing arrow button is Download Agent Binaries.
Links for the available agent binaries appear in the main pane.
The dialog, Select location for download by <IP address>, appears.
A message showing the download progress of the selected agent binary appears, followed by a confirmation message.
If you downloaded to the desktop, the agent installation setup launcher appears there.
You must be a Windows Administrator on the computer on which you plan to install the agent. Before you begin the installation, gather the following information:
Note: The agent authentication key is called the authentication code in the installation wizard.
To install a Windows agent
The installation wizard starts.
The agent FIPS mode you choose should match the FIPS mode for the CA User Activity Reporting Module server which manages it. The agent, by default, starts in that mode. However, the agent automatically detects the server FIPS mode and restarts itself as needed regardless of the mode you choose.
Important! Enter the host name if the CA User Activity Reporting Module is assigned its IP address dynamically.
The Start Copying Files page appears.
The agent installation process completes.
The host name where the agent is installed appears in the Default Agent Group folder on the CA User Activity Reporting Module server.
You can use this procedure to verify the agent installation.
To verify the installation
The name of the computer where you installed the agent appears.
You can export a connector configuration, allowing reuse as a template on different servers of the same platform. This streamlines connector configuration in subsequent agents.
The first time you create an agent on a given platform, you must configure connectors from CA User Activity Reporting Module in order to collect events. When you create subsequent agents on different servers of the same platform, you can export your initial connector configuration to that target server before installing the new agent.
You can enter the name of that connector list file during the agent installation. After agent installation, you can customize this connector for the new agent, rather than configuring an entirely new one.
To export a connector configuration to use as a template
The Select location for download dialog appears with Connectors.xml as the File name.
Note: If doing a silent install, the responsefile.iss should also be in this directory.
A message that the integration file has been exported successfully appears.
A success message appears.
If the silent installation is to include a reference to an exported connector, you must manually install an agent first and create the connector. Create a connector for the Windows platform using a domain account for the credentials and local host for the hostname. Export this connector to create a connector configuration file, Connectors.xml.
Installing silently involves the following procedures:
After you create an initial response file, you can also install silently using a customized response file with the following steps:
You need to supply the same values in the agent installation wizard whether you install an agent manually or set up a response file for silent installation. Before you install, gather the data in the following checklist.
|
Field |
Description |
|---|---|
|
Installation directory path |
Path where the agent is installed, where the default is C:\Program Files\CA\elmagent\ |
|
Server IP (or Name) |
IP address or host name of the CA User Activity Reporting Module server Enter the host name rather than the IP address if the CA User Activity Reporting Module server is assigned its IP address dynamically through DHCP. |
|
Authentication Code |
The Agent Authentication Key |
|
FIPSMODE |
Indicates if the Agent runs in FIPS mode. Default: OFF |
|
Username |
The user name for the agent as defined in the Windows Users folder under Computer Management |
|
Password |
The password associated with the agent Username |
|
File |
(Optional) The name of the exported XML file, typically, Connector.XML. |
Running the agent installer in record mode from a command line creates a response (*.iss) file and installs an agent. You can use the response file to install the agent silently on remote systems after recording it.
Note: You must be an Administrator on the Windows server operating system to set up a response file.
The naming convention for the agent installer is ca-elmagent-x.x.x.x.exe, where the x.x.x.x represents the build number for the agent. The response file is created in %WINDIR% if you do not specify the absolute path with the /f1 option.
To create a response file
Note: If you do not know where it is, do a Search for it through Windows Explorer as "ca-elmagent*"
ca-elmagent-x.x.x.x /r /f1"<path>\responsefile.iss"
/r indicates record mode and "responsefile.iss" can include the path. Be sure to leave no space between /f1 and the response file name. An example of this is:
ca-elmagent-12.0.37.10 /r /f1"C:\elmagentresponse.iss"
The Welcome page of the agent installation wizard appears, click Next.
The response file is generated at the specified path. If you specified no path, it can be found in the %WINDIR% directory.
Consider the following response file command line examples for use with the agent installer for Windows systems.
This example command line creates the file, agentresponsefile.iss, in the C:\WINDOWS or C:\WINNT directory:
ca-elmagent-12.0.37.8.exe /r /f1"agentresponsefile.iss"
This example command line creates the file, agentresponsefile.iss, in the C:\ directory:
ca-elmagent-12.0.37.8.exe /r /f1"C:\agentresponsefile.iss"
You can invoke the silent installation of the agent on a Windows server using the response file (*.iss) with appropriate values for this agent installation. You must be an Administrator to run the silent install program.
To invoke a silent install
The default directory is C:\WINDOWS (or C:\WINNT).
ca-elmagent-x.x.x.x /s /f1"responsefile.iss"
An example command line is, ca-elmagent-12.0.37.10 /s /f1"elmagentresponse.iss"
The agent is installed.
The Agent Explorer lists new agents as they are installed. The Agent Status Details for a selected agent displays whether the agent service is Running.
To view the agent status details
The Log Collection subtab displays the Agent Explorer.
The name of the computer on which you installed the agent appears.
Note: The status of Not Responding indicates that the agent, watchdog, or dispatcher process is not running. Take remedial action specific to the operating environment.
Setting up a response file minimizes installation time when installing many agents. You do not have to type in each parameter manually for each installation. For example, if you want to install an agent on 1000 systems, you can automate the process by reusing the first response file you create as a template.
When you create a new agent user account on a target server, keeping the same name and password specified in the response file may offer an advantage. When the account credentials match the response file, you can reuse it without change, because the agent registers with the same CA User Activity Reporting Module server. This means that the authentication key does not change.
To prepare to reuse the response file
The default directory is %WINDIR%, for example, C:\WINDOWS or C:\WINNT or it may be on the C:\ drive.
Ensure that the file has the extension, *.iss. (You will later copy the new file to the target server.)
szDir=C:\Program Files\CA\elmagent\
szEdit1=127.0.0.1
szEdit2=This_is_default_authentication_key
szEdit1=elmagentusr
szEdit1=elmagentpwd
Use this procedure to install an agent silently using a customized response file.
Note: This procedure assumes that you have created a response file and customized it.
To install silently with a custom response file
ca-elmagent-x.x.x.x /s /f1"customizedresponsefile.iss"
In this command, replace x.x.x.x with the actual release number for your agent installation package. Replace the sample file name with your actual file name.
After you have an agent installed, started, and configured, you may need to perform the following tasks:
You can update user credentials for an agent after installation by running the AgentAuthUtil utility. You might need to do this if you are moving to a user account with lower privileges, or if an employee who is responsible for overseeing the account leaves your company.
You can change user credentials for an agent without needing to re-install the agent. If you did not set up a dedicated agent user account before installing the agent, you could run this utility to allow the agent to run as a non-Administrator or non-root user.
Updating an agent with new user credentials involves the following steps:
Use this procedure to update user credentials for the agent.
Important! This procedure is not part of the normal installation process.
To update the agent with new low-privilege user account credentials
This is the directory that contains the AgentAuthUtil program that you use to perform the update.
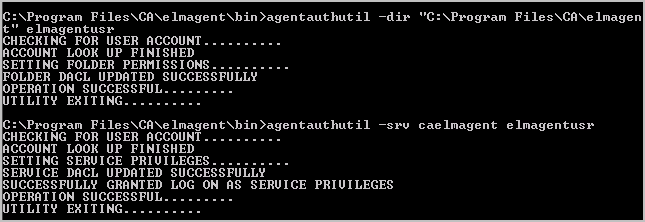
agentauthutil -dir "<agent install directory>" <agent-username>
Note: For a local user account, do not specify a domain, not even a dot (.).
The default agent install directory is C:\Program Files\CA\elmagent, and the agent-username is the name you assigned to the user account you created in the Users group for this Windows server.
When this command completes, the agent user named agent-username has full control (modify, read, execute, write, delete, list contents) over the agent installation folder, subfolders, and files.
agentauthutil -srv caelmagent <agent-username>
The service name is caelmagent, and the agent-username is the name you assigned to the user account you created in the Users group for this Windows server.
When this command completes, the agent user named agent-username can start, stop, pause, or continue (resume) the CA User Activity Reporting Module Agent service on the Windows agent host.
In this example, agent-username is elmagentusr. Example response messages from running this utility follow:
To assign permissions to the agent installation directory
The following command gives the agent account, elmagentusr, full control over the elmagent folder, its subfolders, and all of the files they contain:
agentauthutil -dir “C:\Program Files\CA\elmagent” elmagentusr
To assign permissions for the caelmagent service
The following command gives the agent account, elmagentusr, the ability to change the state of the caelmagent service:
agentauthutil -srv caelmagent elmagentusr
You can edit the agent details in the CA User Activity Reporting Module interface to use the new user credentials.
To edit the agent details
Use this procedure to restart the agent from the CA User Activity Reporting Module interface after changing the user credentials.
To restart the agent
A confirmation message states that the command is placed in the queue.
You can uninstall an agent on a Window host server.
To uninstall an agent on a Windows host
The install wizard appears with a message to confirm deletion.
The wizard uninstalls the agent.
Packages are available to deliver CA User Activity Reporting Module agents with the CA Software Delivery program. The required packages are located in the CA User Activity Reporting Module Application ISO image.
Use the Windows-only program, SDRegister.exe, to register software delivery packages with the Software Delivery Manager. These packages contain pre-recorded sample response files that are only for use as templates. The sample response files (*.iss and *.rsp) reside in separate directories identified by operating system name.
You can run SDRegister.exe from its current location lower in the directory structure to register one package at a time, or it can be run from a root directory to see and register all available packages at one time.
To deliver CA User Activity Reporting Module agents to Windows hosts through a USD/DSM server, you need:
To use USD packages for Unicenter Software Delivery
|
Copyright © 2014 CA Technologies.
All rights reserved.
|
|