

This section contains the following topics:
Least-Privileged User Requirements
Agent Deployment Flowchart for UNIX Platforms
Preparing Files and Testing Silent Installation
Deploying All Other Planned Agents
The agent installation for CA User Activity Reporting Module agents does not offer automatic user or user group creation. Use a root account to install the agent.
While you can run the agent as a root user, it is a better security practice to create a least-privileged account for the agent to use. You can give this user any account name you like, such as elmagentusr.
The agent installation adjusts the permissions on the existing user account you specify during installation. The folder permissions include the following:
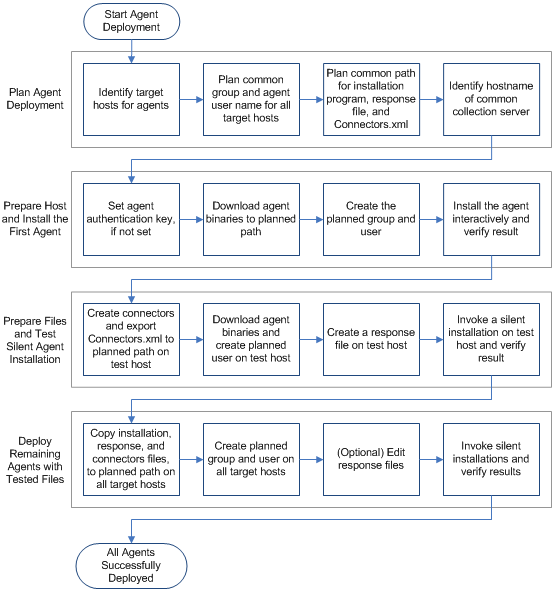
This section is based on the following agent deployment workflow. See online help for tasks related to monitoring and maintaining agents.
Before you begin agent deployments, it is a good practice to identify elements that all agent installations can share and elements unique to each installation. The more elements that agents have in common, the easier agent installations become. Elements unique to each installation are the computers on which agents are installed and computers from which the agents collect events. Elements all agents can share include the collection server that manages the agents, the credentials of the low-privileged user under which the agent service runs, and the authentication key.
Common planning tasks include the following:
Note: See the CA User Activity Reporting Module Agent Hardware and Software Certification Matrix.
Efficient agent deployment takes planning. After determining common and unique elements for planned agents, you are ready to deploy the first agent. The recommended process follows:
If you are a CA User Activity Reporting Module Administrator, you can set the agent authentication key or view the current setting.
To view or set the agent authentication key
The Log Collection Explorer displays in the left pane.
A toolbar appears in the main pane.
Note: The default value is: This_is_default_authentication_key.
Download agent binaries from the collection server that is to manage the agent. Download the binaries to the computer from which you browsed to the CA User Activity Reporting Module.
To download the agent binaries
The Log Collection subtab displays the Log Collection Explorer in the left pane.
A toolbar displays in the main pane.
Links for the available agent binaries appear in the main pane.
The CA User Activity Reporting Module server downloads the file. A message showing the download progress of the selected agent binary appears, followed by a confirmation message.
Note: Unless you downloaded the agent binaries to the target host, export the downloaded tar file to the target host. Then, log on to this host and extract the tar file. The directory containing the installation file is referred to in this guide as the <install directory>.
While you can run the agent as a root user, it is a better security practice to create a low privileged account for the agent to use. We recommend that you create a low privileged user and group before installing the agent. Assign required permissions to the group and user.
Determine whether your site policies permit identical account on all agent hosts with passwords that never expire. If so, you can create a response file where the same agent user name can be used for all silent installations.
Note: The following procedures assume that the directory, /usr/sbin is in the system path.
To add a group and a user account for use by an agent that is not yet installed
Consider an easily recognized username, such as elmagentusr.
The prerequisites for installing a CA User Activity Reporting Module agent interactively are the same on any UNIX system.
Prerequisites include:
When you download the agent binaries from CA User Activity Reporting Module, you save the tar file to the host from which you opened the browser to access CA User Activity Reporting Module. Copy this file to the host where you plan to install the agent. Consider creating a directory on the target host under /usr and copying the tar file to /usr/<mydirectory>.
Important! In this guide, we refer to the directory containing the file you invoke to install the agent as the <install directory>.
The installation program installs the agent and creates the agent root directory, /opt/CA/ELMAgent. The installation program refers to /opt/CA/ELMAgent as the install path.
Installing a CA User Activity Reporting Module agent on a Solaris system is done from the command line.
To install a Solaris agent
pkgadd -d <elmagent_solaris.pkg>
A message asking you to select the package to process appears.
The license agreement appears.
Important! Enter the host name if the CA User Activity Reporting Module is assigned its IP address dynamically.
A message designed to determine the availability of the Connectors.xml file appears.
Note: No is the typical response for the first installation.
A prompt that requests the default connectors configuration file path appears.
The following message appears: Installation of <ca-elmagent> was successful. If you specified a low privileged user as the agent username, the installation process assigned required permissions.
Note: Technically, the agent service starts when the caelmwatchdog process successfully binds with the caelmagent process. To verify that a successful bind occurred or to troubleshoot a bind failure, see Troubleshooting Agent Installation.
Successful agent installation typically starts the agent service. Technically, the agent service starts when the caelmwatchdog process successfully binds with the caelmagent process.
You can determine whether the agent you installed is running while still logged on to the Solaris host.
To verify locally that the agent service is running
ps -eaf|grep caelm
root 16843 16809  0 17:58:11 ?         0:00 ./caelmwatchdog
root 16809     1  0 17:57:57 ?         0:57 ./caelmagent -b
Examine self-monitoring events to determine whether the agent service of the installed agent started successfully. You can monitor the agent installation process, whether installing manually or silently.
To monitor agent registration and startup processing
Current Reporting ELM Server set to <IP address specified as host server>
Registered with ELMServers successfully.
Agent's HTTP Listener started on port 25275.
Agent started successfully.
After the Agent started successfully message appears, view the agent status details.
The Agent Explorer lists new agents as they are installed. The Agent Status Details for a selected agent displays whether the agent service is Running.
To view the agent status details
The Log Collection subtab displays the Agent Explorer.
The name of the computer on which you installed the agent appears.
Note: The status of Not Responding indicates that the agent, watchdog, or dispatcher process is not running. Take remedial action specific to the operating environment.
The most efficient way to deploy agents on additional hosts for a given operating environment is to configure sample connectors on the first agent, and then leverage this effort. After you create and test connectors on the first agent, you export those definitions. Then, you deploy a test agent by creating a response file that references Connectors.xml and performing a silent installation. If all goes well with this test deployment, you can confidently deploy all other planned agents with this same response file and same Connectors.xml.
The recommended process follows:
Create connectors for a given operating environment on the first agent you install is a good practice. You can then export these connector configurations for use in all subsequent agent installations. Connectors are exported as a Connectors.xml file. When you specify Connectors.xml in the response file for silent installations, the agents are deployed with all connectors in place. After the silent installation with connectors, you configure the event sources that each agent targets.
Alternatively, you can skip this step and deploy each connector in bulk after installing all agents for this operating environment. With the bulk connector deployment wizard, you can create a connector for a specific integration and deploy that connector to multiple agents. With this method, you would use bulk deployment for each desired integration.
The process of creating connectors to use as templates involves the following procedures:
Before running the script to create the response file for silent installation, perform the following tasks:
On the Solaris host you are using for testing, create a response file. A response file provides the specifications for all agents installed silently with this file.
To create a response file for silent agent installation
sh install_ca-elmagent.sh -g ca-elmagent.rsp
Select package(s) you wish to process (or 'all' to process all packages). (default: all) [?,??,q]:
Do you agree to the above license terms? [Yes or No] (No):
Enter the hostname/IP of the ELM server :
Enter ELM server authentication code :
Enter the ELM Agent username (root):
Enter the full path to the ca-elmagent root directory (/opt/CA/ELMAgent):
Do you want to configure default connectors?[Yes or No] (Yes):
Enter default connectors configuration file path :
A confirmation message appears.
EULA=Y
ELM_SERVER=172.24.36.107
AGENT_AUTHKEY=my_authentication_key
AGENT_USER=elmagentusr
FIPSMODE=OFF
INSTALL_DIR=/opt/CA/ELMAgent
DEFAULT_CONNECTORS=/usr/mydir/connectors.xml
You can invoke a silent installation of an agent on a Solaris server. Use the response file composed of values for this agent installation. You must be logged in as a root user to run a silent installation. The <install directory> must contain the ca-elmagent.pkg and the ca-elmagent.rsp files.
Before you invoke a silent install, review the response file settings. If the response file contains a value other than root for AGENT_USER, verify that a low privileged user with this name has been defined on this host. If the response file includes a path for DEFAULT_CONNECTORS, verify the Connectors.xml resides in that path.
To invoke a silent install
pkgadd -d ca-elmagent.pkg -n -a admin -r ca-elmagent.rsp ca-elmagent
The agent is installed using the settings you provided when you recorded in the response file.
Installation of <ca-elmagent> was successful.
Before widespread deployment to multiple hosts through silent installation, validate the results of the initial silent installation of the test host.
Deploying the first agent and testing a response file that includes connector configurations comprises most of the work in agent deployment. By leveraging that work, you can roll out the remaining agents with much less effort.
Preparing additional hosts and installing the agents requires that you repeat some of the procedures you performed when installing the first two agents. Consider these tasks when deploying each remaining agent that is based on the first agent.
This step is not needed if you elected to use common elements where possible.
When you install an agent or create a response file on a Solaris system, you specify values for the five parameters listed on the following table. If you copy this file for reuse on other systems, you can edit the original values as needed, or if appropriate, use the original values.
To edit the response file
|
Field |
Description |
|---|---|
|
ELM_SERVER |
The Host name or IP address of the CA User Activity Reporting Module server. Enter the host name if the CA User Activity Reporting Module server gets its IP address dynamically through DHCP. |
|
BASEDIR |
The full path to the agent root directory. Default: /opt/CA/ELMAgent. |
|
AUTH_CODE |
The Agent Authentication Key. Select the Agent Authentication Key button in the Agent Explorer under Administration to view or set this key. Note: If the key value you enter during installation does not match the entry in the UI, the agent service will not start after installation. |
|
FIPSMODE |
Indicates if the Agent runs in FIPS mode. Default: OFF |
|
AGENT_USER |
The user name for running the CA User Activity Reporting Module agent. We recommend that you create a lower-privilege user account to run the agent before starting the agent installation. Default: root |
|
DEFAULT_CONNECTORS |
The exported file containing connector configurations, including the path. Leave this field blank if the Connectors.xml file is not available. Default: <blank> |
Use the following procedures to prepare each agent for use:
Note: The Connectors.xml file derived from the first installed agent provides templates you can use as a basis for event-source specific connectors.
Maintenance tasks for CA User Activity Reporting Module agents include the following:
Note: For maintenance tasks such as applying subscription updates to agents and connectors, creating agent groups, and starting or stopping agents, see online help.
Occasionally, process binding does not take place as expected. Use the following procedure to diagnose this error and take corrective action.
To diagnose and correct a bind failure
ps - eaf|grep caelm
root 27773 27771   0 18:11:12 ?           0:00 ./caelmwatchdog
root 27771     1   0 18:11:07 ?           0:02 ./caelmagent -b
root 27793 26155   0 18:14:22 pts/1       0:00 grep caelm
root 27772 27771   0 18:11:07 ?           0:00 ./caelmdispatcher
root 28386 26155   0 18:56:18 pts/1       0:00 grep caelm
root 28300     1   0 18:51:39 ?           0:01 ./caelmdispatcher
Note: If the caelmwatchdog binding to the caelmagent did not take place, kill the caelmdispatcher and start the agent service manually.
kill -9 28300
./S99elmagent start
The message "CA ELM Agent Started Successfully" appears.
Note: View the agent status details again and verify that the agent is Running.
You can change <original_username> to <replacement_username> for the low privileged user on the agent host. When you change the user name under which the agent runs, update the CA User Activity Reporting Module UI with the new user name.
To change the low privileged user for an agent that is running as a low privileged user
You can uninstall an agent on a Solaris computer using this procedure.
To uninstall an agent that was interactively installed on a Solaris system
pkgrm ca-elmagent
Do you want to remove this package [y, n, ?, q]
Do you want to continue with the removal of this package [y, n, ?, q]
The uninstall process runs. Detailed information is saved in /tmp/uninstall_ca‑elmagent.<timestamp>.log.
Removal of <ca-elmagent> was successful.
The agent is uninstalled.
Important! Log on to the CA User Activity Reporting Module server that managed the agent you uninstalled. If the agent is still displayed in an agent group under the Log Collection, Agent Explorer folder, delete the agent. Click Select in the Agent Status Details, click Delete, and respond Yes to the confirmation prompt.
The command to uninstall a silently installed agent is different from the command to uninstall a manually installed agent. The difference is due to the existence of the admin file that is used only for silent installations.
To uninstall an agent that was silently installed on a Solaris host
pkgrm -a admin -n ca-elmagent
Removal of <ca-elmagent> was successful.
|
Copyright © 2014 CA Technologies.
All rights reserved.
|
|