Previous Topic: Example: Alerting CA NSM of Configuration ChangesNext Topic: Track the Alert Job Progress


Send SNMPv3 Traps to CA NSM

When planning what alerts to send to CA NSM, identify query results that would be of interest to the network operations center. For example, consider queries that detect configuration changes. The following example illustrates how to send a scheduled alert based on the Configuration Change Detail query. This alert specifies CA NSM as the SNMP trap destination.

To send SNMPv3 traps to CA NSM

  1. Open the Alert Scheduling wizard.
    1. Log on to CA User Activity Reporting Module with the credentials of an Analyst or Administrator.
    2. Click the Alert Management tab and the Alert Scheduling subtab.
    3. Click the Schedule an Action Alert button.
  2. Complete the Alert Selection step.
    1. Type a job name. For example, enter Configuration Changes destined for CA NSM.
    2. Verify that the selection type is Queries. Selection of SNMP trap destinations is not allowed for alerts based on tags.
    3. Select the query or queries you identified. For example, select Configuration Change Detail.
  3. (Optional) Complete the Alert Filters, Result Conditions, and Schedule Jobs steps as documented in the online help for this wizard.
  4. Click the Destination step, and then click the SNMP Trap tab.
  5. Examine the destination server and port entries. If not correct, enter the correct IP address for the destination server and port. To add additional destination servers, click add, and enter the additional destination.
  6. Specify the SNMP version information. SNMP Version 2 is selected by default.
    1. Click Version 3. CA NSM is configured to accept SNMP v3 traps.
    2. Click V3 Security.

      The SNMP Version 3 Security Parameters dialog appears.

      Important: The entries on this dialog must match the settings in snmpv3.dat that you configured to enable CA NSM to receive SNMP traps from CA User Activity Reporting Module alerts. The recommended setting follows:

      *.*.*.* *:*   <username>:AuthPriv:MD5:<password>:DES:<password>
      
    3. Select Authentication. Type the configured user name for username, type the configured password for password, and select MD5 for protocol.
    4. Select Encryption. Type the configured password for password and select DES for protocol.
    5. Click OK.
  7. Select the query to send as an SNMP trap.

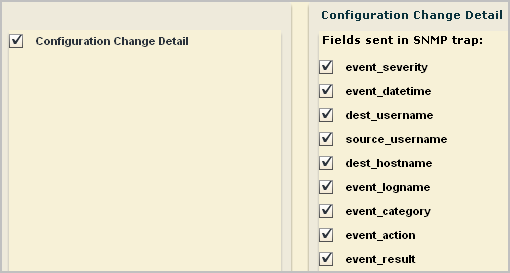
    In this example, when you select Configuration Change Detail, the fields for that query are displayed as selected. Optionally, you can clear any field you do not want included as a trap.

    Important! When you create a custom MIB for this alert, be sure to define a trap with the fields you select here and in the order shown.

    You can clear any query field you want excluded.

  8. Select the number for the final node, x, of the associated elmTrap OID, where all elmTrap OIDs are defined as 1.3.6.1.4.1.791.9845.3.x.

    The initial nodes of the Custom Trap ID are predefined in the CA-ELM.MIB. The final node number is unique to a trap defined in a custom MIB, where the trap reflects a unique set of fields. A custom MIB file defines the traps sent by the CA User Activity Reporting Module alerts that you defined. In the custom trap referenced by the Custom Trap ID, the fields are listed in the same order as the fields sent by the alert. If the OID for the trap in the custom MIB is 1.3.6.1.4.1.791.9845.3.63, select 63 from the number spinner for Custom Trap ID. Or, if you define the alert first, add a trap in your custom MIB for 1.3.6.1.4.1.791.9845.3.63 that defines the query fields you selected.

  9. (Optional) Select Servers.
  10. Click Save and Close.

    The job appears on the Action Alert Jobs list with the configured job name.

More information:

Access the EM Console on CA NSM