

Administration Guide › Action Alerts › Working with CA IT PAM Event/Alert Output Processes › Example: Send an Alert that Runs an IT PAM Process Per Row
Example: Send an Alert that Runs an IT PAM Process Per Row
You can send an alert that runs the CA IT PAM event/alert output process per row or per query. This example illustrates the procedure of running the process per row. It includes an example of what can be viewed for this type of alert by personnel working with both CA IT PAM and the third-party product to which CA IT PAM sends the details.
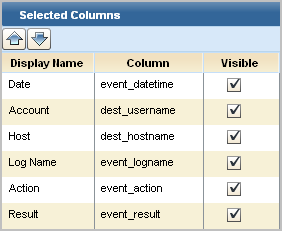
Prior to creating an alert to run an IT PAM process for a given query, it is a good practice to identify the CEG columns that return data. These columns are the ones to select when creating a summary and description statement for the alert.
Note: Copy the query and click the Query Columns step. For fields designed to be visible, notice the column name corresponding to the display name. For example, the CEG field used to populate the Account column is dest_username.
To create an alert when a default account member logs in successfully
- Click the Alert Management tab and then click the Alert Scheduling subtab.
- Click Schedule an Action Alert.
The Schedule Action Alerts wizard appears.
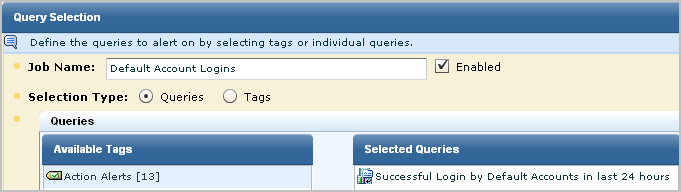
- Complete the Alert Selection step as follows:
- Enter the job name, for example, Default Account Logins.
- Click the Action Alerts tag.
- Select the Successful Login by Default Account in last 24 hours query and move it to the Selected Queries list.
- Select a date range for running the query and the maximum number of rows to display.
- Click Result Conditions.
- Select a date range such as 'now' and 'now' '-1 hours'
- Select result display parameters such as row limit of 10 and time granularity as event_datetime.
- Skip grouped events.
- Define the schedule.
- Define the alert data to pass to the IT PAM process along with the event data retrieved by the query.
- Click the Destination step.
- Select the IT PAM Process tab.
- Select Successful Login by Default Account in the last 24 hours.
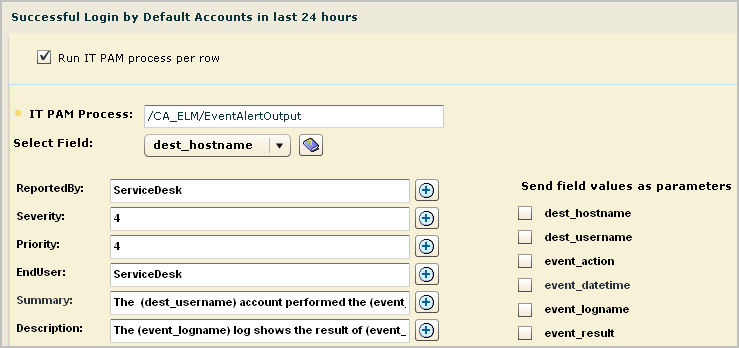
- Select Run IT PAM process per row.
- If the configured IT PAM Process is not the one you want to run, change the path for IT PAM Process. The IT PAM process must contain the full path beginning with a forward slash (/).
- (Optional) Create a summary statement with literal text and variables. Here, the variables are derived from CEG fields when the collected data for a row is refined. Following is an example summary statement using variables.
The (dest_username) account performed the (event_action) action on (dest_hostname)
The first statement is created as follows:
- Type the word, "The"
- Select dest_username from the Select Field drop-down list, then click + next to the Summary field.
- Type the phrase "account performed the"
- Select event_action from the Select Field drop-down list, then click + next to the Summary field.
- Type the phrase "action on"
- Select dest_hostname from the Select Field drop-down list, then click + next to the Summary field.
- (Optional) Create a description with literal text and text derived from CEG fields. Select the desired field from the Select Field drop-down list and click +. For example:
The (event_logname) log shows the result of (event_result) on (event_datetime)
The(event_result) of the (event_action) is logged in the (event_logname) log.
The (event_logname) log shows the (event_action) action had a result of (event_result).
- For Send field values as parameters, select each CEG field that the specified IT PAM process uses as a process parameter.
Note: Since the selected process does not use any CEG field names as parameters, no fields are checked in this example. To determine if a custom process uses such parameters, view the Dataset tab in the CA IT PAM event/alert output process.
- Select a Server.
- Click Save and Close.
The job appears on the Action Alert Jobs list.

- Click Alert Management, Self-Monitoring Events to view results. A partial view the information rows follows:

- Click the Alert Management tab, Action Alerts subtab. Select the alert you scheduled to view query results.
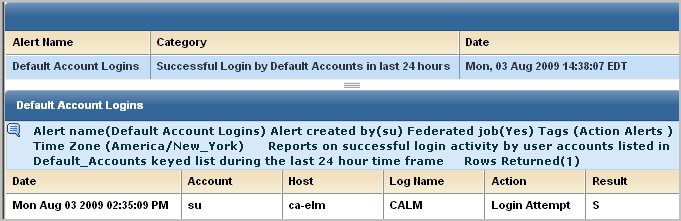
- Check the self-monitoring event tab for results returned from CA IT PAM.
A partial example of a success message follows, where this message appears in the self monitoring events for the Report Server. Notice the ticket number following Results =.

- (Optional) Review the results on CA Service Desk as follows:
- Log on to CA Service Desk.
- Select Request and enter the issue number.
- Click the request number link to review the issue detail and summary information.
More information:
Guidelines for Creating an Event/Alert Output Process
Copyright © 2013 CA.
All rights reserved.
|
|