CA ARCServe Backup lets you perform in depth reporting on CA ARCServe Backup objects, centralize the management of all CA ARCServe Backup servers, generate comprehensive reports on backup media and devices, and produce detailed analysis of data protection strategy. To take a backup of all the servers managed by CA SRM, you must register the ARCserve Backup server.
- Open the CA SRM Windows Client main window.
- Select Backup/Archive Products, CA ARCServe Backup, Servers in the Object Tree structure.
The CA SRM Backup Registration Wizard dialog appears.
- Select CA ARCServe Backup and then select your operating system from the drop-down list.
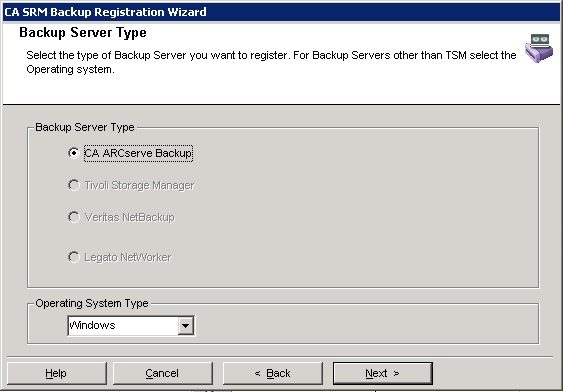
- Click Next.
The Setting Discovery Information dialog appears.
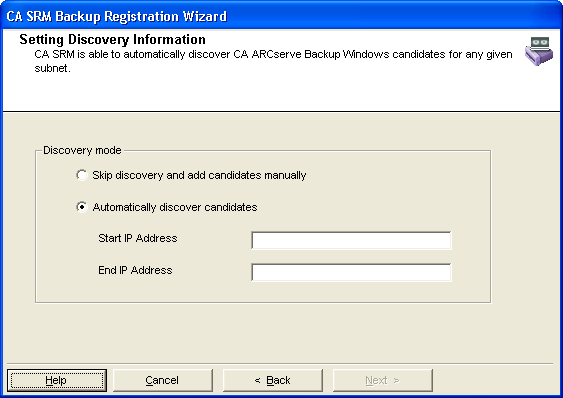
- Select one of the following discovery modes:
- Skip discovery and add candidates manually
-
Lets you add backup servers and add candidates manually. Go to Step 5.
- Automatically discover candidates
-
Lets you to automatically discover backup servers. You must type the values for the Start IP Address and End IP Address fields. The Selecting Servers and Setting Security dialog appears. Go to Step 20.
We recommend that you select the skip discovery and add candidates manually.
Note: When you register a CA ARCServe Backup Netware machine using the discovery mode, you must provide the subnet for the CA ARCServe Backup Manager for Windows.
- Click Next.
The Selecting Servers and Setting Security dialog appears.
- Click Add Backup Servers.
The Add CA ARCServe Backup Windows server dialog appears.
- Select the check box if the ARCServe Backup server version is v12.0 or later. This action automatically enables the remaining fields on the dialog.
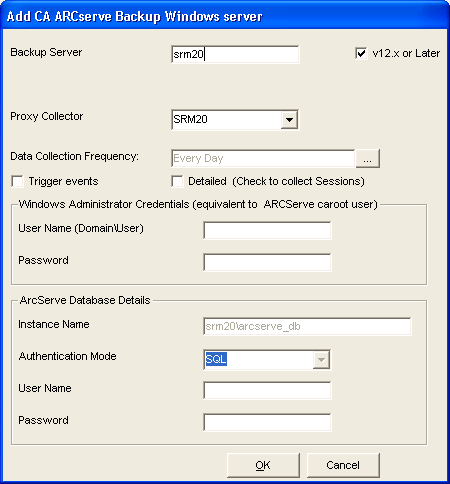
- Type the name of the backup server.
- Select the name of the proxy collector. This proxy collector is a managed computer that has ARCServe Primary Server or Standalone Server installed.
- Specify how often you want CA SRM to perform data collection. Click the Ellipsis button.
The Data Collection Frequency dialog opens.
Use this dialog to set the data collection frequency you want. The default value for data collection is once every day. Click OK to save the settings and close the dialog.
- Select the check box adjacent to Trigger if you wish to trigger the events.
- Select the check box adjacent to Detailed to get detailed information about sessions.
- Type the user name that has administrator privileges in the Windows Administrator Credentials (equivalent to ARCServe caroot user) section.
- Type the password associated with the above administrator user name.
- Type the instance of the database in the ARCServe Database Details section.
Note: In case of SQL server as the database for ARCServe server, then the database instance name will be the server name in general. If the database is SQL Express, then the database instance name will be <Server name>\arcserve_db.
- Select the authentication mode that you want the ARCServe backup to register for. The possible values are SQL and Windows.
Note: Selecting Windows as authentication mode will set the value of the database user to that of administrator user.
- Type the database user name.
- Type the password associated with the database user name.
- Click OK.
The Selecting Servers and Setting Security dialog appears with the backup server details populated to the relevant fields.
- Select the backup servers from the list of candidate servers that you want to register.
Note: If you are registering a CA ARCServe Backup server on a Netware operating system, you must also enter the name of the Proxy iSponsor.
- Click Next.
The Set Organization and Location dialog appears.
- Edit the fields in this dialog if you want to add a different location, organization, and contact:
- Location-Lets you attach a geographic location to the computer or server. Select a location from the drop-down list. You can also click New Location to add the details of the new location in the Create New Location dialog. Click OK to exit the dialog.
- Organization- Lets you attach organization to the computer or server. Select an organization from the drop-down list. You can also click New Organization to add the details of the new organization in the Create New Organization dialog. Click OK to exit the dialog.
- Contact- Lets you add a contact. Click New Contact to add a contact using the Create New Contact dialog. Enter the name, telephone number, and email address of the new contact. You can access your default address book by clicking the To: Button and select the email address from there.
Note: You can also add new contacts by clicking New Contact in the Create New Location dialog or Create New Organization dialog.
- Click Register to complete the registration.
The CA SRM Backup Registration Wizard displays the registration complete message.
- Click Close to exit the wizard.

