

CA SRM collects and monitors storage capacity and other information from a server virtualization product, for example, VMWare ESX server. Virtual Host Environments allows you to correlate the virtual hosts to the physical environment.
To create a virtual host environment, register the virtual host Hyper-V servers using the computer registration wizard.
Follow these steps:
The CA SRM Computer Registration Wizard welcome dialog opens.
The Select Operating System dialog opens.
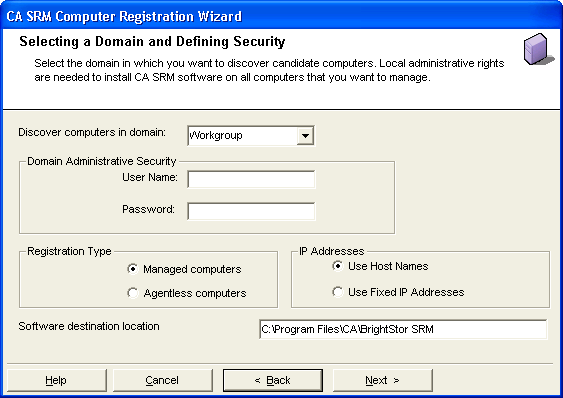
The Selecting a Domain and Defining Security dialog opens.
The following list describes the fields on this dialog:
Select the domain that contains the computers you want to register.
Type the name of a user with at least Administrator privileges on the computers you want to register.
Type the password for the user name.
Specify whether this computer is a managed computer or an agentless computer.
If you select Managed computers, the CA SRM Agent is installed, which enables CA SRM to collect detailed data.
If you select Agentless computers, CA SRM collects basic data using WMI.
Specify whether you want to use the host name or the numeric IP address for the computer.
Specify the location in which you want the CA SRM agent to be installed on the target computers.
When you finish entering this information, click Next to start the Discovery process.
The Setting Data Collection Properties dialog opens.
The Non-published Computer dialog opens.
The Setting Data Collection Security dialog opens.
Important! If at least one Windows 2008 or later server version computers with Hyper-V on a full installation, configured to be registered, the Collect Hyper-V information check box appears on the Setting Data Collection Security dialog.
Microsoft Hyper-V on a Server Core installation is not supported.
The Set Organization and Location dialog opens.
Note: The Collect Hyper-V option enables data collection for the computers with Hyper-V information as part of managed computers registration. The Hyper-V information will be populated in the Virtual Host Server Environment, after the data collection is complete.
SRM does not collect Hyper-V through System Center Virtual Machine Manager (SCVMM).
You must have valid Virtual Host Server license for the successful data collection of the Hyper-V information. If you do not have valid Virtual Host Server license, the Hyper-V information will not be collected for those managed computers.
Lets you attach a geographic location to the computer or server. Select a location from the drop-down list. You can also click New Location to add the details of the new location in the Create New Location dialog. Click OK to exit the dialog.
Lets you attach organization to the computer or server. Select an organization from the drop-down list. You can also click New Organization to add the details of the new organization in the Create New Organization dialog. Click OK to exit the dialog.
Lets you add a contact. Click New Contact to add a contact using the Create New Contact dialog. Enter the name, telephone number, and email address of the new contact. You can access your default address book by clicking the To: Button and select the email address from there.
Note: You can also add new contacts by clicking New Contact in the Create New Location dialog or Create New Organization dialog.
Notice that your CA license information for computer and Hyper-V is updated and displays.
The CA SRM Computer Registration Wizard displays the registration complete message.
|
Copyright © 2016 CA Technologies.
All rights reserved.
|
|