

To enable FWS in a federated environment for a SiteMinder/WebSphere Application Server (WAS) configuration, deploy the FWS application.
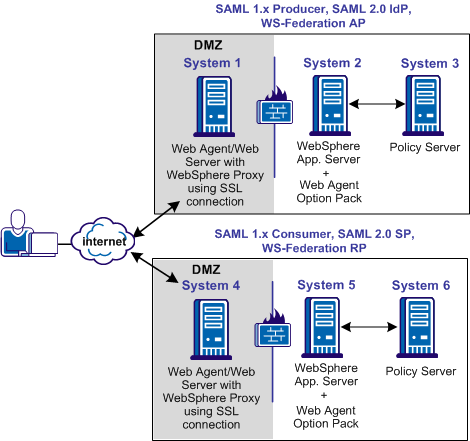
On Systems 2 and 5, deploy FWS. These systems must also have WAS and the associated WAS Fix Pack, if applicable. On Systems 1 and 4, install the Web Agent and the WAS Proxy Plug-in. Enable SSL between the proxy and the WAS.
The following illustration shows a SiteMinder and WebSphere sample configuration.
Prerequisites:
After installing the software components on the systems in the illustration, deploy FWS on System 2 and System 5 by following these steps:
After you install the Web Agent Option Pack on a UNIX system, the installation program creates an environment script (ca-wa-opack-env.sh).
Source the environment script so the library path of the application server points to the location of the Web Agent Option Pack /bin directory.
Source the script by entering the following command at the command line:
. ./ca-wa-opack-env.sh
Setting the correct library path lets the option pack and the web or application server to work together.
After you source the script, the library path is set. The variable name for the library path differs depending on the operating system. Example of several library paths:
LD_LIBRARY_PATH=/webagent_option_pack_home/bin
SHLIB_PATH=/webagent_option_pack_home/bin
LIBPATH=/webagent_option_pack_home/bin
Important! The application server startup script can reset the library path. Ensure that the path to the Web Agent Option Pack is the first entry in the path.
The path to the Web Agent Option Pack environment script points to one of the following locations:
If you install the option pack on the same system as the web agent, the script resides in the web agent directory. For any UNIX installation, the default location is /web_agent_home/bin.
The FWS application requires the SmHost.conf file. However, the Web Agent Option Pack does not install this file, so you must create it.
To create an SmHost.conf file
/webagent_option_pack_home/bin
/webagent_option_pack_home/config
The FWS application requires the WebAgent.conf file; however, the Web Agent Option Pack does not install this file so you must create it.
To create a WebAgent.conf file
/webagent_option_pack_home/config
where,
Defines the installed location of the Web Agent Option Pack on System 2 and System 5.
The following sample shows a WebAgent.conf file for the FWS application:
# WebAgent.conf - configuration file for the Federation Web Services Application
#agentname="<agent_name>, <IP_address>"
HostConfigFile="/<webagent_option_pack>/config/SmHost.conf"
AgentConfigObject="<agent_config_object_name>"
EnableWebAgent="YES"
Note: The Agent Configuration Object referenced in this WebAgent.conf file must be a new object that you create. Do not specify the object in use by the Web Agent installed in your environment.
|
Copyright © 2012 CA.
All rights reserved.
|
|