

This section contains the following topics:
Control IIS 7.x Module Execution Order when using the SiteMinder Agent for IIS
Use an IIS Proxy User Account (IIS Only)
Use the NetBIOS Name or UPN for IIS Authentication
Configure Agents for IIS to Support NT Challenge/Response Authentication
How to Implement an Information Card Authentication Scheme
Disable Windows Security Context on Agents for IIS
How to Control When SiteMinder Agents Process Cookies
By default, SiteMinder Agents redirect requests for resources protected by the Windows authentication scheme to an NTLM credential collector (NTC) to retrieve their Windows credentials.
You can configure SiteMinder Agents for IIS to obtain the credentials of the user from the HTTP request inline (that is, without redirecting to an NTC).
The following illustration describes the differences between the two credential collection methods:
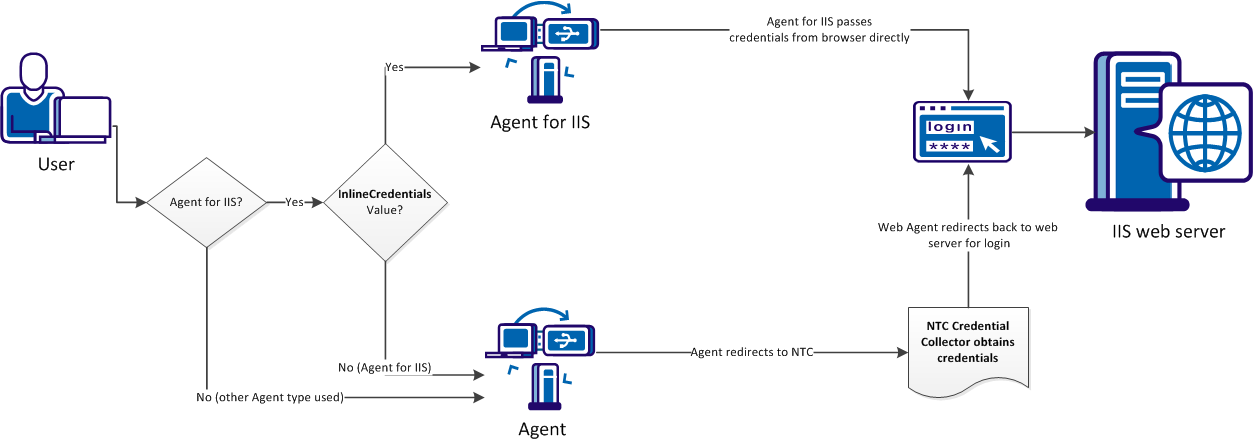
To configure an agent to obtain credentials of the user from the HTTP request without redirecting to an NTC, set the InlineCredentials configuration parameter as follows:
Specifies how the Agent for IIS handles user credentials. When the value of this parameter is yes, the Agent for IIS reads the credentials directly from the HTTP request. When the value of this parameter is no, the Agent redirects to an NTC credential collector.
Default: No
Note: If any SiteMinder Agents in your environment are configured to use NTC redirects, configure NT challenge/response authentication.
When you install and configure the SiteMinder Agent for IIS on an IIS web server, the Agent for IIS executes before any other modules. If your IIS environment requires another module to execute first, you can change the number set the following location in the Windows Registry:
HKLM\Software\Netegrity\SiteMinder Web Agent\Microsoft IIS\RequestPriority
For example, suppose another module in your IIS 7.x web server (like UrlScan) is assigned the same execution priority as the SiteMinder Agent for IIS. Use this setting to control when the SiteMinder module executes.
Follow these steps:
HKLM\Software\Netegrity\SiteMinder Web Agent\Microsoft IIS
RequestPriority
Executes the SiteMinder Agent for IIS before any other modules on your IIS web server. This setting is the default.
Example: 0 (First)
Default: 0
Executes the SiteMinder Agent for IIS module after any modules set to execute first, but before any modules set to execute with medium, low or last priority.
Example: 1 (High)
Executes the SiteMinder Agent for IIS module after modules set to execute first and high, but before modules set to execute with low or last priority.
Example: 2 (Medium)
Executes the SiteMinder Agent for IIS module after modules set to execute first, high, and medium, but before modules set to execute with last priority.
Example: 3 (Low)
Executes the module for the SiteMinder Agent for IIS after all other modules.
Example: 4 (Last)
If users try to access resources on an IIS web server protected by SiteMinder, the Web Agent may deny access if those users lack sufficient IIS privileges for those resources. For example, if users are stored in an LDAP user directory on a UNIX system, those users may not have access to the Windows system with the IIS web server.
The IIS web server has a default proxy account that has sufficient privileges for users who are granted access by SiteMinder. The Web Agent uses the values of the DefaultUserName and DefaultPassword parameters as credentials even if the user has a valid Windows security context.
Follow these steps:
Default: No
DefaultUserName=Windows_domain\acct_with_admin_privilege
Otherwise, specify just the user name.
Important! We recommend setting this parameter in your Agent Configuration Object because you can encrypt it. If you set it in a local configuration file, the value is stored unencrypted in plain text.
The IIS Proxy account is configured.
If you do not want users to have access as the proxy user, you can set the following parameter:
Instructs the IIS Web Agent to execute the web application as an anonymous user, instead of using credentials of the proxy user.
Default: No
Note: This parameter applies to IIS Web Agents only.
To enable anonymous user access, set the UseAnonAccess parameter to yes.
In an IIS network, you may have a NetBIOS name that is different than the domain name for the location of a requested resource. When a user tries to access a protected resource and there are multiple domain controllers, user authentication fails and the web server log shows an "IIS logon failure." You can control whether the UPN or NetBIOS name is sent to the IIS web server with the following parameter:
Specifies whether the IIS 6.0 Web Agent sends the user principal name (UPN) or the NetBIOS name to the IIS 6.0 web server for IIS user authentication.
Note: This parameter is valid only if an Active Directory user store is associated with the Policy Server.
If you enable this parameter, the Policy Server extracts the UserDN, the UPN, and the NetBIOS name from the Active Directory during SiteMinder authentication, and sends this data back to the IIS 6.0 Web Agent.
Depending on whether or not you selected the Run in Authenticated User's Security Context option for the user directory with the Administrative UI and how you set the UseNetBIOSforIIAuth parameter, a user's logon credentials are sent as follows:
The IIS web server authenticates the user with the credentials it receives from the Web Agent.
Default: No
To have the Web Agent use the NetBIOS name for IIS authentication, set the UseNetBIOSAuth parameter to yes.
If any SiteMinder Agents in your environment are configured to use NTC redirects, configure NT challenge/response authentication.
With NT challenge/response authentication, the IIS web server challenges the Internet Explorer browser of a user when that user requests access to a resource.
Note: NT challenge/response authentication only works with Internet Explorer browsers.
You can implement NT challenge/response authentication in either of the following ways:
The automatic logon feature allows users to access a resource without being challenged. The authentication process still takes place, but the NT challenge/response process between the browser and the server is transparent to the user. Automatic logon is typically used for Intranets where security is less strict and you want users to have seamless access to resources. We do not recommend using the Automatic logon feature for communication across the Internet.
SiteMinder Agents use credential collectors to gather the Windows credentials of users for the NT challenge/response authentication scheme. The agent supports the NTC extension for collecting NTLM credentials.
Note: Set the NTCEXT only if you want to change this default behavior.
To make SiteMinder operate with NT challenge/response authentication, use the following process:
Note: For more information, see the Policy Server Configuration Guide.
The NT Challenge Response Authentication for IIS is configured.
Map the .NTC file extension to the ISAPIWebAgent.dll application to configure NT Challenge/Response Authentication on the IIS Web Server.
To map the .NTC file extension
The Default Web Site Properties dialog appears.
The Application Configuration dialog appears.
The Add/Edit Application Extension Mapping dialog opens.
The Add/Edit Application Extension Mapping dialog, the Application Configuration dialog and the Default Web Site Properties dialog close. The .ntc file extension is mapped.
|
Copyright © 2012 CA.
All rights reserved.
|
|