
Agent for SharePoint Guide › Advanced Configuration Options › Replace the Certificates for your CA SiteMinder® Trusted Identity Provider
Replace the Certificates for your CA SiteMinder® Trusted Identity Provider
CA SiteMinder® trusted identity providers use the following SSL certificates to encrypt their communications with the CA SiteMinder® Policy Server:
- A certificate authority certificate (CA-certificate or root certificate).
- An x.509 certificate (signing certificate).
When any of the previous certificates expire, you can replace them with valid certificates.
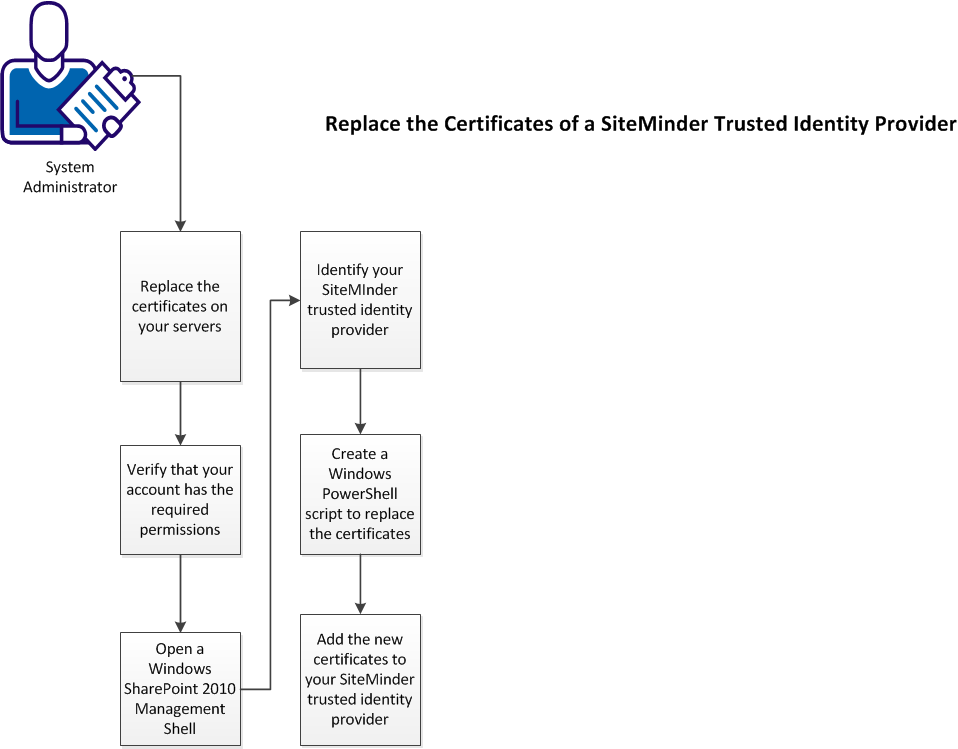
The following illustration describes how to replace the certificates of your CA SiteMinder® trusted identity provider:

Follow these steps:
- Replace the certificates on your servers.
- Verify that your account has the required permissions.
- Open a SharePoint 2010 management shell window on your SharePoint central administration server.
- Identify your CA SiteMinder® trusted identity provider.
- Create a Windows PowerShell script to update the certificates.
- Add the new certificates to your CA SiteMinder® trusted identity provider.
Replace the Certificates on your Servers
Replace the expired certificates on the following computers:
- The computer hosting your SharePoint central administration server.
- Any computers hosting a web front end (WFE) for your SharePoint environment.
Note: Record this information for future use in your Windows PowerShell script.
Follow these steps:
- Perform the following steps on the computer hosting your SharePoint central administration server:
- Remove the expired CA-certificate (root certificate) from the computer.
- Copy your new CA-certificate (root certificate) to the computer.
- Remove the expired signing certificate from the computer.
- Copy your new signing certificate to the computer.
- Perform the following steps on a computer hosting a web front end (WFE) server in your SharePoint environment:
- Remove the expired CA-certificate (root certificate) from the computer.
- Copy your new CA-certificate (root certificate) to the computer.
- Remove the expired signing certificate from the computer.
- Copy your new signing certificate to the computer.
- Repeat Step 2 for all web front end (WFE) servers in your SharePoint environment.
The certificates on your computers have been replaced.
Verify that your Account has the Required Permissions
The user account with which you want to modify the CA SiteMinder® trusted identity provider requires certain permissions. Modify the permissions of your user account if it does not meet the following conditions:
- An Administrator account.
- A member of the Administrators group.
Add the following privileges to your account:
- Local administrator on all SharePoint web front end (WFE) servers.
- Read/Write access to the configuration database.
Open a SharePoint 2010 Management Shell Window on your SharePoint Central Administration Server
A SharePoint 2010 environment can have multiple trusted identity providers. Identify your CA SiteMinder® trusted identity provider before modifying any claims that are associated with it.
Follow these steps:
- Enter the following command to list all of the trusted identity providers:
Get-SPTrustedIdentityTokenIssuer
A list of trusted identity providers appears.
- Locate your CA SiteMinder® trusted identity provider in the list.
Your CA SiteMinder® trusted identity provider is identified.
Identify your Trusted Identity Provider
A SharePoint 2010 environment can have multiple trusted identity providers. Identify your CA SiteMinder® trusted identity provider before modifying any claims that are associated with it.
Follow these steps:
- Enter the following command to list all of the trusted identity providers:
Get-SPTrustedIdentityTokenIssuer
A list of trusted identity providers appears.
- Locate your CA SiteMinder® trusted identity provider in the list.
Your CA SiteMinder® trusted identity provider is identified.
Create a PowerShell Script to Update the Certificates
Adding the new certificates to your CA SiteMinder® trusted identity provider involves several steps using the SharePoint 2010 Management shell.
We recommend using a PowerShell script that contains all of the commands, such as the one shown in the following example:
Remove-SPTrustedRootAuthority CASigningRootCert
Remove-SPTrustedRootAuthority CASigningCert

$rootcert = New-Object System.Security.Cryptography.X509Certificates.X509Certificate2("full_path_to_updated_certificate_authority_certificate.cer")
$cert = New-Object System.Security.Cryptography.X509Certificates.X509Certificate2("full_path_to_signing_certificate.cer")
$tip = Get-SPTrustedIdentityTokenIssuer name_of_siteminder_trusted_identity_provider
$tip.SigningCertificate = $cert
$tip.Update()
New-SPTrustedRootAuthority -Name "CASigningRootCert" -Certificate $rootcert
New-SPTrustedRootAuthority -Name "CASigningCert" -Certificate $cert
Follow these steps:
- Copy the example script shown previous and save it on your SharePoint central administration server as a .ps1 file.
- Open the .ps1 file with a text editor.
- Edit the .ps1 file to suit your environment with the following steps:
- Locate the following text:
full_path_to_updated_certificate_authority_certificate
- Replace the previous text with the full path to your new certificate authority (root) certificate.
Example: C:\exampleserver\certificates\rootcertificate.cer
- Locate the following text:
full_path_to_signing_certificate
- Replace the previous text with the full path to your new signing certificate.
Example: C:\exampleserver\certificates\signingcertificates\sharepointsigningcertificate.cer
- Locate the following text:
name_of_siteminder_trusted_identity_provider
- Replace the previous text with the name of your CA SiteMinder® trusted identity provider.
Example: SiteMinder_TIP
- Save the .ps1 file and close the text editor.
The Windows PowerShell script is created.
Add the New Certificates to your CA SiteMinder® Trusted Identity Provider
Add the new certificates to your CA SiteMinder® trusted identity provider by running the PowerShell script on your SharePoint Central administration server.
Follow these steps:
- Change the directory of your SharePoint 2010 Management shell window to the directory that contains your .ps1 file.
- Execute your .ps1 file with the following command.
\.name_of_your_.ps1_file.ps1
The new certificates are added to the trusted identity provider.
Copyright © 2014 CA.
All rights reserved.
 
|
|


