Previous Topic: Leave the Sign-out Service URL UnprotectedNext Topic: Verify the Prerequisites


How to Enable SSL for the Agent for SharePoint

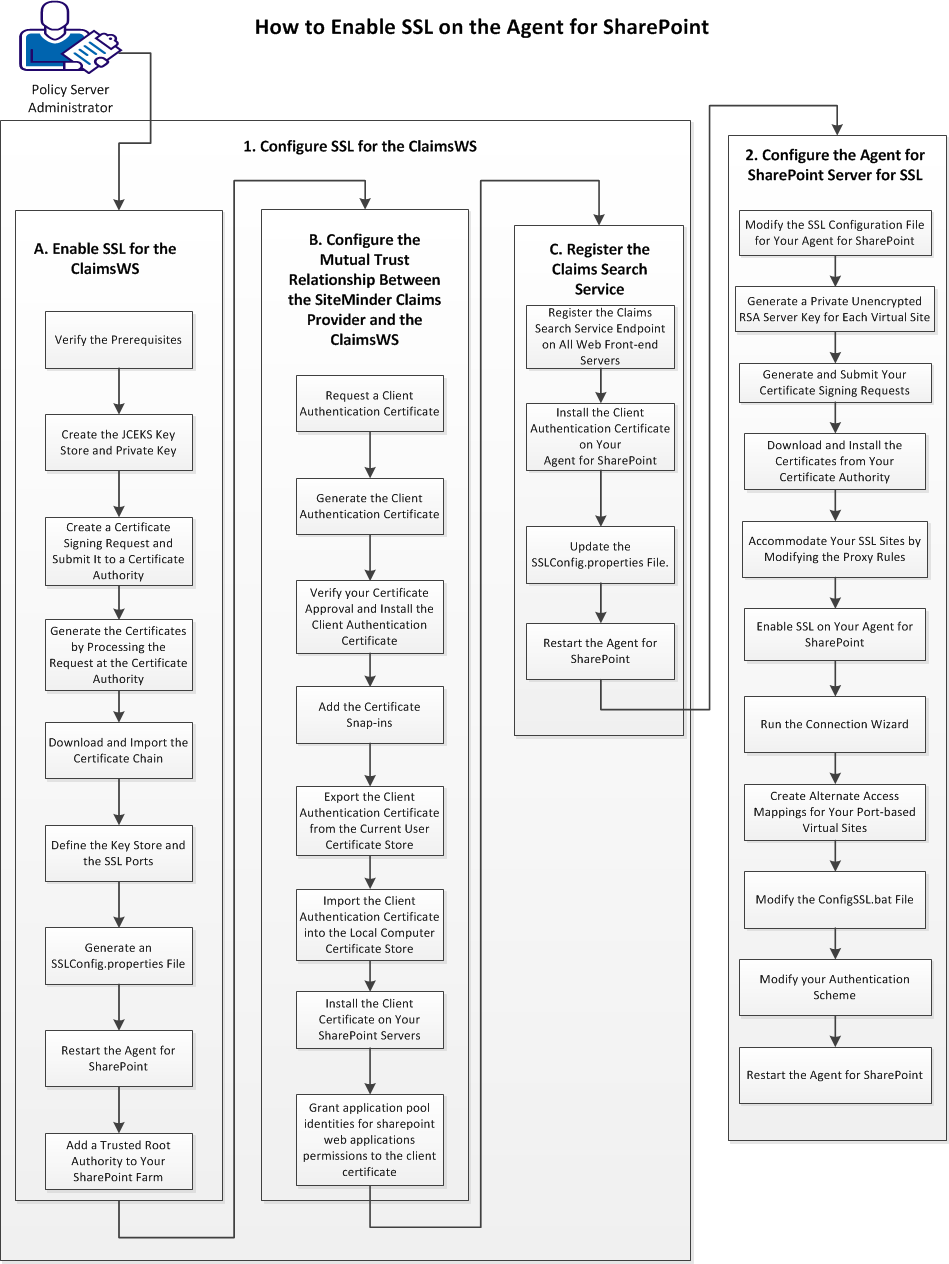
The procedure for enabling Secure Sockets Layer (SSL) communications on the Agent for SharePoint has the following parts:

The following graphic describes these procedures:

This graphic describes the workflow of Enabling SSL on the Agent for SharePoint

Follow these steps:

  1. Enable SSL for the ClaimsWS service with the following steps:
    1. Verify the prerequisites.
    2. Create the JCEKS key store and private key.
    3. Create a certificate signing request and submit it to a certificate authority.
    4. Generate the certificates by processing the request at the certificate authority.
    5. Download and import the certificate chain.
    6. Define the Key Store and the SSL ports.
    7. Generate an SSLConfig.properties file.
    8. Restart the Agent for SharePoint.
    9. Add a trusted root authority to your SharePoint farm.
  2. Configure the mutual trust relationship between the CA SiteMinder claims provider and the ClaimsWS service with the following steps:
    1. Request a client authentication certificate.
    2. Generate the client authentication certificate.
    3. Verify your certificate approval and install the client authentication certificate.
    4. Add the certificate snap-ins.
    5. Export the client authentication certificate from the current user certificate store.
    6. Import the client authentication certificate into the local computer certificate store.
    7. Install the client certificate on your SharePoint servers.
    8. Grant application pool identities for sharepoint web applications permissions to the client certificate.
  3. Register the Claims WS service with the following steps:
    1. Register the claims search service end point on all web front-end (WFE) servers.
    2. Install the client authentication certificate on your Agent for SharePoint.
    3. Update the SSLConfig.properties file.
    4. Restart the Agent for SharePoint.
  4. Configure the Agent for SharePoint server for SSL with the following steps:
    1. Modify the SSL configuration file for your Agent for SharePoint.
    2. Generate a private unencrypted RSA server key for each virtual site.
    3. Generate and submit certificate signing requests.
    4. Download and install the certificates from your certificate authority.
    5. Accommodate your SSL sites by modifying the proxy rules.
    6. Enable SSL on your Agent for SharePoint.
    7. Run the connection wizard.
    8. Create alternate access mappings for your port-based virtual sites.
    9. Modify the ConfigSSL.bat file.
    10. Modify your authentication scheme.
    11. Restart the Agent for SharePoint.