

Oracle Unified Directory (OUD) can function as a policy store. A single directory server instance can function as a:
Using a single directory server simplifies administration tasks. This scenario describes how to configure a single directory server instance to store policy data and encryption keys.
Note: If your implementation requires, you can configure a separate key store.
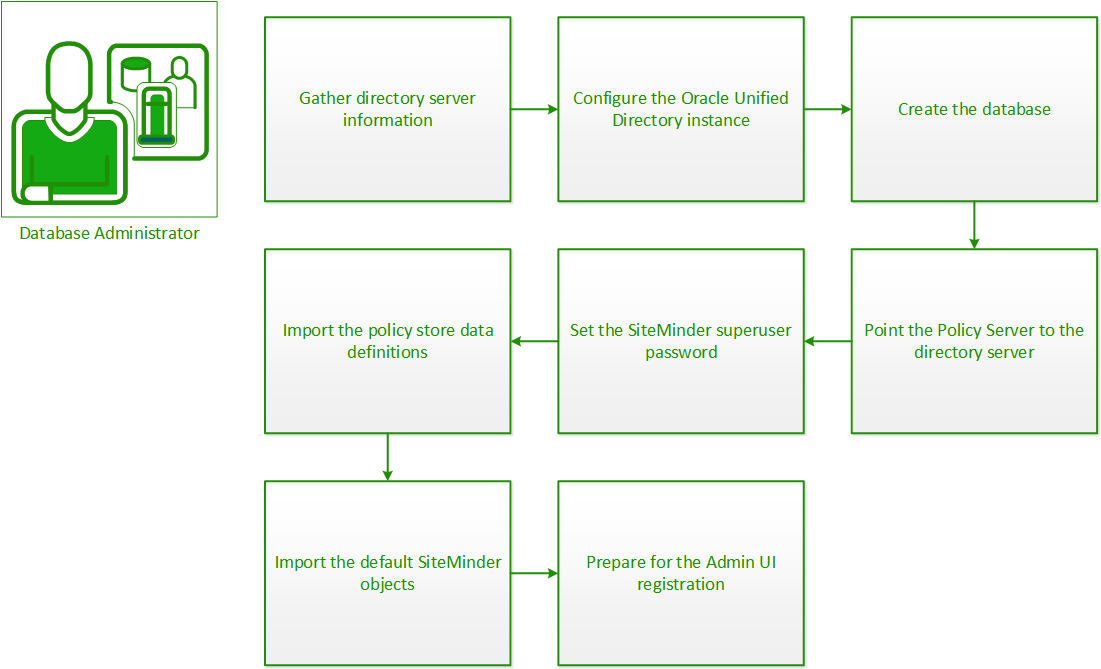
To configure Oracle Unified Directory as a policy store, complete the following procedures:
Configuring an LDAP directory server as a policy store or upgrading an existing policy store requires specific directory server information. Gather the following information before beginning. You can use the Policy Store Worksheets to record your values.
Note: Policy and data store worksheets are provided to help you gather and record information before configuring or upgrading a CA SiteMinder® data store. You can print the applicable worksheet and can use it to record required information before beginning.
Specifies the fully-qualified host name or the IP Address of the directory server.
(Optional) Specifies a non-standard port.
Default values: 636 (SSL) and 389 (non-SSL)
Specifies the LDAP user name of a user who has privileges to create, read, modify, and delete objects in the LDAP tree underneath the policy store root object.
Specifies the password for the Administrative DN.
Specifies the distinguished name of the node in the LDAP tree where policy store objects are to be defined.
Specifies the pathname of the directory where the SSL client certificate database file resides.
Limit: SSL only
Oracle Unified Directory requires more configuration before you can use it as a policy store. The following process lists the configuration steps:
Specify the CA SiteMinder® schema files.
Follow these steps:
oud_sm_schema.ldif
Specifies the Policy Server installation path.
Specifies the name of the Oracle Unified Directory instance.
oud_XPS_schema.ldif
The CA SiteMinder® schema files are specified.
Specify the CA SiteMinder® schema files.
Follow these steps:
oud_sm_schema.ldif
Specifies the Policy Server installation path.
Specifies the name of the Oracle Unified Directory instance.
oud_XPS_schema.ldif
The CA SiteMinder® schema files are specified.
Specify indexing in the Oracle Unified Directory instance config file (oud_instance\config\config.ldif) to use Oracle Unified Directory as a policy store.
Follow these steps:
Specifies the name of the Oracle Unified Directory instance.
dn: cn=Index,cn=userRoot,cn=Workflow Elements,cn=config
objectClass: top
objectClass: ds-cfg-branch
cn: Index
rebuild-index.bat -b base_dn --rebuildAll -h hostname -p OUD_administration_port -D "cn=Directory Manager" -j <bindpasswordfile> -X -t 0 --completionNotify emailAddress
Specifies the base DN of a back end that supports indexing. The index is rebuilt within the scope of the given base DN.
Specifies the fully qualified hostname or IP address of the directory server. If not provided, defaults to localhost.
Specifies the administration port of the directory server. If not provided, the default administration port (44444) is used.
Specifies the file that contains the bind password to use when authenticating to the directory server.
Specifies the email address of a recipient to be notified when the task completes. This option can be specified more than once in a single command.
Policy store indexing for Oracle Unified Directory is specified.
Specify indexing in the Oracle Unified Directory instance config file (oud_instance/config/config.ldif) to use Oracle Unified Directory as a policy store.
Follow these steps:
Specifies the name of the Oracle Unified Directory instance.
dn: cn=Index,cn=userRoot,cn=Workflow Elements,cn=config
objectClass: top
objectClass: ds-cfg-branch
cn: Index
Specifies the Policy Server installation path.
rebuild-index -b base_dn --rebuildAll -h hostname -p OUD_administration_port -D "cn=Directory Manager" -j bindpasswordfile -X -t 0 --completionNotify emailAddress
Specifies the base DN of a back end that supports indexing. The index is rebuilt within the scope of the given base DN.
Specifies the fully qualified hostname or IP address of the directory server. If not provided, defaults to localhost.
Specifies the administration port of the directory server. If not provided, the default administration port (44444) is used.
Specifies the file that contains the bind password to use when authenticating to the directory server.
Specifies the email address of a recipient to be notified when the task completes. This option can be specified more than once in a single command.
The policy store indexing for Oracle Unified Directory is specified.
The following process lists the steps for creating the directory server database for the policy store:
To create a base tree structure to store policy store objects, specify the following entry under the root DN:
ou=Netegrity,ou=SiteMinder,ou=PolicySvr4
Add entries to the directory server so that CA SiteMinder® has the necessary organization and organizational role information.
Follow these steps:
Example: The following example contains an organization entry and an organizational role entry for the entries.ldif.
# CA, example.com
dn: ou=Netegrity,dc= example,dc=com
ou: CA
objectClass: organizationalUnit
objectClass: top

# SiteMinder, CA, example.com
dn: ou=SiteMinder,ou=CA,dc= example,dc=com
ou: SiteMinder
objectClass: organizationalUnit
objectClass: top

# PolicySvr4, SiteMinder, CA, example.com
dn: ou=PolicySvr4,ou=SiteMinder,ou=CA,dc= example,dc=com
ou: PolicySvr4
objectClass: organizationalUnit
objectClass: top
ldapmodify -h hostname -p port -D bindDN -j pwd_file -a -f LDIF_file_name
Specifies the fully qualified hostname or IP address of the directory server.
Default: localhost.
Specifies the port on which to contact the directory server.
Default: 389
Specifies the bind DN to authenticate to the directory server.
Default: cn=Directory Manager
Specifies the file that contains the bind password for authenticating to the directory server.
Specifies the LDIF file that you created in Step 1.
You point the Policy Server to the policy store so the Policy Server can access the policy store.
Follow these steps:
Important! If you are accessing this graphical user interface on Windows Server 2008, open the shortcut with Administrator permissions. Use Administrator permissions even if you are logged in to the system as an Administrator. For more information, see the release notes for your CA SiteMinder® component.
Policy Store
LDAP
Note: You can click Help for a description of fields, controls, and their respective requirements.
Key Store
LDAP
Use Policy Store database
The default CA SiteMinder® administrator account is named:
siteminder
The account has maximum permissions.
We recommend that you do not use the default superuser for day–to–day operations. Use the default superuser to:
Follow these steps:
Specifies the Policy Server installation path.
Note: The utility is at the top level of the Policy Server installation kit.
smreg -su password
Specifies the password for the default CA SiteMinder® administrator.
Limits:
Note: If you are configuring an Oracle policy store, the password is case–sensitive. The password is not case–sensitive for all other policy stores.
The password for the default CA SiteMinder® administrator account is set.
Importing the policy store data definitions defines the types of objects that can be created and stored in the policy store.
Follow these steps:
Specifies the Policy Server installation path.
XPSDDInstall SmMaster.xdd
Imports the required data definitions.
Importing the default policy store objects configures the policy store for use with the Administrative UI and the Policy Server.
Consider the following items:
Specifies the Policy Server installation path.
Follow these steps:
XPSImport smpolicy.xml -npass
XPSImport smpolicy-secure.xml -npass
Specifies that no passphrase is required. The default policy store objects do not contain encrypted data.
Both files include the default policy store objects. These objects include the default security settings in the default Agent Configuration Object (ACO) templates. The smpolicy–secure file provides more restrictive security settings. For more information, see Default Policy Store Objects Consideration.
Note: Importing smpolicy.xml makes available legacy federation and Web Service Variables functionality that is separately licensed from CA SiteMinder®. If you intend on using the latter functionality, contact your CA account representative for licensing information.
Enable the advanced authentication server as part of configuring your Policy Server.
Follow these steps:
The master key screen appears.
Note: If you are installing another (nth) Policy Server, use the same encryption key for the Advanced Authentication server that you used previously.
The advanced authentication server is enabled.
You use the default CA SiteMinder® super user account (siteminder) to log into the Administrative UI for the first–time. The initial login requires that you to register the Administrative UI with a Policy Server, which creates a trusted relationship between both components.
You prepare for the registration by using the XPSRegClient utility to supply the super user account name and password. The Policy Server uses these credentials to verify that the registration request is valid and that the trusted relationship can be established.
Consider the following:
To prepare for the Administrative UI registration
XPSRegClient siteminder[:passphrase] -adminui-setup -t timeout -r retries -c comment -cp -l log_path -e error_path -vT -vI -vW -vE -vF
Specifies the password for the default CA SiteMinder® super user account (siteminder).
Note: If you do not specify the passphrase, XPSRegClient prompts you to enter and confirm one.
Specifies that the Administrative UI is being registered with a Policy Server for the first–time.
(Optional) Specifies the allotted time from when you to install the Administrative UI to the time you log in and create a trusted relationship with a Policy Server. The Policy Server denies the registration request when the timeout value is exceeded.
Unit of measurement: minutes
Default: 240 (4 hours)
Minimum Limit: 15
Maximum Limit: 1440 (24 hours)
(Optional) Specifies how many failed attempts are allowed when you are registering the Administrative UI. A failed attempt can result from submitting incorrect CA SiteMinder® administrator credentials when logging into the Administrative UI for the first–time
Default: 1
Maximum Limit: 5
(Optional) Inserts the specified comments into the registration log file for informational purposes.
Note: Surround comments with quotes.
(Optional) Specifies that registration log file can contain multiple lines of comments. The utility prompts for multiple lines of comments and inserts the specified comments into the registration log file for informational purposes.
Note: Surround comments with quotes.
(Optional) Specifies where the registration log file must be exported.
Default: siteminder_home\log
siteminder_home
Specifies the Policy Server installation path.
(Optional) Sends exceptions to the specified path.
Default: stderr
(Optional) Sets the verbosity level to TRACE.
(Optional) Sets the verbosity level to INFO.
(Optional) Sets the verbosity level to WARNING.
(Optional) Sets the verbosity level to ERROR.
(Optional) Sets the verbosity level to FATAL.
XPSRegClient supplies the Policy Server with the administrator credentials. The Policy Server uses these credentials to verify the registration request when you log into the Administrative UI for the first–time.
|
Copyright © 2013 CA.
All rights reserved.
|
|