

This scenario describes how a Policy Server administrator and an agent owner configure an OAuth authentication scheme.
The OAuth authentication scheme lets users submit credentials through an OAuth provider. The OAuth provider authenticates the user and sends an authentication response with claims about the user. The Policy Server verifies the authentication response, completes the authentication process, and authorizes access to the resource.
The goal of the scenario is for you to:
The following figure shows the required tasks to configure an OAuth authentication scheme.
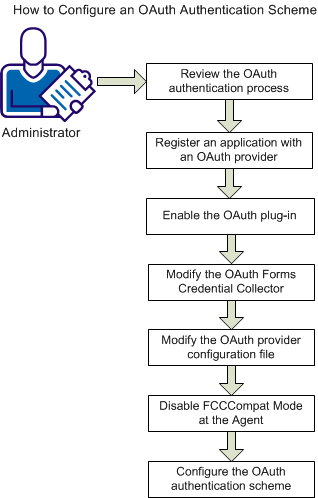
Complete the following steps for OAuth configuration:
The following process explains how the OAuth authentication scheme works:
Note: The authentication scheme supports an anonymous mode of authentication. In anonymous mode, the Policy Server does not use the claim value to map to a user. The Policy Server searches all user directories in the policy domain for a user matching the anonymous user that you defined in the authentication scheme.
Prerequisite
Determine whether the SecureURLs parameter is set in your web agent configuration and its value, if it is set.
Part of the registration process is to specify an entry in the Redirect URIs setting (Google) or the Site URL setting (Facebook). The format of this entry depends on the value of the SecureURLs agent parameter. Check the value of the SecureURLs parameter from the Administrative UI. The parameter is in the Agent Configuration Object for the host agent.
http(s)://agent_host/siteminderagent/forms/oauthcb.fcc?SMQUERYDATA=Sample
http(s)://agent_host/siteminderagent/forms/oauthcb.fcc
Follow these steps:
http(s)://homepage.com
Example: http://www.forwardinc.com
Web application
http://agent_host
Example: http://myagent.ca.com
http(s)://agent_host/siteminderagent/forms/oauthcb.fcc
(SecureURLs not set or set to No)
or
http(s)://agent_host/siteminderagent/forms/oauthcb.fcc?SMQUERYDATA=Sample
(SecureURLs set to Yes)
The Google registration process is complete.
Follow these steps:
http(s)://agent_host/siteminderagent/forms/oauthcb.fcc
(SecureURLs not set or set to No)
or
http(s)://agent_host/siteminderagent/forms/oauthcb.fcc?SMQUERYDATA=Sample
(SecureURLs set to Yes)
The registration process results in the generation of the client application URL, the client ID, and its associated secret. Registration also generates the OAuth authorization server endpoint URLs, from where the OAuth service obtains the authorization code and access token. Some of this information is required when setting up the files that the OAuth authentication scheme uses to operate properly.
The OAuth plug-in is referenced in the web agent configuration file (WebAgent.conf). The plug-in lets agents communicate with an OAuth provider and forwards the OAuth provider authentication response to the Policy Server.
Contact agent owners and instruct them to enable the required plug-in.
Follow these steps:
agent_home\bin\IIS
agent_home
Specifies the agent installation path.
web_server_home/https-hostname/config
web_server_home
Specifies the web server installation path.
web_server_home/conf
web_server_home
Specifies the web server installation path.
C:\lotus\domino
$HOME/notesdata
Example:
#LoadPlugin="C:\Program Files\CA\webagent\bin\OAuthPlugin.dll"
A sample OAuth FCC is included with the web agent installation. The FCC lets users authenticate by entering an OAuth provider user name.
By default, the FCC presents numerous OAuth providers. Contact the agent owner and instruct them to modify the FCC so that the file includes only those providers that the protected application supports.
The following steps explain how to modify the FCC.
Follow these steps:
agent_home\samples\forms
Specifies the web agent installation path.
The following excerpt shows two examples of provider entries:
var oauth_providers = {
    google : {
        name : 'Google',
        image :'images/google.gif',
		apps : 'ForwardIncGoogleApp'

    },
    facebook : {
        name : 'Facebook',
        image :'images/facebook.gif',
		apps : 'ForwardIncFacebookApp'
    }
The following excerpt shows two example application entries. One is named FowardIncGoogleApp and the other is named ForwardIncFacebookApp.
Important! These application names are only example values. Enter the real application names for your deployment. Also, the application names you enter in this FCC file must match the application names you enter in the oauthproviders.xml file.
};
var oauth_applications = {

ForwardIncGoogleApp : {
	name : 'ForwardIncGoogleApp',
	label : 'Login using google application',
	image : 'images/google.ico'
	}
ForwardIncFacebookApp : {
	name : 'ForwardIncFacebookApp',
	label : 'Login using facebook application',
	image : 'images/facebook.ico'
	},
/* google : {
      name : 'ForwardIncGoogleApp',
      image :'images/google.gif',
     apps : 'ForwardIncGoogleApp'
},*/
An OAuth provider configuration file (oauthproviders.xml) is installed with the Policy Server. The provider configuration file contains configuration details of each provider and the protected application. If the file does not include the correct settings, authentication fails.
Information about the file:
Important! The values are samples only. We recommend that you verify all configuration settings with your OAuth provider before deploying the authentication scheme.
Follow these steps:
siteminder_home\config\properties
Specifies the Policy Server installation path.
<OAuthProvider>
</OAuthProvider>
<TrustedOAuthProviders>
</TrustedOAuthProviders>
Identifies the OAuth provider for this node. Enter the name of the provider.
Note: Use lower-case when entering a provider name.
Provides the authorization server end-point URL for this provider. This URL must generate an authorization token after successful authentication of a user.
Google example: https://accounts.google.com/o/oauth2/auth
Facebook example: https://www.facebook.com/dialog/oauth
Provides an access token end-point URL. A user can query for an access token by exchanging authorization code along with application configuration details.
Google example: https://accounts.google.com/o/oauth2/token
Facebook example: https://graph.facebook.com/oauth/access_token
<Application>
</Application>
Update values for the following settings:
Identifies the configuration for the OAuth registered application and the user authentication configuration. The end user must provide this identifier in the FCC page to use the configuration for the OAuth authentication.
Examples: ForwardIncGoogleApp, ForwardIncFacebookApp
Important! These application names are only example values. Enter the real application names for your deployment. Also, the application names you enter in this file must match the application names you enter in the oauth.fcc file.
Specifies the registered application URL. Update the value of this setting with the same Redirect URIs (Google) or Site URL (Facebook) you entered when you registered the application. For example, if the Google Redirect URIs value is set to the following:
Redirect URIs: https://fedserver.bizpartnerinc.ca/siteminderagent/forms/oauthcb.fcc
The value for the ApplicationURL in this file is:
</OAuthProvider>
<Application appname="ForwardIncGoogleApp">
<ApplicationURL>
<!-- HOSTNAME : WebAgent/SPS host name -->
https://fedserver.bizpartnerinc.ca/siteminderagent/forms/oauthcb.fcc
</ApplicationURL>
The format of the URL depends on the value of the SecureURLs agent parameter. Check the value of the SecureURLs parameter from the Administrative UI. The parameter is in the Agent Configuration Object for the host agent.
http(s)://agent_host/siteminderagent/forms/oauthcb.fcc?SMQUERYDATA=Sample
Example: https://myagent.ca.com/siteminderagent/forms/oauthcb.fcc?SMQUERYDATA=Sample
http(s)://agent_host/siteminderagent/forms/oauthcb.fcc
Contains the identifier of the registered client application at the OAuth server. Update the value of this setting with the generated client ID. The authorization server provides this ID value when the application is successfully registered.
Indicates the secret associated with the ClientID. Update the value of this setting with the secret associated with the ClientID. The authorization server provides this value when the application is successfully registered.
Links the application with a provider. Specify the providername value of a defined provider. This application uses the provider configuration while performing OAuth authentication.
Examples: google, facebook
Specifies the required type of permission the application is requesting from the user. For example, if the scope value is https://www.googleapis.com/auth/userinfo.profile, the application can gain read-only access to basic user profile information.
This scope value is passed in the authorization token request. The client can use the code to access resource URLs, which are specified in the UserInfoURL attribute. Administrator can specify a single value or multiple space separated values for this attribute.
Designates a single URL or multiple space-separated URLs for which user information can be queried with the generated access token. The URL represents the resource the that client is trying access.
Specifies a user attribute. Update this value with the user identifying claim from the OAuth user information. The value of this attribute is used to disambiguate the user. For example, the user attribute can be "email."
Disable the FCCCompatMode setting in the cam-agent configuration.
Follow these steps:
A list of Agent configuration objects that match the search criteria appears.
Note: Click Help for descriptions of settings and controls, including their respective requirements and limits.
Configure the OAuth authentication scheme object using the Administrative UI.
If your network includes multiple cookie domains and each cookie domain requires the authentication scheme, configure a separate authentication scheme object in each cookie domain.
Note: For operation on Solaris platforms, modify the java.security file in the directory jre_root/lib/security so that the sun.security.provider.Sun provider is registered as the first provider.
Follow these steps:
The Create Authentication Scheme page appears.
The scheme-specific settings appear.
Important! Restart the Policy Server if you change any of the proxy settings.
You have completed the required tasks to configure an OAuth authentication scheme. You can now use the authentication scheme in a policy or application component to protect resources.
|
Copyright © 2013 CA.
All rights reserved.
|
|