

This scenario describes how a CA SiteMinder® administrator and a CA SiteMinder® agent owner configure an OpenID authentication scheme.
The CA SiteMinder® OpenID authentication scheme lets CA SiteMinder® users submit credentials through an OpenID provider. The OpenID provider authenticates the user and sends CA SiteMinder® an authentication response. The Policy Server verifies the authentication response, completes the authentication process, and authorizes access to the resource.
The goal of the scenario is to let the intended audience:
CA SiteMinder® 12.52 supports OpenID versions 1.1 and 2.0 and OpenID Attribute Exchange version 1.0.
The following process explains how OpenID authentication works in CA SiteMinder®:
Note: The authentication scheme supports an anonymous mode of authentication. In anonymous mode, the Policy Server does not use the claim value to map to a CA SiteMinder® user. The Policy Server searches all user directories in the policy domain for a user matching the anonymous user that you defined in the authentication scheme.
This section describes how a CA SiteMinder® administrator can configure the OpenID authentication scheme. The following diagram illustrates the required tasks:
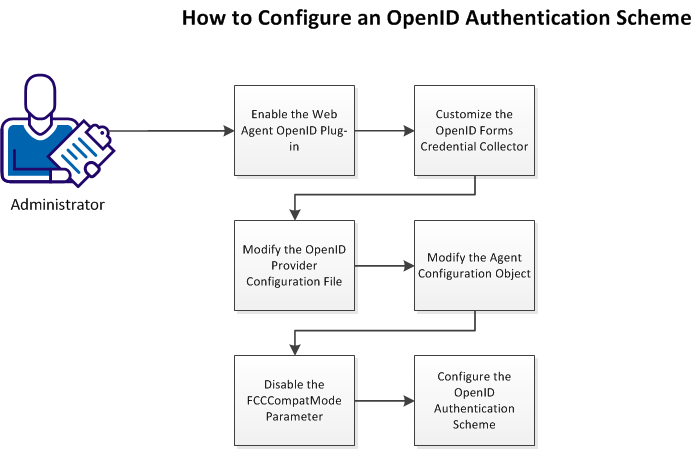
Follow these steps:
The OpenID plug–in is referenced in the web agent configuration file (WebAgent.conf). The plug–in is required to let agents communicate with an OpenID provider and communicate the OpenID provider authentication response to the Policy Server.
Contact agent owners and instruct them to enable the required plug–in.
Follow these steps:
Note: The default location of the file depends on the web server type:
agent_home\bin\IIS
Specifies the agent installation path.
web_server_home/https-hostname/config
Specifies the web server installation path.
web_server_home/conf
Specifies the web server installation path.
C:\lotus\domino
$HOME/notesdata
Example:
#LoadPlugin="C:\Program Files\CA\webagent\bin\OpenIDPlugin.dll"
A sample OpenID FCC is included with the web agent installation. The FCC is required to let users authenticate by:
By default, the FCC presents numerous OpenID providers. Contact the agent owner and instruct them to display only those providers that the protected application supports by modifying the FCC.
Follow these steps:
agent_home\samples\forms
Specifies the web agent installation path.
openid.fcc
var providers_large
var providers_small
Example:
/*google : {
name : 'Google',
url : 'https://www.google.com/accounts/o8/id'
},*/
Example:
}/*,
myprovider : {
name : 'MyProvider',
label : 'Enter your provider username',
url : 'http://ca.com/{username}/',
image : 'images/image.png'
}*/
Note: The separate provider sections correspond to the sizes of provider icons that the FCC displays:
/*
*/
Example:
myprovider : {
name : 'Foward Inc',
label : 'Enter your Forward Inc user name',
url : 'http://ca.com/{username}/',
image : 'images/image.png'
}
Note: Forward, Inc. is a fictitious company name that is used strictly for instructional purposes only and is not meant to reference an existing company.
Example:
myprovider : {
name : 'Foward Inc',
label : 'Enter your Forward Inc user name',
url : 'http://{username}.forwardinc.com/'
image : 'images/image.png'
}
Example:
myprovider : {
name : 'Foward Inc',
label : 'Enter your Forward Inc user name',
url : 'http://{username}.forwardinc.com/'
image : 'images/forwardinc.png'
}
Important! The default provider IDs include the following image index property:
imageidx
Do not remove or change the property. The property verifies that the FCC displays the correct provider icon.
The product provides an OpenID provider configuration file. The file must reference the configuration details of each provider that the protected application supports. If the file does not include the correct settings, authentication fails.
Important! The values are samples only. We recommend that you verify all configuration settings with your OpenID provider before deploying the authentication scheme.
Follow these steps:
siteminder_home\config\properties
Specifies the Policy Server installation path.
Openidproviders.xml
Example: You can enable Federal Identity, Credential, and Access Management (ICAM) compliance for one instance of the authentication scheme and can disable ICAM compliance for another.
<OpenIDProvider>
</OpenIDProvider>
<TrustedOpenIDProviders>
</TrustedOpenIDProviders>
Indicates the beginning of the configuration settings for a provider.
(Optional) Specifies the schema type that the provider supports.
Valid values: ax or sreg.
Default: ax.
Specifies the URL of the OpenID provider hosting the service. The value can include a comma–separated list of provider URLs.
Specifies the claims that the OpenID provider returns as part of the authentication request. If the provider cannot provide all of the required claims, authentication fails. This node requires at least one claim node.
Defines an individual required claim.
Specifies the URI form of the OpenID provider claim. The Policy Server constructs the authentication request using this value.
Important! Verify that the value of the first required claim maps to a user attribute in your user directories. The Policy Server determines the value of the first required claim that is based on the provider authentication response. The Policy Server then searches all user directories in the policy domain for a user that matches the claim value. If the Policy Server cannot map the claim value to a user attribute, authentication fails.
Value: The value must adhere to the type of schema that the provider supports.
(Optional) Defines the user-friendly name of the URI node value and prevents the URI from being stored or referenced. The system uses the alias to identify the claim.
Value: Any string.
Example: Instead of storing a URI that returns the first name of users in the session store, the system can reference the claim name as fullname.
Note: The system appends the following prefix to an alias that is stored in the session store:
smopenidclaim
(Optional) Specifies the optional claims that the OpenID provider is to return as part of the authentication request. If the provider cannot provide an optional claim, authentication does not fail. This node requires at least one claim node.
(Optional) Defines the properties that ICAM compliance requires. If you are configuring the authentication scheme for ICAM compliance, this node and all child nodes are required.
(Optional) Specifies the time for which the OpenID provider user session is valid. If the user session is valid, the OpenID provider authenticates the user for a protected resource using a provider–specific cookie. If the session expires, the user is prompted to reauthenticate.
Unit of measurement: seconds.
Default: 0.
If you leave the default value, the user must authenticate against the OpenID provider, regardless of a valid session.
Value: The value must be a positive integer.
(Optional) Specifies a comma–separated list of the ICAM policies to which the OpenID provider must adhere. If the provider does not adhere to the compliance level, authentication fails.
The default settings for the ignore extensions ACO parameter prevent the OpenID FCC from displaying. Modify the default settings using the Administrative UI.
Follow these steps:
IgnoreExt
Note: Separate the values with a comma.
Example:
.class, .gif, .jpg, .jpeg, .png, .fcc, .scc, .sfcc, .ccc, .ntc,.css,.js
The agent configuration object is updated with the excluded resource extensions.
Agents use an FCCCompatMode configuration parameter for backward compatibility with older versions of the product. For newer versions of the product (such as 12.52), this parameter must be disabled for better security when using certain features.
Note: This procedure assumes you configure your agents centrally, using an agent configuration object on a Policy Server. If you use the local agent configuration method instead, disable the FCCCompatMode parameter in your LocalConfig.conf file.
Follow these steps:
Enable an FCC/NTC to serve up forms for resources that 4.x Web Agents protect or third-party applications.
Note: SMUSRMSG is supported for the custom authentication scheme only when FCCCompatMode set to yes.
Limits: yes, no
Default: (traditional agents) Yes
Default: (framework agents) No
Important! Setting this parameter to no removes support for version 4.x of the Netscape browser.
The Edit parameter dialog appears.
The Edit parameter dialog closes.
The FCCCompatMode parameter is disabled and a confirmation message appears.
You use the Administrative UI to configure the OpenID authentication scheme object.
If your network includes multiple cookie domains and each cookie domain requires the authentication scheme, configure a separate authentication scheme object in each cookie domain.
Note: For operation on any Solaris platforms, modify the java.security file in the directory jre_root/lib/security so that the sun.security.provider.Sun provider is registered as the first provider.
Follow these steps:
The Create Authentication Scheme page appears.
The scheme-specific settings appear.
Note: Click Help for descriptions of settings and controls, including their respective requirements and limits.
Important! If you change any of the proxy settings or the post processing chain setting, restart the Policy Server.
You have completed the required tasks to configure an OpenID authentication scheme. You can now bind the authentication scheme to a policy realm and an Enterprise Policy Management (EPM) application component.
|
Copyright © 2013 CA.
All rights reserved.
|
|