

This section contains the following topics:
FIPS 140-2 Migration Requirements
Migration Roadmap—Re-Encrypt Sensitive Data
How to Re-Encrypt Existing Sensitive Data
Migration Roadmap—Configure FIPS-Only Mode
How to Configure FIPS-only Mode
The Policy Server uses certified Federal Information Processing Standard (FIPS) 140–2 compliant cryptographic libraries. FIPS is a US government computer security standard that is used to accredit cryptographic modules that meet the Advanced Encryption Standard (AES). These libraries provide a FIPS mode of operation when a CA SiteMinder® environment only uses FIPS–compliant algorithms to encrypt sensitive data. A CA SiteMinder® environment can operate in one of the following FIPS modes of operation:
By default, an environment that is upgraded to 12.52 is operating in FIPS–compatibility mode. In FIPS–compatibility mode, the environment uses algorithms existing in previous versions of CA SiteMinder® to encrypt sensitive data and is compatible with previous versions CA SiteMinder®. If your organization does not require the use of FIPS–compliant algorithms, the environment can operate in FIPS–compatibility mode without further configuration.
Migrating your environment to use only FIPS–compliant algorithms is comprised of two stages.
Important! An environment that is running in FIPS–only mode cannot interoperate with and is not backward compatible to versions of CA SiteMinder® before 12.x, including:
Re–link all such software with the 12.52 versions of the respective SDKs to achieve the required support for FIPS–only mode.
Ensure that your environment meets the minimum requirements before migrating the environment to only use FIPS-compliant algorithms. You may want to print the following to use as a checklist:
Note: More information on re-linking custom agents exists in the API Reference Guide for C and the API Reference Guide for Java.
Note: More information on enabling agent key generation exists in the Policy Server Administration Guide.
Before your environment can operate in FIPS-only mode, you must:
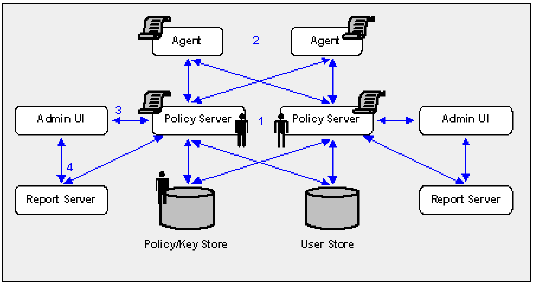
The following figure illustrates a sample 12.52 environment and details:

Important! If you have configured a separate database for a key store, audit logs, token data, or a session store, these passwords are encrypted using algorithms that are not FIPS–compliant. Re-encrypt these passwords before configuring the environment for FIPS-only mode.
Note: The password is for the default CA SiteMinder® administrator account. The account is used for all administrative tasks that do not require direct access to the Administrative UI. The password is not the password for the Administrative UI administrator account with superuser privileges.
The shared secrets that the Policy Servers and Agents use to establish encrypted communication channels are encrypted using algorithms that are not FIPS–compliant. Re-encrypt the shared secrets before configuring the environment for FIPS-only mode.
Note: The previous figure depicts a single database instance as a policy/key store. Your environment can use separate database instances for individual policy and key stores.
Sensitive data stored in a policy store or policy and key stores is encrypted using algorithms that are not FIPS–compliant. Re-encrypt the keys and sensitive policy store data before configuring the environment for FIPS-only mode.
Note: How the password policy is configured determines when the Policy Server re-encrypts the Password Blob:
Complete the following procedures to re-encrypt existing sensitive data using FIPS-compliant algorithms:
Re-encrypting existing sensitive data while the Policy Server operates in FIPS-migration mode requires specific environment information.
Note: A FIPS information worksheet is provided to help you gather and record information prior to re-encrypting sensitive data. You may want to print this worksheet and use it to record required information.
Specifies the Policy Server installation path.
Note: This is the account that is used for all administrative tasks that do not require direct access to the Administrative UI. These are not the credentials for the Administrative UI administrator account with Super User privileges.
You set the Policy Servers to FIPS-migration mode so the environment can continue to use the existing CA SiteMinder® encryption algorithms as you re-encrypt existing sensitive data using FIPS-compliant algorithms.
Follow these steps:
setFIPSmigration
MIGRATION appears in the command window.
Note: For more information about stopping and starting the Policy Server, see the Policy Server Administration Guide.
. ./ca_ps_env.ksh
Policy Server migrating from classic SiteMinder to FIPS-140 cryptographic algorithms.
The Policy Server is set to operate in FIPS-migration mode.
You can now re-encrypt the policy store key for each Policy Server in the environment.
You re-encrypt the policy store key to replace the existing key with a version that is encrypted using FIPS-compliant algorithms.
To re-encrypt the policy store key
smreg -cf MIGRATE -key key_value
Specifies that smreg run in FIPS-migration mode.
Note: When smreg runs in FIPS-migration mode, the policy store key is re-generated using FIPS-compliant algorithms.
Specifies the current policy store key.
smreg generates a new policy store key and encrypts it using FIPS-compliant algorithms.
Prefix example: {AES}
The policy store key is re-encrypted.
You may now re-encrypt the policy store administrator password.
You re-encrypt the policy store administrator password to be sure that the data is encrypted using FIPS-compliant algorithms.
Follow these steps:
Note: For more information about starting the Policy Server Management Console, see the Policy Server Administration Guide.
The administrator password is encrypted using FIPS-compliant algorithms.
Important! A Policy Server operating in FIPS-only mode cannot decrypt a database password that remains encrypted with algorithms that are not FIPS–compliant.
You can now re-encrypt the CA SiteMinder® superuser password.
You re-encrypt the CA SiteMinder® Super User password to ensure that the data is encrypted using FIPS-compliant algorithms.
Note: This is the password for the default administrator account. This account is used for all administrative tasks that do not require direct access to the Administrative UI. This is not the password for the Administrative UI administrator account with Super User privileges.
To reset the CA SiteMinder® Super User password, open a command prompt and run the following command:
smreg -cf MIGRATE -su password
Specifies that smreg run in FIPS-migration mode.
Note: When smreg runs in FIPS-migration mode, the existing Super User password is saved using FIPS-compliant algorithms.
Specifies the existing Super User password.
Note: You do not have to supply a new password. You are entering the same password to ensure that the data is encrypted using FIPS-compliant algorithms.
The CA SiteMinder® Super User password is encrypted using FIPS-compliant algorithms.
You may now set each of the Agents in the environment to FIPS-migration mode.
You set the Agents to FIPS-migration mode so the environment can continue to use existing CA SiteMinder® encryption algorithms as you re-encrypt sensitive data using FIPS-compliant algorithms.
To change the FIPS mode of an agent
The following line appears in the file:
fipsmode="COMPAT"
fipsmode="MIGRATE"
The agent is operating in FIPS-migration mode.
You may now encrypt agent shared secrets.
You re-encrypt the agent shared secrets to replace the existing secrets with secrets that are encrypted using FIPS-compliant algorithms. You re-encrypt shared secrets either:
Note: You only have to use smreghost if the agent was not configured for shared secret rollover when you registered the trusted host.
To rollover the shared secret from the Administrative UI
The Shared Secret Rollover pane appears.
Rollover Now becomes active.
The Policy Server rolls over the shared secrets for all trusted hosts configured to allow shared secret rollover.
You may now re-encrypt sensitive policy and key data in the policy store.
To use smreghost to re-encrypt a shared secret
smreghost -i policy_server_ip_address -u administrator_user_name
-p administrator_password -hn hostname_for_registration -hc host_config_object
-f path_to_host_config_file -o -cf MIGRATE
Specifies the IP address of the Policy Server to which the trusted host is registered.
Specifies the name of the CA SiteMinder® administrator with the rights to register a trusted host.
Specifies the password of the administrator who is allowed to register a trusted host.
Specifies the current name of the host that is registered.
Specifies the Host Configuration Object configured at the Policy Server.
Specifies the full path to the file that contains the registration data. The default file name is SmHost.conf.
Note: If you do not specify a file path, the updated file is saved in the location where you are running smreghost.
Overwrites an existing trusted host. If you do not use this argument, you will have to delete the existing trusted host using the Administrative UI. We recommend using smreghost with this argument.
Specifies that smreghost run in FIPS-migration mode.
Note: When smreghost runs in FIPS-migration mode, the shared secret created and encrypted using FIPS-compliant algorithms.
smreghost re-registers the trusted host and creates a new shared secret that is encrypted using FIPS-approved algorithms.
The shared secret is encrypted using FIPS-compliant algorithms.
Prefix example: {AES}
You may now re-encrypt sensitive policy and key data in the policy store.
You re-encrypt policy and key store data to ensure that sensitive data that is encrypted using existing CA SiteMinder® algorithms is encrypted using FIPS-compliant algorithms.
There are three ways to re-encrypt policy and key store data. You can:
This guide details the steps for re-encrypting the policy and key store data for existing stores.
If you want to create a new 12.52 policy store or policy and key store:
Note: XPSExport does not export keys that are stored in a policy or key store. More information on using smkeyexport exists in the Policy Server Administration Guide.
Note: More information on using XPSExport exists in the Policy Server Administration Guide.
Note: More information on creating a policy and key stores exists in the Policy Server Installation Guide.
Note: More information on using smkeyimport exists in the Policy Server Administration Guide.
Note: More information on using XPSImport exists in the Policy Server Administration Guide.
You re-encrypt the keys stored in the policy or key store to replace the existing keys with versions that are encrypted using FIPS-compliant algorithms.
To re-encrypt the keys stored in the policy or key store
smkeyexport -dadmin_name -wadmin_password -ooutput_file_name -l -v -t -cf
Specifies the name of the CA SiteMinder® administrator account.
Specifies the password for the CA SiteMinder® administrator account.
(Optional) Specifies the name of the exported file. If you do not specify a file name, the default file name is stdout.smdif.
Note: Ensure that the file name contains the .smdif extension.
Example: pskeys.smdif
Specifies that a log file be created.
(Optional) Enables verbose mode for troubleshooting.
(Optional) Enables tracing for troubleshooting.
Specifies that smkeyexport run in FIPS-migration mode.
Note: When smkeyexport runs in FIPS-migration mode, the keys stored in the policy store are exported and re-encrypted using FIPS-compliant algorithms.
smkeyexport exports an smdif file that contains the re-encrypted keys.
smkeyimport -iinput_file_name -dadmin_name -wadmin_password -l -v -t -cf
Specifies the name of the file output file you created.
Note: Ensure that the file name you specify includes the .smdif extension.
Specifies the name of the CA SiteMinder® administrator account.
Specifies the password for the CA SiteMinder® administrator account.
Specifies that a log file be created.
(Optional) Enables verbose mode for troubleshooting.
(Optional) Enables tracing for troubleshooting.
Specifies that smkeyimport run in FIPS-migration mode.
smkeyimport imports the re-encrypted keys into the respective store.
You may now re-encrypt policy store data.
To re-encrypt the policy store data
XPSExport outputfile -xe -xp -pass <passphrase> -vT -vI -vW -vE -vF -e file_name -l log_file
Note: Although you can use XPSExport to export one or more granular objects, this procedure provides the arguments for exporting all of the policy store data. This ensures that the export includes all of the sensitive data. More information on exporting one or more granular objects exists in the Policy Server Administration Guide.
Specifies the name of the XML output file.
Note: The file name must be unique. The export fails if a file with the same name exists.
Example: psdata
Exports the object types that are related to the execution environment.
Exports the object types that are related to the policies.
Specifies a passphrase required for encryption of sensitive data. Record this value as it is required to import the sensitive data back into the policy store.
Limit: The passphrase must be contain at least:
Note: If the passphrase contains spaces, enclose it in quotes (").
(Optional) Sets verbosity level to TRACE.
(Optional) Sets verbosity level to INFO.
(Optional) Sets verbosity level to WARNING (default).
(Optional) Sets verbosity level to ERROR.
(Optional) Sets verbosity level to FATAL.
(Optional) Outputs log to the specified path.
(Optional) Specifies the file to which errors and exceptions are logged. If omitted, stderr is used.
XPSExport exports the policy store data and places the data file in the directory from which you ran the tool.
XPSImport input_file -pass <passphrase> -vT -vI -vW -vE -vF -l log_path
Specifies the input XML file.
Specifies the passphrase required for the decryption of sensitive data.
Limit: The phrase must match the phrase you specified during export or the decryption fails.
(Optional) Sets verbosity level to TRACE.
(Optional) Sets verbosity level to INFO.
(Optional) Sets verbosity level to WARNING (default).
(Optional) Sets verbosity level to ERROR.
(Optional) Sets verbosity level to FATAL.
(Optional) Outputs log to the specified path.
(Optional) Specifies the file to which errors and exceptions are logged. If omitted, stderr is used.
XPSImport imports the data into the policy store. Sensitive data is encrypted using FIPS-compliant algorithms.
If your environment users Basic Password Services, you may now verify that the Password Blobs are re-encrypted using FIPS-approved algorithms.
You verify that the Policy Server has re-encrypted every Password Blob in the user store to prevent users from losing their password history and being locked out by Password Services.
When you configured the user store connection for password policies, you specified the Password Data user profile attribute. This value represents where Password Blobs are stored in the user store and is the value you use to identify Password Blobs that are not re-encrypted.
To verify that Password Blobs are re-encrypted
{AES}
Example: If "audio" is the value you specified in the Password Data field when configuring the user store connection, search for all entries stored in "audio" that are not prefixed with {AES}.
Note: How the password policy is configured determines when the Policy Server re-encrypts the Password Blob:
Important! Password Services locks out users whose Password Blobs are not re-encrypted when the Policy Server is operating in FIPS-only mode. A user cannot regain access until you have deleted the Password Blob and cleared any disabled flags. Deleting the Password Blob results in the loss of the user's password history.
The following diagram illustrates a sample 12.52 environment operating in FIPS-migration mode and lists the order in which you configure each component and connection to operate in FIPS-only mode.
The shaded components represent sensitive data that must be re-encrypted using FIPS-approved algorithms. Do not continue with the migration process until you have:
Important! Password Services locks out users whose Password Blobs are not re-encrypted when the Policy Server is operating in FIPS-only mode. A user cannot regain access until you have deleted the Password Blob and cleared any disabled flags. Deleting the Password Blob results in the loss of the user's password history.
Complete the following procedures to be sure that your environment only encrypts sensitive data using FIPs–compliant algorithms:
The process you follow to re–register an Administrative UI depends on how it is authenticating CA SiteMinder® administrators.
Note: Repeat this step until all Administrative UI connections are re–registered.
Note: Repeat this step until all Report Server connections are re–registered.
You set an Agent to FIPS-only mode to ensure that the Agent only accepts session keys, Agent Keys, and shared secrets that are encrypted using FIPS-compliant algorithms.
To set an Agent to FIPS-only mode
The following line appears in the file:
fipsmode="MIGRATE"
fipsmode="ONLY"
The agent is operating in FIPS-migration mode.
You may now set Policy Servers to operate in FIPS-only mode.
Setting the Policy Server to FIPS–only mode configures the Policy Server to read and write encrypted information using FIPS–compliant algorithms only.
Important! Password Services locks out users whose Password Blobs are not re-encrypted when the Policy Server is operating in FIPS-only mode. A user cannot regain access until you have deleted the Password Blob and cleared any disabled flags. Deleting the Password Blob results in the loss of the user's password history.
Note: For more information about identifying Password Blobs that are not re–encrypted, see Verify that Password Blobs are Re-encrypted.
Follow these steps:
setFIPSonly
ONLY appears in the command window.
Note: For more information about stopping and starting the Policy Server, see the Policy Server Administration Guide.
./ca_ps_env.ksh
Policy Server employing only FIPS-140 cryptographic algorithms.
The Policy Server is set to operate in FIPS-only mode.
You can now re–register each Administrative UI with its respective Policy Server.
Existing CA SiteMinder® algorithms continue to encrypt the shared secret that the Administrative UI and the Policy Server use to establish an encrypted connection. Re–registering the Administrative UI creates a new shared secret that is encrypted using FIPS–compliant algorithms.
Complete the following procedures to re–register an Administrative UI configured for internal authentication:
To stop the application server
Note: For more information about stopping the application server, see the Policy Server Installation Guide.
Delete the Administrative UI data directory to remove the existing trusted connection between the Administrative UI and the Policy Server.
To delete the Administrative UI data directory
data
administrative_ui_home
Specifies the Administrative UI installation path.
JBoss_home
Specifies the JBoss installation path.
The data folder contains the apacheds, derby, and siteminder folders.
data
WebLogic_domain_folder
Specifies the path to the WebLogic domain created for the Administrative UI.
data
WebSphere_home
Specifies the full path of the WebSphere installation.
profile
Specifies the name of the profile used for the Administrative UI.
The Administrative UI data dictionary is deleted.
Reset the registration window to submit the credentials of any super user in the policy store. The Policy Server uses these credentials to verify that the registration request is valid and that the relationship between the Administrative UI and the Policy Server can be trusted.
To reset the Administrative UI registration window
XPSRegClient siteminder_administrator[:passphrase] -adminui-setup -t timeout -r retries -c comment -cp -l
log_path -e error_path -vT -vI -vW -vE -vF
Specifies a CA SiteMinder® administrator with super user permissions.
Note: If a super user account is not available, use the smreg utility to create the default CA SiteMinder® account.
Specifies the password for the CA SiteMinder® administrator account.
Note: If you do not specify the passphrase, XPSRegClient prompts you to enter and confirm it.
Specifies that the Administrative UI is being re–registered with a Policy Server.
(Optional) Specifies the allotted time from when you to install the Administrative UI to the time you log in and create a trusted relationship with a Policy Server. The Policy Server denies the registration request when the timeout value is exceeded.
Unit of measurement: minutes
Default: 240 (4 hours)
Minimum limit: 1
Maximum limit: 1440 (24 hours)
(Optional) Specifies how many failed attempts are allowed when you are registering the Administrative UI. A failed attempt can result from submitting incorrect CA SiteMinder® administrator credentials when logging into the Administrative UI to complete the registration process.
Default: 1
Maximum limit: 5
(Optional) Inserts the specified comments into the registration log file for informational purposes.
Note: Surround comments with quotes.
(Optional) Specifies that registration log file can contain multiple lines of comments. The utility prompts for multiple lines of comments and inserts the specified comments into the registration log file for informational purposes.
Note: Surround comments with quotes.
(Optional) Specifies where the registration log file must be exported.
Default: siteminder_home\log
siteminder_home
Specifies the Policy Server installation path.
(Optional) Sends exceptions to the specified path.
Default: stderr
(Optional) Sets the verbosity level to TRACE.
(Optional) Sets the verbosity level to INFO.
(Optional) Sets the verbosity level to WARNING.
(Optional) Sets the verbosity level to ERROR.
(Optional) Sets the verbosity level to FATAL.
XPSRegClient supplies the Policy Server with the administrator credentials. The Policy Server uses these credentials to verify the registration request when you log into the Administrative UI.
To start the application server
Note: For more information about starting the application server, see the Policy Server Installation Guide.
Register the Administrative UI to create a new shared secret that is encrypted using FIPS–compliant algorithms.
Note: For more information about registering the Administrative UI, see the Policy Server Installation Guide.
Existing CA SiteMinder® algorithms continue to encrypt the shared secret that the Administrative UI and the Policy Server use to establish an encrypted connection. Re–registering the Administrative UI creates a new shared secret that is encrypted using FIPS–compliant algorithms.
Complete the following procedures to re–register an Administrative UI configured for external authentication:
You delete the Administrative UI connection to the Policy Server so that you can re–register the connection.
To delete the Administrative UI connection to the Policy Server
A list of connection types appears.
The Delete Policy Server Connection pane appears.
Connections matching your criteria appear.
You are prompted to confirm the request.
The connection between the Administrative UI and the Policy Server is deleted.
You run the Administrative UI registration tool to create a client name and passphrase. A client name and passphrase pairing are values that the Policy Server uses to identify the Administrative UI you are registering. You submit the client and passphrase values from the Administrative UI to complete the registration process.
To run the registration tool
XPSRegClient client_name[:passphrase] -adminui -t timeout -r retries -c comment -cp -l log_path -e error_path
-vT -vI -vW -vE -vF
Note: Inserting a space between client_name and [:passphrase] results in an error.
Identifies the Administrative UI being registered.
Limit: This value must be unique. For example, if you have previously used smui1 to register an Administrative UI, enter smui2.
Note: Record this value. This value is to complete the registration process from the Administrative UI.
Specifies the password required to complete the registration of the Administrative UI.
Limits:
Note: If you do not specify the passphrase in this step, XPSRegClient prompts you to enter and confirm one.
Important! Record the passphrase, so that you can refer to it later.
Specifies that an Administrative UI is being registered.
(Optional) Specifies how long you have to complete the registration process from the Administrative UI. The Policy Server denies the registration request when the timeout value is reached.
Unit of measurement: minutes
Default: 240 (four hours)
Minimum Limit: 1
Maximum Limit: 1440 (one day)
(Optional) Specifies how many failed attempts are allowed when you complete the registration process from the Administrative UI. A failed attempt can result from an incorrect client name or passphrase submitted to the Policy Server during the registration process.
Default: 1
Maximum Limit: 5
(Optional) Inserts the specified comments into the registration log file for informational purposes.
Note: Surround comments with quotes.
(Optional) Specifies that registration log file can contain multiple lines of comments. The registration tool prompts for multiple lines of comments and inserts the specified comments into the registration log file for informational purposes.
Note: Surround comments with quotes.
(Optional) Specifies where to export the registration log file.
Default: siteminder_home\log
siteminder_home
Specifies the Policy Server installation path.
(Optional) Sends exceptions to the specified path.
Default: stderr
(Optional) Sets the verbosity level to TRACE.
(Optional) Sets the verbosity level to INFO.
(Optional) Sets the verbosity level to WARNING.
(Optional) Sets the verbosity level to ERROR.
(Optional) Sets the verbosity level to FATAL.
The registration tool lists the name of the registration log file and prompts for a passphrase.
The registration tool creates the client name and passphrase pairing.
You can now register the Administrative UI with a Policy Server. You complete the registration process from the Administrative UI.
The Administrative UI requires specific information about the Policy Server and the client name and passphrase you created to complete the registration process. Gather the following information before logging into the Administrative UI:
Default: 44442
Note: A worksheet is provided to help you gather and record information before registering the Administrative UI.
You configure the Administrative UI and Policy Server connection so CA SiteMinder® administrators can use the Administrative UI to manage policy information through the Policy Server. You configure the connection from the Administrative UI.
To configure the Administrative UI and Policy Server connection
http://host.domain/iam/siteminder/adminui
The Administrative UI login screen appears.
The Register Policy Server Connection pane opens.
Note: Click Help for descriptions of settings and controls, including their respective requirements and limits.
Note: This value must match the value in the Authentication port (TCP) field on the Settings tab in the Policy Server Management Console. The default authentication port is 44442.
The connection between the Administrative UI and Policy Server is configured. The shared secret the Administrative UI and Policy Server use to establish an encrypted connection is encrypted using FIPS-approved algorithms.
You have completed the process for re–registering the Administrative UI.
Re–registering the Administrative UI with a Policy Server creates a new trusted host. You delete the previous trusted host as it is no longer needed.
To delete the trusted host connection
The Delete Trusted Host pane appears.
Note: A trusted host that is created as a result of the Administrative UI registration process has the following description: Generated by XPSRegClient.
The Administrative UI prompts you to verify the selection.
Important! Be sure that you delete the trusted host that was created the last time you registered the Administrative UI and not the new trusted host.
The trusted host connection is deleted.
Re-registering the Report Server ensures that the connection between the Report Server and the Policy server is encrypted using FIPS-approved algorithms.
Complete the following steps to re-register a report server:
You run the XPSRegClient utility to create a client name and passphrase. A client name and passphrase are:
To run the registration tool
Specifies the Policy Server installation path.
XPSRegClient client_name[:passphrase] -report -t timeout -r retries
-c comment -cp -l log_path -e error_path -vT -vI -vW -vE -vF
Identifies the name of Report Server you are registering.
Limit: The value must be unique. For example, if you have previously used reportserver1, enter reportserver2.
Note: Record this value. This value is required to complete registration process from the Report Server host system.
Specifies the password required to complete the Report Server registration.
Limits: The passphrase
If you do not specify the passphrase in this step, XPSRegClient prompts you to enter and confirm it.
Note: Record this value. This value is required to complete registration process from the Report Server host system.
Specifies that a Report Server is being registered.
(Optional) Specifies how long you have to complete the registration process from the Report Server host system. The Policy Server denies the registration request when the timeout value is reached.
Unit of measurement: minutes
Default: 240 (4 hours)
Minimum Limit: 1
Maximum Limit: 1440 (one day)
(Optional) Specifies how many failed attempts are allowed when you complete the registration process from the Report Server host system. A failed attempt can result from submitting an incorrect passphrase to the Policy Server during the registration.
Default: 1
Maximum Limit: 5
(Optional) Inserts the specified comments into the registration log file for informational purposes.
Note: Surround comments with quotes.
(Optional) Specifies that registration log file can contain multiple lines of comments. The registration tool prompts for multiple lines of comments and inserts the specified comments into the registration log file for informational purposes.
Note: Surround comment with quotes.
(Optional) Specifies where the registration log file must be exported.
Default: siteminder_home\log, where siteminder_home is where the Policy Server is installed.
(Optional) Sends exceptions to the specified path.
Default: stderr
(Optional) Sets the verbosity level to TRACE.
(Optional) Sets the verbosity level to INFO.
(Optional) Sets the verbosity level to WARNING.
(Optional) Sets the verbosity level to ERROR.
(Optional) Sets the verbosity level to FATAL.
The utility lists the name of the registration log file. If you did not provide a passphrase, the utility prompts for one.
The registration tool creates the client name and passphrase.
You can now register the Report Server with the Policy Server. You complete the registration process from the Report Server host system.
Completing the registration process between the Report Server and the Policy Server requires specific information. Gather the following information before running the XPSRegClient utility from the Report Server host system.
You register the Report Server with the Policy Server to create a trusted relationship between both components. You configure the connection from the Report Server host system using the Report Server registration tool.
To configure the connection to the Policy Server
Specifies the Report Server installation location.
Default: (Windows) C:\Program Files\CA\SC\CommonReporting3
Default: (UNIX) /opt/CA/SharedComponents/CommonReporting3
regreportserver.bat -pshost host_name -client client_name -passphrase passphrase
-psport portnum -fipsmode 0|1
Important! Before running a CA SiteMinder® utility or executable on Windows Server 2008, open the command line window with administrator permissions. Open the command line window this way, even if your account has administrator privileges.
regreportserver.sh -pshost host_name -client client_name -passphrase passphrase
-psport portnum -fipsmode 0|1
Specifies the IP address or name of the Policy Server host system to which you are registering the Report Server.
Specifies the client name. The client name identifies the Report Server that you are registering.
Note: This value must match the client name that you specified using the XPSRegClient utility when you registered the Report Server on the Policy Server host system.
Example: If you specified "reportserver1" when using the XPSRegClient utility, enter "reportserver1".
Specifies the passphrase that is paired with the client name. The client name identifies the Report Server that you are registering.
Note: This value must match the passphrase that you specified using the XPSRegClient utility when you registered the Report Server on the Policy Server host system.
Example: If you specified CA SiteMinder® when using the XPSRegClient utility, enter CA SiteMinder®.
(optional) Specifies the port on which the Policy Server is listening for the registration request.
Specifies how the communication between the Report Server and the Policy Server is encrypted.
Default: 0
You receive a message stating that the registration is successful. You have completed re–registering the Report Server with the Policy Server. The connection between the Report Server and the Policy Server is encrypted using FIPS-compliant algorithms.
|
Copyright © 2013 CA.
All rights reserved.
|
|