

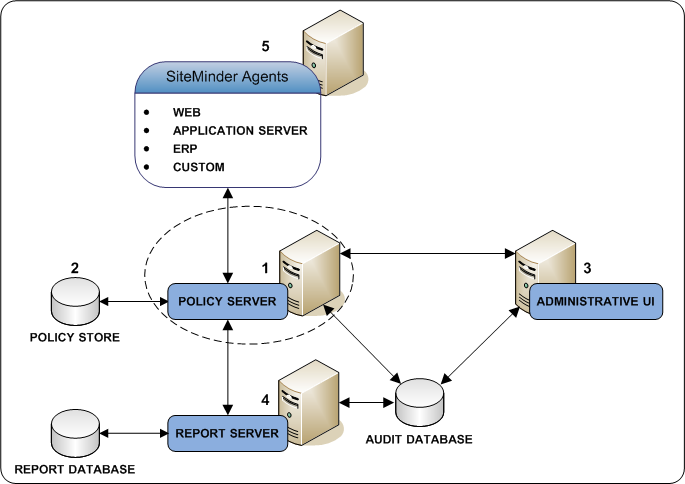
The following diagram illustrates a sample CA SiteMinder® installation and lists the order in which you install and configure each component. Consider the following items:
Consider the following items before installing the Policy Server:
Note: We recommend trimming the pre–CA SiteMinder® system path to approximately 700 characters for best results.
These ports are the default Policy Server accounting, authentication, and authorization ports. If you change these ports after installing the Policy Server, be sure to allow inbound connections to the respective ports.
Note: For more information, see the Microsoft documentation.
To install the Policy Server complete the following procedures:
In addition to the Policy Server, the installer can install and configure the following components. Review the following items before installing the Policy Server:
The OneView Monitor enables the monitoring of CA SiteMinder® components.
Note: A supported Java SDK and ServletExec/AS is required to configure the OneView Monitor.
Note: The key store and the certificate data store are automatically configured and collocated with the policy store.
Be sure that you have an SNMP Service (Master OS Agent) installed with your Windows operating system before installing the Policy Server.
Note: For more information about installing the SNMP Service, see the Windows online help system.
You can store audit logs in either a relational database or a text file. After you install the Policy Server, audit logging is set to a text file and not to ODBC by default.
Note: For a list of supported CA and third-party components, refer to the CA SiteMinder® 12.52 Platform Support Matrix on the Technical Support site.
Consider the following items before running the Policy Server installer or the Policy Server Configuration wizard:
Note: Be sure that you have met the prerequisites for configuring AD LDS as a policy store.
Important! The Policy Server installer and the Policy Server Configuration wizard cannot automatically configure a policy store that is being connected to using an SSL connection.
The Policy Server uses certified Federal Information Processing Standard (FIPS) 140-2 compliant cryptographic libraries. FIPS is a US government computer security standard that is used to accredit cryptographic modules that meet the Advanced Encryption Standard (AES). The libraries provide a FIPS mode of operation when a CA SiteMinder® environment only uses FIPS-compliant algorithms to encrypt sensitive data.
You can install the Policy Server in one of the following FIPS modes of operation.
Note: The FIPS mode a Policy Server operates in is system-specific. For more information, see the CA SiteMinder® 12.52 Platform Support Matrix on the Technical Support site.
In FIPS-migration mode, the 12.52 Policy Server continues to use existing CA SiteMinder® encryption algorithms as you migrate the 12.52 environment to use only FIPS-compliant algorithms.
Install the Policy Server in FIPS-migration mode if you are in the process of configuring the existing environment to use only FIPS-compliant algorithms.
Install the Policy Server in FIPS-only mode if the existing environment is upgraded to 12.52 and the existing environment is configured to use only FIPS-compliant algorithms.
Important! A 12.52 environment that is running in FIPS-only mode cannot operate with versions of CA SiteMinder® that do not also fully support FIPS (that is, versions before r12.0). This restriction applies to all agents, custom software using older versions of the Agent API, and custom software using PM APIs or any other API that the Policy Server exposes. Relink all such software with the 12.52 versions of the respective SDKs to achieve the required FIPS support.
Note: For more information about migrating an environment to use only FIPS-compliant algorithms, see the Upgrade Guide.
The Policy Server installer requires specific information to install the Policy Server and any optional components.
Note: Installation worksheets are provided to help you gather and record information prior to installing or configuring Policy Server components using the Policy Server Installation Wizard or the Policy Server Configuration Wizard. You may want to print these worksheets and use them to record required information prior to running either wizard.
Gather the following required information before running the Policy Server installer or the Configuration wizard. You can use the Required Information Worksheet to record your values.
Default: C:\Program Files\CA
Limits: 6 to 24 characters.
Gather the following required information to configure Microsoft Active Directory LDS as a policy store:
Example: dc=ca,dc=com
Example: CN=user1,CN=people,CN=Configuration,CN=guid
Note: This user must have the necessary permissions to modify attributes and change passwords.
siteminder
Limits:
Note: We recommend that you do not use the default superuser for day-to-day operations. Rather, use the default superuser to access the Administrative UI for the first–time and then create an administrator with superuser permissions.
Gather the following required information to configure Oracle Directory Server to function as a policy store:
Default: 389
Example: o=yourorg.com
Example: cn=Directory Manager
Note: This user must have the necessary permissions to modify attributes and change passwords.
siteminder
Limits:
Note: We recommend that you do not use the default superuser for day-to-day operations. Rather, use the default superuser to access the Administrative UI for the first–time and then create an administrator with superuser permissions.
To configure Microsoft SQL Server as a policy store, gather the following required information:
Identify the IP address or name of the database host system.
Note: For more information about IPv6 support, see the CA SiteMinder® Platform Support Matrix.
Identify the named instance or the name of the database that is to function as the policy store.
Identify the port on which the database is listening.
Identify the name and password of an administrator account with permission to do the following operations:
Note: If the CA SiteMinder® schema is already present in the database, the wizard does not require the credentials of a database administrator with create permission. For more information, see Configure a SQL Server Policy Store.
The default CA SiteMinder® superuser account has maximum permissions. Determine the password for the default superuser account. The name of the default account is:
siteminder
Limits:
Note: We recommend that you do not use the default superuser for day-to-day operations. Rather, use the default superuser to access the Administrative UI for the first–time and then create an administrator with superuser permissions.
Gather the following required information to configure Oracle RDBMS as a policy store.
Identify the IP address or the name of the database host system.
Note: For more information about IPv6 support, see the CA SiteMinder® Platform Support Matrix.
Identify the service name of the database that is to function as the policy store.
Identify the port on which the database is listening.
Identify the name of an administrator account with permission to do the following operations:
Identify the password of the administrator account.
The default CA SiteMinder® superuser account has maximum permissions. Determine the password for the default superuser account. The name of the default account is:
siteminder
Limits:
Note: We recommend that you do not use the default superuser for day-to-day operations. Rather, use the default superuser to access the Administrative UI for the first–time and then create an administrator with superuser permissions.
You only have to gather OneView Monitor information if you plan on configuring the OneView Monitor.
Gather the following required information to configure the OneView Monitor. You can use the OneView Monitor Information Worksheet to record your values.
Example: /usr/local/NewAtlanta/ServletExecAS
Example: /sunjavasystem_home/location
Specifies the installed location of the Sun Java System.
Specifies the installed location of the Sun Java System Web servers.
You install the Policy Server using the installation media on the Technical Support site.
Note: For a list of installation media names, see the Policy Server Release Notes.
Follow these steps:
Specifies the name of the Policy Server installation executable.
The installer starts.
siteminder
Example: [2001:db8::1428:57ab]
The Policy Server and all selected components are installed and configured.
Note: If you experience problems during the installation, you can locate the installation log file and the policy store details file in siteminder_home\siteminder\install_config_info.
Specifies the Policy Server installation path.
Use the following files to troubleshoot the Policy Server installation:
The installation log contains a summary section that lists the number of successes, warnings, non–fatal errors, and errors that occurred during the installation. Individual installation actions are listed with the respective status.
Specifies the Policy Server release.
Location: siteminder_home\siteminder\install_config_info
The policy store log details the policy store status.
Location: siteminder_home\siteminder\install_config_info
The smps.log is created when you start the Policy Server. This log contains the following line if the Policy Server installed successfully:
[Info] Journaling thread started, will delete commands older than 60 minutes.
Location: siteminder_home\siteminder\log
Specifies the Policy Server installation path.
This is an optional step. You only have to enable SNMP trapping if you configured this feature when installing the Policy Server.
Note: Before completing this procedure, ensure you have an SNMP Service installed on the Windows systems.
To enable SNMP event trapping, use the XPSConfig utility to set the event handler library (eventsnmp.dll) to the XPSAudit list. The default location of eventsnmp.dll is policy_server_home\bin.
Specifies the Policy Server installation location.
Note: More information on using the XPSConfig utility to set event handler libraries exists in the Policy Server Administration Guide.
To finish configuring SNMP event trapping, configure the snmptrap.conf file. The necessary SNMP prerequisites and procedures are detailed in SNMP Support.
If you did not use the Policy Server installer to configure a policy store automatically, manually configure a supported LDAP directory server or relational database as a policy store.
After the Policy Server is manually installed on one machine, you can reinstall it or install it on a separate machine using an unattended installation mode. An unattended installation lets you install or uninstall the Policy Server without any user interaction.
The installer provides a ca-ps-installer.properties template file that lets you define installation variables. The default parameters, passwords, and paths in this file reflect the information you entered during the initial Policy Server installation. In this file, you can either store encrypted or plain text passwords. If you are using encrypted passwords, for example, a shared secret and CA SiteMinder® Super User, you must use the same ones that you entered during the initial installation since they are encrypted in the file and cannot be modified. However, you can use plain text passwords by modifying the file.
|
Copyright © 2013 CA.
All rights reserved.
|
|