

This section contains the following topics:
A rule group is a set of rules that can be bound to CA SiteMinder® policies. You can use a rule group to combine groups of rules you will be applying to the same policy. For example, if you have a number of rules that allow a GET action for different resources of a Web site, you could then create a rule group that contains all of the resources. When you configure the policy that will include the rules, you can add a single rule group to the policy, rather than add all of the rules individually.
When you include a rule group in a policy, each rule in the group is evaluated and applied independently of other rules in the group.
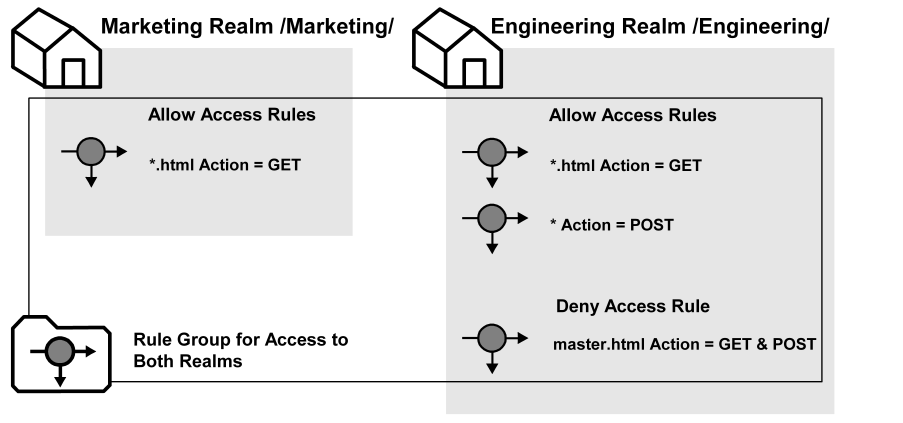
The previous diagram illustrates a rule group that contains rules for both the Marketing realm and the Engineering realm. The rule group can be used in a policy rather than including all four rules separately.
You can create a rule group and add it to a domain.
Note: The following procedure assumes that you are creating an object. You can also copy the properties of an existing object to create an object.
To create a rule group
The Rule Groups page appears.
The Create Rule Group page appears. Verify that the Create a new object of type Rule Group option is selected
The Create Rule Group: Select Domain page appears.
The Create Rule Group: Define Rule Group page appears.
The Rule Group Members page appears.
The Available Members column lists all rules that are defined in the specified domain and in the realms associated with the specified Agent type. When the Agent type is Generic RADIUS, the Available Members column lists all rules that the RADIUS Agents support.
The rules are removed from the list of Available Members and added to the list of Selected Members.
To select more than one member at one time, hold down the Ctrl key while you click the additional members. To select a block of members, click the first member and then hold down the Shift key while you click the last member in the block.
The selected rules are listed under Group Members.
The Rule Group is created.
You can add rules to a rule group in the same domain and of the same Agent type.
To add rules to a rule group
The Rule Groups page appears.
A list of rule groups that match the search criteria appears.
The View Rule Group page appears.
The settings and controls become active.
The Rule Group Members page appears.
Note: The Available Members column lists all rules that are defined in the specified domain and in the realms associated with the specified Agent type. When the Agent type is Generic RADIUS, the Available Members column lists all rules that the RADIUS Agents support.
The rules are removed from the list of Available Members and added to the list of Selected Members.
Note: To select more than one member at one time, hold down the Ctrl key while you click the additional members. To select a block of members, click the first member and then hold down the Shift key while you click the last member in the block.
The selected rules are listed under Group Members.
The selected rules are added to the rule group.
You can modify all of the properties of a rule group, except the Agent Type for CA SiteMinder® Agents and the vendor type for RADIUS Agents. To change the Agent type or vendor type, delete the rule group and create a new one.
Note: More information about modifying and deleting Policy Server objects exists in Manage Policy Server Objects.
Deleting a rule group only deletes the grouping. The rules contained in the grouping are not deleted.
Note: More information about modifying and deleting Policy Server objects exists in Manage Policy Server Objects.
|
Copyright © 2013 CA.
All rights reserved.
|
|