

This section contains the following topics:
Use the Policy Server as a Radius Server
The RADIUS Client/Server Architecture
How RADIUS Authentication Works with the Policy Server
Policies in RADIUS Environments
Responses in RADIUS Policy Domains
Deploy SiteMinder in a RADIUS Environment
Guidelines for Protecting RADIUS Devices
How to Authenticate Users in a Homogeneous RADIUS Environment
Authenticate Users in Heterogeneous RADIUS Environments with One User Directory
How to Authenticate Users in Heterogeneous RADIUS Environments with Two User Directories
Remote Authentication Dial-In User Service (RADIUS) is a protocol that enables you to exchange session authentication and configuration information between a Network Access Server (NAS) device and a RADIUS authentication server. You can use the Policy Server as the RADIUS authentication server.
The RADIUS protocol is often used by NAS devices that serve as:
RADIUS is designed to simplify security by separating the communication technology provided by a NAS device from the security technology provided by the authentication server. RADIUS security protects remote access to networks and network services using a distributed client/server architecture. The Policy Server is the RADIUS server. The RADIUS client is the NAS device.
A NAS device performs one of the following:
The Policy Server can serve as the RADIUS authentication server when configured as described in this chapter. As the RADIUS server, the Policy Server authenticates RADIUS users using a RADIUS authentication scheme and a pre-defined user directory.
Note: To use RADIUS accounting, you must configure a separate RADIUS accounting server. The Policy Server will satisfy the NAS device by sending the ACK response to the accounting server. However, you can log accounting information to files.
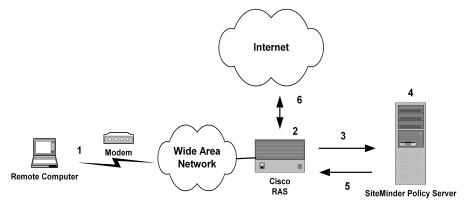
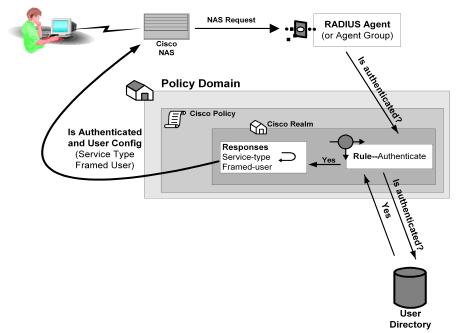
The Policy Server authenticates users through a series of communications with the NAS device. When CA SiteMinder® authenticates a user, the NAS provides that user with access to the appropriate network services.
This authentication process is depicted in the following graphic:
PAP is a PPP authentication protocol that provides a simple method for a host to establish its identity in a two-way handshake. Authentication takes place only upon initial link establishment and does not use encryption.
CHAP is also a secure PPP authentication protocol. CHAP provides a way to periodically verify the identity of a host using a three-way handshake and encryption. Authentication takes place upon initial link establishment. The RAS can repeat the authentication process any time after the connection takes place.
The RAS notifies the Policy Server that the session has begun and when the session ends.
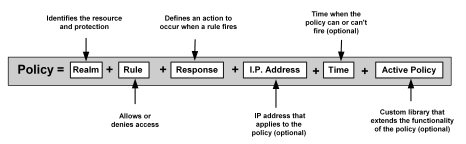
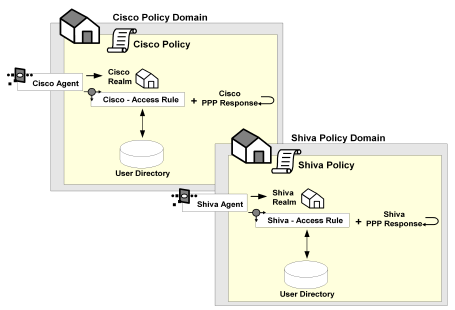
A CA SiteMinder® RADIUS policy is enforced by a RADIUS Agent and is created by binding the following elements together:
The basic structure of a policy is shown in the following diagram.
Although RADIUS policies are composed of the same elements that are contained in policies used by CA SiteMinder® Agents, RADIUS Agents interpret the components differently. Rules, realms, and responses perform different functions, as shown in the following table.
|
Policy Component |
In a RADIUS Policy, this item: |
In a CA SiteMinder® Agent Policy, this item: |
|---|---|---|
|
Realm |
|
|
|
Rule |
|
|
|
Response |
|
|
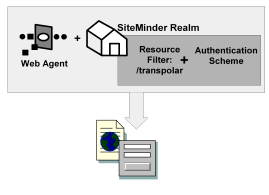
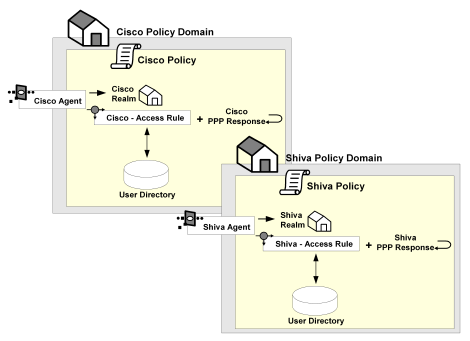
The elements of a RADIUS policy are treated differently in part because of how resources are identified in a RADIUS environment. In a CA SiteMinder® Agent environment, specific resources are identified using a resource filter in the definition of the realm. The resource filter identifies the directory location of the resources. The realm definition also identifies the Web Agent and the authentication scheme, as shown in the following diagram:
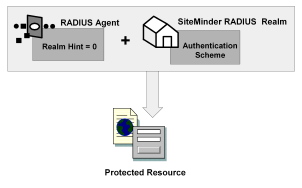
As shown in the following diagram, protected resources are located differently in a RADIUS environment. Instead of the realm identifying the resource using a filter, the RADIUS Agent identifies the resource using a realm hint. A realm hint is an attribute that enables the Policy Server to establish the domain in which to authenticate users. The realm hint either identifies a specific realm that the Agent protects or signifies that the Agent must protect the entire NAS device.
How does a RADIUS Agent protect a NAS device that must authenticate users in different domains, such as domainA and domainB? A realm hint is a RADIUS attribute that enables CA SiteMinder® to determine the correct domain in which to authenticate a user. You must provide a RADIUS Agent with one of the following realm hint values:
When the realm hint is set to 1, the realm name is parsed from the user name attribute. The user_name-realm separator must be “@” or “/”.
The following diagram and explanation shows how a proxy server determines the correct CA SiteMinder® domain in which to authenticate a user.
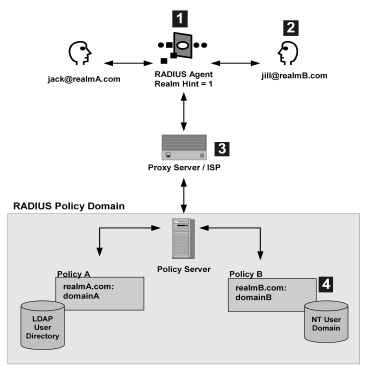
Example: jill@realmB.com, where jill is the user_name and realmB.com is the realm_name.
The Policy Server identifies the domain associated with the realm_name. The domain associated with realmB.com is domainB.
CA SiteMinder® responses can be used to return RADIUS attributes to the NAS device if the user is authenticated. Attributes configure the characteristics of the session once the user is authenticated and define the user profile of the authenticated user. The user profile can be used by the NAS device. For example, using attributes in a response, you can define time limits for the RADIUS user session.
Using responses, you can provide the NAS device with user profile information that assigns privileges to the user. For example, you could allow one user unlimited access to a resource, yet limit another user’s access to the same resource. Used in this way, responses give you the ability to authorize users even though RADIUS is primarily only a mechanism for authentication.
Note: If the NAS specifies authentication only, by default, CA SiteMinder® does not return RADIUS attributes. To return RADIUS attributes when the NAS specifies authentication only, follow the instructions in Configure SiteMinder to Always Return RADIUS Attributes.
RADIUS responses are paired with rules that authenticate. If a rule authenticates a user successfully, the RADIUS response is triggered. If the rule does not authenticate the user, the response is not triggered.
If a response is triggered, the Policy Server sends the attributes contained in the response to the NAS device. This information is used to customize the user’s session, as shown in the following diagram:
You can use the following attributes in responses:
These attributes return information associated with a user in an LDAP, WinNT, or ODBC user directory. User attributes are retrieved from the user directory and can used to modify the behavior of the RADIUS device.
These attributes return profile information associated with an LDAP directory object related to the user. For example, the DN attribute could return information about LDAP objects such as the user’s group or organizational unit (OU).
These attributes return values from a custom library that was developed using the CA SiteMinder® Authorization API. An active response is generated when CA SiteMinder® invokes a function in the custom library.
These attributes return values defined by the following Agent type attributes:
Generic RADIUS attributes, as defined by the RADIUS Protocol specification, Request for Comment (RFC) 2138. The identifiers for these attributes include 1-25 and 27-63. Some of these attributes may be used multiple times in the same response.
Any RADIUS Agent type can return a response that includes generic RADIUS attributes.
Attributes defined in the Dictionary file of the NAS device. These attributes define values that are not defined by generic RADIUS attributes and are specific to the type of NAS device in use. The unique identifiers for these attributes extend beyond the range reserved for generic RADIUS attributes, starting with 64. For example, Lucent provides an extended RADIUS attribute called Ascend-Disconnect-Cause, which uses the identifier 195.
Only Agent types that match the vendor type of the extended RADIUS attribute can use the attribute. For example, a Shiva Agent type can use the extended RADIUS attributes defined for Shiva, but a Cisco Agent type cannot use Shiva extended attributes in a response. The extended attributes that are used in a response must match the attributes defined in the Dictionary file of the RADIUS client.
By default, CA SiteMinder® provides pre-defined RADIUS extended attributes for some Agent Types that use these attributes, such as Ascend (Lucent). You can also define additional RADIUS extended attributes for any of the RADIUS Agent types, if necessary.
Attributes defined in the Dictionary file of the NAS device, which use 26 as an identifier. Vendor-specific attributes enable you to define attributes for values that are not provided by the generic RADIUS attributes. Some vendors use vendor-specific attributes in place of or in addition to RADIUS extended attributes. For example, Cisco does not use RADIUS Extended attributes; however, this NAS device supports several vendor-specific attributes, such as Cisco AV–pair and Account-Info.
You can use vendor-specific attributes to pass information to other protocols. For example, you can define a vendor specific attribute for the Cisco AV–pair attribute to pass TACACS+ information to a TACACS+ server.
Vendor-specific attributes can only be defined in responses that match the vendor type of the RADIUS client.
By default, CA SiteMinder® provides pre-defined vendor-specific attributes for some Agent Types that use these attributes, such as the Network Associates' Sniffer Agent type. You can also define additional RADIUS extended attributes to any of the RADIUS Agent types, if necessary.
Note: For more information about RADIUS attributes, see Request for Comment (RFC) RADIUS Protocol 2138.
Some NAS devices always expect RADIUS responses in the Access-Accept, even if the NAS specifies authentication only. If the NAS specifies authentication only, by default, CA SiteMinder® does not return RADIUS attributes.
To always return RADIUS attributes to a NAS device, create a new registry value with the following parameters:
Note: The install program does not create a registry entry for AlwaysReturnRadiusAttrs. Until you create and set the entry, CA SiteMinder® uses the default value of 0.
After you set AlwaysReturnRadiusAttrs to a value greater than zero, the following message will appear in the Authentication Server’s debug log:
Radius Attributes will be returned regardless of RA_SERVICE_TYPE_AUTHENTICATE_ONLY
Before you can use an attribute in a response, the attribute must be made available to the Agent type returning the response. Attributes are made available to Agent types by defining the attributes in Agent types. Although many Agent types are pre-configured with vendor-specific and RADIUS extended attributes, you can add additional extended RADIUS, generic RADIUS, and vendor-specific attributes to Agent types, as needed.
You can define multiple instances of a vendor-specific attribute for the same Agent type. When you define multiple instances of a vendor-specific attribute, you can send a different value to the NAS device for each instance of the attribute. For example, for a Cisco Agent, you can define the following vendor-specific attributes, all using the same identifier (26):
The settings that define the number of times an attribute can be used within a response are located on the Modify Agent Type Attribute page of the Administrative UI.
To configure the attribute to be used multiple times, the Access Accept value must be set to Zero or Many.
The type of attribute that you define must match the vendor type of the Agent returning the response. For example, a vendor-specific Cisco attribute can only be returned by a Cisco Agent.
When the response is returned by the Agent, the packet structure of the response reflects the type of RADIUS Agent that sent the response. For example, the packet structure of a response returned by a Cisco Agent would include the vendor ID and the length of the string.
To define an attribute for an Agent type
The Agent Types page appears.
A list of Agent types that match the search criteria appears.
The View Agent Type page appears.
The settings and controls become active.
Verify that Create a new object of type Agent Type Attribute option is selected.
The Create Agent Type Attribute page appears.
The attribute identifier is defined in the RADIUS protocol specification. Although it is possible to overwrite the identifier of a Generic RADIUS attribute, you should generally retain the pre-defined Generic RADIUS attribute definitions, which match the RADIUS specification (RFC 2138).
Example: To create an attribute for the Callback-Id variable, type 20 in the Identifier field.
The attribute identifier is defined in the vendor documentation.
Example: To create an attribute for the Ascend-Callback attribute, type 246 in the Identifier field.
The attribute identifier is 26.
Example: To create an attribute for a Cisco Agent that enables the Agent to use TACACS+, type 26 in the Identifier field.
Note: For more information about attribute identifiers, see your RADIUS vendor documentation.
Attribute cannot be used in a response.
One instance or no instances of the attribute can be returned in the same response. If this value is selected, and you use the attribute in a response, the attribute will be removed from the Attribute list after you have used the attribute in a response.
Multiple instances or no instances of the attribute can be returned in the same response.
One instance of the attribute must be returned in a response. If this value is selected, and you use the attribute in a response, the attribute will be removed from the Attribute list after you have used the attribute in a response.
The RADIUS-specific fields are as follows
Provides information used to determine whether or not a user is allowed access to a specific NAS. The Access Request packets also provide information for any special services requested for that user.
Provides specific configuration information necessary to begin delivery of service to the user.
Note: You must set the Access Accept value to Zero or One, Zero or Many, or One and Only One in order to use the attribute in a response.
Sends information if any value of the received Attributes is not acceptable. This code is often used for reply messages.
Sends information if the NAS device has been configured for challenge/response.
Describes the type of service being delivered and the user to whom it is being delivered.
Sends information if the Accounting Request was recorded successfully. A RADIUS Accounting-Response is not required to have any attributes in it.
The Modify Agent Type Attribute page reappears, and the attribute name-value pair is added.
Note: To create multiple attribute name-value pairs, repeat steps 11 and 12. By mapping symbolic names to values, you only need to remember names.
The Modify Agent Type page reappears, and the Agent type attribute is added.
The attribute is defined for the selected Agent Type.
Note: When the task is complete and you create a response for this Agent type, you can select the Agent type attribute that you just added to the Agent type from an attribute list.
You can modify attributes that you created and attributes that have been pre-defined for a RADIUS Agent. For example, you can modify the pre-defined Ascend-PPP-Address attribute for the Ascend Agent type.
Note: When you modify an existing attribute, the attribute is not updated dynamically in responses that already use the attribute. If an attribute is used in a response, you must recreate the response using the updated attribute.
All RADIUS Agent types have been pre-configured to use the generic RADIUS attributes, as defined in RFC 2138. These attributes are available to be used by each RADIUS Agent type.
Important! If you overwrite a generic attribute or define a new attribute in the Generic RADIUS Agent, the change is applied to all RADIUS Agents. For example, if you modify the Filter ID attribute in the Generic RADIUS Agent, the modification is also made to all of the other RADIUS Agent types, such as Cisco, Shiva, Livingston, Ascend, and Checkpoint.
To modify agent type attributes
The Modify Agent Type pane opens.
CA SiteMinder® can be setup to provide authentication services in a variety of different RADIUS environments:
Before deploying CA SiteMinder® in a RADIUS environment, note the following guidelines:
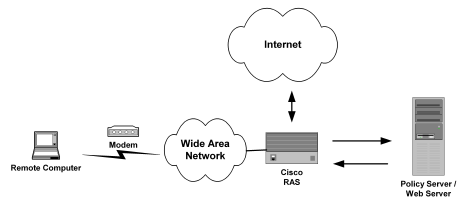
A homogeneous RADIUS environment is the most simple to protect. You can protect the RADIUS device using just one policy. This type of environment includes only one RADIUS device, such as a Cisco RAS, and one user directory, as shown in the following graphic:
Follow these steps:
You can authenticate RADIUS users using any user directory that is supported for the NT or UNIX platform you are using.
If the user directory contains information about user privileges, you can create responses using user attributes. When the user attributes are sent back to the RADIUS device, the attributes are used to configure the user session.
You can use the following directories:
The policy domain must identify one or more user directories that contain the names of the RADIUS users, the names of the Administrators who can modify the domain, and the realm that the RADIUS Agent is protecting.
You can use any of the following authentication schemes:
PAP is a PPP authentication protocol that provides a simple method for a host to establish its identity in a two-way handshake. Authentication takes place only upon initial link establishment and does not use encryption.
CHAP is also a secure PPP authentication protocol. CHAP provides a way to periodically verify the identity of a host using a three-way handshake and encryption. Authentication takes place upon initial link establishment. The RAS can repeat the authentication process any time after the connection takes place.
Note: For more information on creating an authentication scheme, see the Authentication Schemes chapter in this guide.
A more powerful and complex deployment of the Policy Server in a RADIUS environment is one that includes multiple realms administered by multiple NAS devices. In this scenario, the Policy Server can serve as the RADIUS authentication server for multiple RADIUS clients at once.
The advantage of using a heterogeneous configuration is that you save time by using the same RADIUS authentication server (that is, the Policy Server) for each RADIUS client.
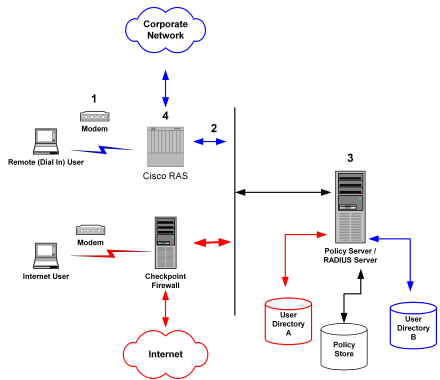
An example of a heterogeneous configuration is illustrated in the following graphic:
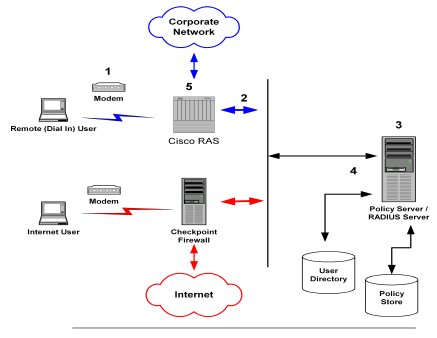
In the network topology shown in the previous diagram, the Policy Server authenticates users of two NAS devices: a Cisco RAS and a Checkpoint Firewall. The Policy Server uses one user directory to authenticate the users.
Each NAS device has its own RADIUS Agent, which has been configured with a realm hint. When the Policy Server receives a request to authenticate the user, it uses the RADIUS Agent’s realm hint to determine the resource (domain) that the authenticated user can access.
The process of authentication when one user directory is used is as follows:
The RAS notifies the Policy Server that the session has begun and when the session ends.
When the Internet user attempts to dial into the Internet Service Provider via the Checkpoint Firewall, a similar process of authentication occurs. Using the realm hint, the RADIUS Agent defined for the Checkpoint Firewall determines which domain the Internet user has access to. If the user is authenticated, the Policy Server passes the Firewall the correct attributes to establish the session.
User information for both NAS devices is stored in the same user directory. Each time the Policy Server receives an authentication request, it authenticates the user using the same data directory.
This system configuration differs from the homogeneous environment; you must now create two Agents.
Within the policy domain there is one policy that includes rules and responses for the Cisco Agent and the Checkpoint Agent.
To setup CA SiteMinder® in the heterogeneous, single directory environment described above, you must:
A diagram of this policy domain is shown in the following graphic:
For this environment, you must configure two RADIUS Agents:
The Policy Server can authenticate users using the same user directory for both NAS devices.
The policy domain must identify the user directory that contains the names of the RADIUS users, the names of the Administrators who can modify the domain, and the realm that the RADIUS Agent is protecting. A RADIUS environment that uses only one user directory requires only one policy domain.
The Policy Server can also be configured to authenticate users for multiple NAS devices when the user information for each device is located in separate user directories. The NAS devices can be of different vendor types.
There are several advantages to this configuration:
An example of a heterogeneous configuration that uses two user directories is illustrated in the following graphic:
Unlike the topology described in the previous section, this Policy Server uses two user directories to authenticate the users. User information for the Cisco RAS users is stored in User Directory A. User information for the Checkpoint firewall is stored in User Directory B. The Policy Server can authenticate users using both of these directories.
By dividing the configuration into two policy domains, the need for realm hints is eliminated. Each RADIUS Agent exists in a separate policy domain and is bound to only one realm.
The process of authentication when two user directories are used is as follows:
The RAS notifies the Policy Server that the session has begun and when the session ends.
When the Internet user attempts to dial into the Internet Service Provider by using the Checkpoint Firewall, this same process of authentication occurs. However, the Policy Server evaluates the Internet user’s authentication information against a different user directory.
To configure the heterogeneous environment described above, which includes two user directories, you must:
A diagram of these two policy domains is shown in the following graphic:
For this environment, you must configure two RADIUS Agents:
Each of the user directories containing RADIUS user information must be configured in the Policy Server. Each directory will be associated with a separate policy domain so that separate administrators can be defined for each policy domain.
One policy domain must be created for the Cisco RAS and one policy domain must be created for the Checkpoint firewall. When defining the policy domains, associate each domain with the appropriate user directory.
Creating a RADIUS Agent group enables you to manage multiple RADIUS Agents at once and eliminates the need to create and configure separate realms for each RADIUS Agent. Using one realm saves time because you can define the same session timeouts and the same authentication scheme for all RADIUS Agents simultaneously.
A group of RADIUS Agents could include Agents for different types of NAS devices. For instance, an Agent group could contain Agents for a Shiva LAN Rover RAS, a Checkpoint firewall, and a Cisco RAS. The Agent group containing all of these RADIUS Agents would be associated with a single realm, which defined the authentication scheme and session timeout requirements.
Agent groups are best suited for static environments that do not change often; Agent groups enable you to quickly configure CA SiteMinder® to authenticate users of many NAS devices. If your environment is not static and frequently changes as new NAS devices are added or removed, you should probably avoid using Agent groups. Instead, it is usually easier to add and remove RADIUS Agents if they are not located in groups. If the Agents are separated and not grouped together, you can usually find specific Agents faster, and modify or remove policies more quickly.
When using RADIUS Agent groups, you typically setup a separate policy for each type of RADIUS Agent. By using separate policies for each type of RADIUS Agent, you can share the common elements of the policy domain, such as the realm and a rule, in each policy. Sharing these common elements saves time.
Unlike the rule and realm, the response in each policy is not shared. Each policy has its own response, which corresponds to the device type of the RADIUS Agent in the policy. The attributes in a response match the attributes provided by the Dictionary file of the NAS device. For example, a response for a Cisco RAS would need to provide attributes that the Cisco RAS could interpret using the Cisco Dictionary file.
Note: All of the NAS devices represented in a RADIUS Agent group must share the same user directory. If they do not share the same user directory, they cannot exist in the same policy domain and therefore, they cannot share the same generic realms or generic rules.
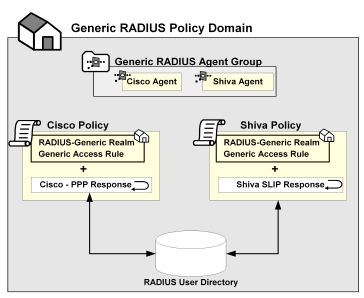
The following example depicts one RADIUS Agent group that contains both an Agent for a Cisco RAS and an Agent for a Shiva RAS. The Agent group is shared by both the Cisco policy and the Shiva policy. Both of these policies share the same generic rule to allow access and the same generic realm, which binds the Agent group to the same authentication scheme. Notice, however, that the responses for each policy are unique.
The procedure for setting up a RADIUS Agent Group is in Configure an Agent Group.
A RADIUS response group is a collection of responses defined for the same type of Agent, such as Generic RADIUS. When a rule fires, all of the RADIUS responses paired with it in the response group are triggered.
The responses must be of the same Agent type in order to use the same Dictionary file. For example, you could combine two Cisco responses in the same group or two Generic RADIUS responses in the same group. However, you could not group a Generic RADIUS and a Cisco response in the same group.
The advantage of using RADIUS response groups is that it enables you to configure a policy domain using fewer policies. Instead of creating a separate realm and a separate policy for each RADIUS Agent, you could group RADIUS Agents of the same type, create one generic rule for authentication, and then group the responses for the rule. This type of configuration is shown in the following diagram:
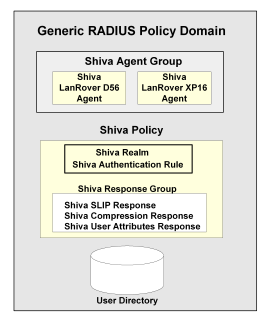
Response groups also make it easier to add RADIUS devices to the environment. For instance, in an environment such as the one shown in the previous figure, you could quickly add another Shiva RAS to the RADIUS Agent group and this new RAS would automatically be configured with the appropriate rule and responses.
Once you have configured the Policy Server to act as a RADIUS authentication server, you can test and troubleshoot the policies using the tools described in subsequent topics.
RADIUS logs track debugging and accounting information generated by the Policy Server. Use the RADIUS log file to track the following:
Logs are turned on and off using the Policy Server Management Console from the Debug tab.
The Policy Server time stamps the log file with the date and time it was created. For example, "log.txt" can be specified as the name of the file. When the Policy Server is restarted and the Policy Server creates the log file, the date and time are added to the name.
If you are appending logging information to the same file, the date on the file reflects the date and time it was created. The timestamp is only updated if the Policy Server is restarted.
This tool is used to read RADIUS log files generated by the Policy Server. It is useful for troubleshooting the Policy Server when used as a RADIUS authentication server. Options are provided to display individual RADIUS attributes that are exchanged between NAS and CA SiteMinder®.
Smreadclog uses the following arguments to supply information required to read RADIUS log files:
Specifies the filename of the log file.
Specifies the filename of the output file.
Specifies the shared secret that can be used to decode RADIUS passwords.
Indicates that a hex dump of an entire RADIUS packet be displayed.
Indicates that RADIUS attributes should be displayed individually.
Indicates that RADIUS attributes should be displayed according to their definition in the policy store. This option displays actual attribute names as well as attribute values formatted based on their attribute type. Without this option, only the attribute name and value are displayed (as a hex string).
Enables you to record and replay RADIUS activity of the Policy Server service against your RADIUS server.
Specifies the port used for RADIUS authentication if that port is not the default port, 1645.
Specifies the port used for RADIUS accounting if that port is not the default port, 1646.
To use smreadclog
where <siteminder_installation> is the installed location of CA SiteMinder®.
where <siteminder_installation> is the installed location of CA SiteMinder®.
smreadclog -i<input-file> -o<output-file>
-s<secret> -r -a -d -p<radius-server> -m<portnumber>
-n<portnumber>
For example,
smreadclog -iradiuslog.txt -oradiuslog2.txt
-ssecret -r -a -d -p123.123.12.12
The CA SiteMinder® Test Tool simulates the behavior of a RADIUS authentication server. Using the Test Tool, you can test policies that authenticate RADIUS users and ensure that the response attributes you configured are returning the appropriate data.
The process of testing RADIUS policies includes the following steps:
To configure the Policy Server Management console
Important! If you are accessing this graphical user interface on Windows Server 2008, open the shortcut with Administrator permissions. Use Administrator permissions even if you are logged in to the system as an Administrator. For more information, see the release notes for your CA SiteMinder® component.
You are now ready to test the RADIUS policies using the Test Tool.
To test RADIUS policies
Important! Before running a CA SiteMinder® utility or executable on Windows Server 2008, open the command line window with administrator permissions. Open the command line window this way, even if your account has administrator privileges.
The policy is tested and the response attributes appear in the Attributes group box.
|
Copyright © 2013 CA.
All rights reserved.
|
|