

Web Services Security Guides › CA SiteMinder® Web Services Security Upgrade Guide › Upgrading from CA SOA Security Manager r12.1 SP3 › How to Configure a Parallel Environment
How to Configure a Parallel Environment
Complete the follow procedures to configure a parallel environment:
- Review the parallel environment key management options to determine how to implement single sign–on.
- Create the 12.52 environment.
- Do one of the following:
- Be sure that both environments meet the common key store single sign–on requirements.
- Be sure that both environments meet the multiple key store single sign–on requirements.
- Migrate the r12.1 SP3 policy store data. Use the 12.52 version of the XPSImport utility to import 12.52 default policy objects to the 12.1 SP3 policy store using the following command
XPSImport smpolicy.xml -npass
- If your r12.1 SP3 environment contains smkeydatabases:
- Synchronize all instances.
- Migrate the content of a smkeydatabase to the 12.52 certificate data store.
- If you are managing legacy federation (Federation Security Services) objects in your r12.x environment, migrate the assertion issuer ID.
- Review the user directory single sign–on requirements.
More information:
Certificate Data Management
Synchronize Key Database Instances
Parallel Environment Key Management Options
Managing CA SiteMinder® keys to maintain single sign–on between the existing environment and 12.52 environment is critical to a successful parallel upgrade. Two CA SiteMinder® key management options are available. The option you deploy depends on how you implement one or more key stores across both environments. The options include:
- Multiple policy stores with a common key store
- Multiple policy stores with separate key stores
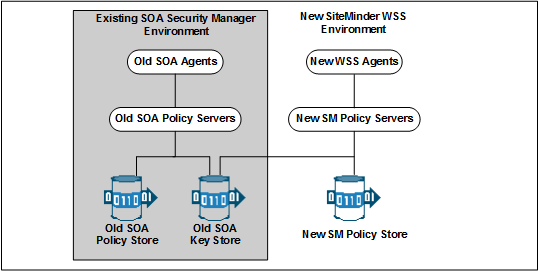
Common Key Store Deployment
All Policy Servers can use a single key store for key rollover. The following figure illustrates:
- r12.1 SP3 Policy Servers connecting to an r12.1 SP3 policy store.
- 12.52 Policy Servers connecting to a 12.52 policy store.
- A common r12.1 SP3 key store maintaining key data for all Policy Servers. The common key store lets Agents associated with all Policy Server share keys. Sharing the keys enables single sign–on between both environments.
Important! The r12.1 SP3 key store must be configured separately from the r12.1 SP3 policy store.
- All Policy Servers connecting to a common key store to retrieve new keys.
Important! The 12.52 Policy Servers must be configured with the r12.1 SP3 key store. r12.1 SP3 Policy Servers cannot communicate with a 12.52 key store.
- All SOA Agents and WSS Agents polling their respective Policy Server to retrieve new keys.
Note: Although not illustrated, policy store and key store data can be replicated for failover. The database or directory server type determines how you replicate data. For more information about key management in a master/slave environment, see the Policy Server Administration Guide. For more information about replicating data, see your vendor–specific documentation.
Multiple Key Store Deployment
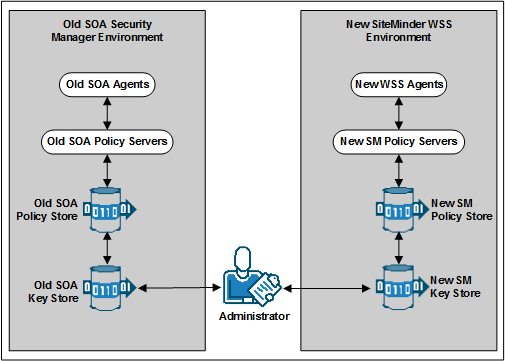
Existing r12.1 SP3 Policy Servers can use an r12.1 SP3 key store for key rollover, while 12.52 Policy Servers can use a 12.52 key store for key rollover. The following figure illustrates:
Note: Although not illustrated, policy store and key store data can be replicated for failover. The database or directory server type determines how you replicate data. For more information about key management in a master/slave environment, see the Policy Server Administration Guide. For more information about replicating data, see your vendor–specific documentation.
Create the 12.52 Environment
You can configure a 12.52 environment independently of the existing environment. Install and configure the 12.52 components in the following order:
- One or more Policy Servers.
Important! If you are maintaining single sign–on with a common key store, all Policy Servers must use the same encryption key. If you do not know the value of the encryption key, you can reset the r12.1 SP3 value in the policy store. Use the new value when installing 12.52 Policy Servers.
Note: For more information about resetting the policy store encryption key, see the Policy Server Administration Guide.
- A policy store.
- An Administrative UI.
- One or more WSS Agents.
Note: For more information about installing a Policy Server, a policy store, and an Administrative UI, see the Policy Server Installation Guide. For more information about installing WSS Agents, see the corresponding WSS Agent Guides.
Common Key Store Single Sign–on Requirements
If you are deploying a common key store, do the following or single sign–on fails:
- Be sure that the r12.1 SP3 policy and key store are configured separately.
Note: For more information about configuring a key store, see the Policy Server Administration Guide.
- Leave the key store version at r12.1 SP3. 12.52 Policy Servers can communicate with an r12.1 SP3 key store, but r12.1 SP3 Policy Servers cannot communicate with a 12.52 key store.
- Configure all Policy Servers to use the common r12.1 SP3 key store.
- Verify that all Policy Servers use the same encryption key. If you do not know the value of the encryption key, you can reset the r12.1 SP3 value in the policy store. Use the new value when installing a 12.52 Policy Server.
Note: For more information about resetting the policy store encryption key, see the Policy Server Administration Guide.
- Nominate a single Policy Server to generate dynamic Agent keys. Disable Agent key generation for the remaining Policy Servers.
Note: For more information about dynamically generating Agent keys, see the Policy Server Administration Guide.
How to Separate a Key Store from a Policy Store
Complete the following procedures to separate the key store from the policy store:
- Install or locate a set–up Policy Server. A set–up Policy Server is a Policy Server that is not configured with the collocated policy/key store.
- If a Policy Server is configured with the collocated store, you cannot use it to configure the new key store instance. The required CA SiteMinder® utilities available on the Policy Server host system are configured to manage the collocated store.
- The set–up Policy Server makes available a separate set of the required utilities. The separate set lets you configure the key store without interfering with the collocated store.
- Use the set–up Policy Server host system to create a separate r12.1 SP3 key store instance. Consider the following items:
- The key store only requires the default policy store schema. For more information about configuring a separate key store, see the r12.1 SP3 Policy Server Installation Guide.
- The key store does not require that you:
- Set the CA SiteMinder® superuser password.
- Import the default policy store objects.
- Disable dynamic agent key generation in the r12.1 SP3 environment.
Note: If your environment uses static keys, this step is not required. However, be sure that a CA SiteMinder® administrator does not generate a random agent key after you export the keys from the policy store.
- Export the agent keys from the r12.1 SP3 policy/key store.
- Import the agent keys in to the r12.1 SP3 key store.
- Configure all Policy Servers to use the separate key store.
- If you disabled dynamic agent key generation, re–enable it.
Disable Dynamic Agent Key Generation
Before the key store separation is complete, the r12.1 SP3 environment is operating with two key stores:
- Some Policy Servers use the agents keys in the collocated policy/key store.
- Some Policy Servers use the agent keys in the separate key store.
Disabling dynamic agent key generation prevents a Policy Server from generating keys after you export them for the separate store. Stopping the Policy Server from generating keys prevents single sign–on issues that can occur when the keys are not synchronized in all stores.
Follow these steps:
- Log in to the r12.1 SP3 Administrative UI.
- Click Administration, Policy Server.
- Click Key Management, Agent Key Management.
- Select the Use Static Agent Key option.
- Click Submit.
The Policy Server is configured to use a static key. The Policy Server does not generate keys automatically.
Export the Agent Keys
You export the keys from the collocated policy/key store to make them available to the separate key store.
Follow these steps:
- Log in to a r12.1 SP3 Policy Server host system. Be sure that this Policy Server is configured with the collocated policy/key store.
- Run the following command to export only the keys from the policy store:
smkeyexport -dadministrator -wpassword -ofile_name
Important! Before running a CA SiteMinder® utility or executable on Windows Server 2008, open the command line window with administrator permissions. Open the command line window this way, even if your account has administrator privileges.
Note: For more information about the utility, see the r12.1 SP3 Policy Server Administration Guide.
Example:
smkeyexport -dsuperuser -wpassword -oagentkeys
The agent keys are exported from the collocated policy/key store.
- Copy the file that contains the agent keys to the set–up Policy Server host system.
Import the Agent Keys
You import the keys from the collocated policy/key store to make them available to the separate key store.
Follow these steps:
- Log in to the r12.1 SP3 set–up Policy Server host system.
- Run the following command to import the agent keys in to the separate key store:
smobjimport -ffile_name -k
Important! Before running a CA SiteMinder® utility or executable on Windows Server 2008, open the command line window with administrator permissions. Open the command line window this way, even if your account has administrator privileges.
Note: For more information about these modes and arguments, see the r12.1 SP3 Policy Server Administration Guide.
Example:
smobjimport -fagentkeys -k
The agent keys are imported in to the separate key store.
Configure all Policy Servers to use the Key Store
Configuring all Policy Servers in the parallel environment to use a common r12.1 SP3 key store maintains single sign–on across both environments.
Follow these steps:
- Identify the Policy Server that is nominated to generate agent keys dynamically. Configure this Policy Server with the key store last.
- Complete the following steps for all other Policy Servers in the environment:
- Log in to the Policy Server host system.
- Open the Policy Server Management Console.
- Click the Data tab.
- Select Key Store from the Database list and clear the Use Policy Store database option.
- Select the key store type from the Storage list.
- Complete one of the following steps:
- (LDAP) Enter the required connection information in the LDAP Key Store section.
- (ODBC) Enter the data source information in the Data Source Information section.
- Test the Connection.
- Click OK.
- Restart the Policy Server to configure the Policy Server to use the key store.
- Configure the Policy Server that is nominated to generate agent keys to use the key store.
Re–enable Dynamic Agent Key Generation
If you disabled dynamic agent key generation, re–enable the functionality for the Policy Server that is nominated to generate agent keys. Complete this procedure only after all Policy Servers in the environment are configured to use the new key store.
Follow these steps:
- Log in to the r12.1 SP3 Administrative UI.
- Click Administration, Policy Server.
- Click Key Management, Agent Key Management.
- Select the Use Dynamic Agent Key option.
- Click Submit.
The nominated Policy Server is enabled to generate keys dynamically.
You have completed the required tasks to separate the key store from the policy store.
Multiple Key Store Single Sign–on Requirements
If you are deploying multiple key stores, do the following or single sign–on fails:
- Disable dynamic Agent key generation for all Policy Servers.
- Be sure that a CA SiteMinder® administrator has the necessary Administrative UI permissions to specify the same static Agent key and the same session ticket in the r12.1 SP3 and 12.52 key stores.
Note: For more information about delegating administrator permissions, see the Policy Server Configuration Guide.
- Be sure that the same static Agent key and the same session ticket are configured in the r12.1 SP3 and 12.52 key stores.
Note: For more information about configuring a static Agent key and session ticket, see the Policy Server Administration Guide.
Migrate Keys and Certificates
If your environment contains one or more smkeydatabases, migrate their contents to the 12.52 certificate data store.
Follow these steps:
- Be sure that all r12.1 SP3 smkeydatabases are synchronized.
- Log in to an r12.1 SP3 Policy Server host system and go to the following location:
PS_home\config\properties
- PS_home
-
Specifies the Policy Server installation path.
- Copy the following file
smkeydatabase.properties
- Log in to a 12.52 Policy Server host system and complete the following steps:
- Go to the following location:
siteminder_home\config\properties
- Rename the 12.52 version of the smkeydatabase properties file to the following value:
newsmkeydatabase.properties
- Add the r12.1 SP3 version of the properties file to the directory.
- Open the 12.52 and r12.1 SP3 properties file in a text editor.
- Edit the database location path in the r12.1 SP3 version to match the path in the 12.52 version.
Example:
The r12.1 SP3 file references the following path:
DBLocation=C\:/Program Files/netegrity/siteminder/smkeydatabase
The 12.52 file references the following path:
DBLocation=C:/Program Files/CA/siteminder/smkeydatabase
Update the r12.x file to reference the following path:
DBLocation=C\:/Program Files/CA/siteminder/smkeydatabase
- Save the r12.1 SP3 properties file and close the 12.52 properties file.
- Create the following directory at the root of the Policy Server installation:
smkeydatabase
Example:
C:\Program Files\CA\SiteMinder\smkeydatabase
- Return to the r12.1 SP3 Policy Server host system and copy the contents of the smkeydatabase directory.
Note: The default location of this directory is siteminder_home.
- Return to the 12.52 Policy Server host system and complete the following steps:
- Add the contents of the r12.1 SP3 smkeydatabase directory to the 12.52 smkeydatabase directory you created.
- Use the following migration utility to migrate the smkeydatabase to the certificate data store:
smmigratecds
- After a successful migration, remove the smkeydatabase properties file and the smkeydatabase directory.
The migration is complete.
More information:
Migrate a CA SiteMinder® Key Database Manually
Migrate the Assertion Issuer ID
If you have configured policy objects related to generating SAML assertions in your r12.1 SP3 environment, migrate the assertion issuer ID from r12.1 SP3 to 12.52.
Follow these steps:
- Log in to an r12.1 SP3 Policy Server host system and go to the following location:
ps_home\config\properties
- ps_home
-
Specifies the Policy Server installation path.
- Copy the following file:
AMAssertionGenerator.properties
- Log in to a 12.52 Policy Server host system and go to the following location:
ps_home\config\properties
- Rename the 12.52 version of the assertion generator properties file to the following value:
newAMAssertionGenerator.properties
- Add the r12.1 SP3 version of the properties file to the directory.
The migration is complete.
Migrate the r12.1 SP3 Policies
If you plan on using the 12.52 deployment to protect r12.1 SP3 resources, we recommend migrating your policy store data to the 12.52 policy store.
Although not required, if you migrate the policy store data before you begin managing the 12.52 policy store, you can avoid the possibility of conflicts associated with duplicate objects.
To migrate policies
- Use the r12.1 SP3 version of the XPSExport utility to export the r12.1 SP3 policy store data. For more information about the r12.1 SP3 version of XPSExport, see the r12.1 SP3 Policy Server Administration Guide.
- Use the 12.52 version of the XPSImport utility to import the policy data into the 12.52 policy store. For more information about the 12.52 version of XPSImport, see the Policy Server Administration Guide.
When moving CA SiteMinder® policies from one environment to another, either as part of an upgrade or a policy migration, some objects that are environment–specific are included in the export file. Examples of these objects include:
- Trusted hosts
- HCO Policy Server settings
- Authentication scheme URLs
Depending on the mode you select when using XPSExport, these objects may be added to the new environment or can overwrite existing settings. Be sure that you do not adversely affect environment settings when importing the objects.
Note: For more information about the XPSExport modes of export, see the Policy Server Administration Guide.
User Directory Single Sign on Requirements
Be sure that the CA SiteMinder® user directory objects you create in both environments have the same names. If you use different names to point r12.1 SP3 and 12.52 Policy Servers to the same user stores, single sign–on fails.
Copyright © 2013 CA.
All rights reserved.
|
|