
CA SiteMinder® Federation enables single sign-on between enterprise users and Office 365 services. Federating to Office 365 removes the burden of hosting services locally. For example, an enterprise user logs in to the desktop email client but is unaware that the service is in the cloud. The sign-in experience with Office 365 is the same as if they were connected to an on-premise application.
The following profiles are available for single sign-on to Office 365:
WS-Federation Passive Requestor Profile works with passive requestors, primarily web browsers, or browser-based applications that support HTTP. The passive profile enables single sign-on between these clients and Microsoft Office 365.
The Security Token Service (STS) implements the WS-Federation Active Requestor Profile. This profile enables single sign-on between SOAP-enabled desktop clients and the following Office 365 services:
The clients send and receive SOAP messages using HTTP-POST requests and responses. Users can sign in with their enterprise credentials and gain access to Outlook and Lync.
CA SiteMinder® Federation provides the STS service, which serves as an Identity Provider that Office 365 trusts. The STS service issues security tokens that Office 365 services can consume.
To implement single sign-on to Office 365, both WS-Federation profiles require a WS-Federation IP-to-RP partnership that is configured at the federation system.
For the WS-Federation Active Requestor Profile, these other components are also required:
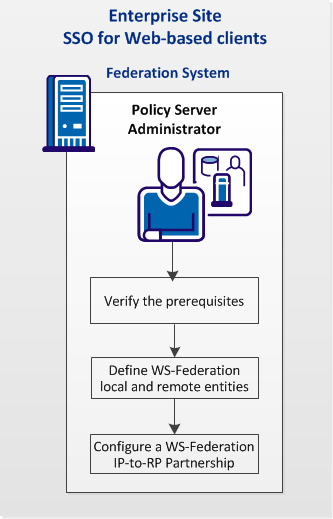
The following graphic shows the required configuration steps for web-based client SSO (Passive Requestor Profile):

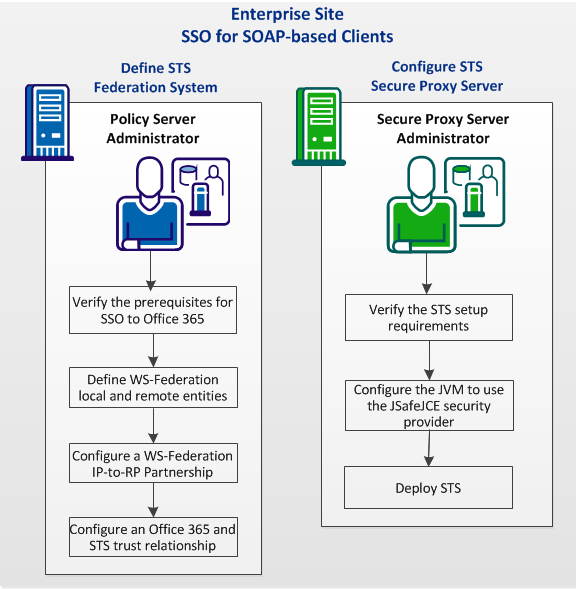
The following graphic shows the required configuration steps for SOAP-based client SSO (Active Requestor Profile):

Complete the following tasks at the federation system:
Complete the following tasks on CA SiteMinder® SPS for deploying STS (SOAP-based SSO only):
For supplemental configuration details about single sign-on to Office 365, view the appropriate runbook in the CA SiteMinder® Federation Cloud Runbook Library. You need a login to view this content.
For single sign-on to Office 365, be aware of the requirements for:
Office 365 Setup Requirements
For information on configuring your deployment to work with Office 365, refer to the relevant Microsoft documentation for instructions on how to:
For supplemental configuration details about single sign-on to Office 365, view the appropriate runbook in the CA SiteMinder® Federation Cloud Runbook Library. You need a login to view this content.
CA SiteMinder® User Directory Requirements
The Immutable ID and the UPN are required. Supply these values when you configure the WS-Federation partnership.
Configure a WS-Federation partnership with Office 365. A WS-Federation IP-to-RP partnership is necessary for either web-based or SOAP-based client SSO.
In this partnership:
The differences between this partnership to configure WS-Federation Passive Requestor Profile and Active Requestor Profile are:
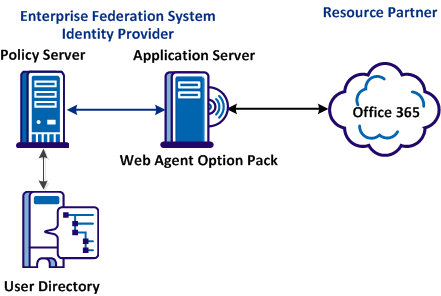
The following graphic shows a recommended deployment for this federated solution.

The on-premise federation system is the Identity Provider in the partnership with Office 365. As the Identity Provider, the system issues the security token containing the SAML 1.1 assertion.
Create a local Identity Provider entity with a SAML 1.1 token.
Follow these steps:
The Create Entity dialog displays.
Select WSFED Identity Provider.
SAML 1.1
In the Configure Entity step, complete all required fields in the dialog. Pay particular attention to the following fields:
Enter the IssuerURI specified in the Office 365 domain.
For this local partner, the Entity ID does not have to be unique.
Enter any name that identifies this local IP. The Entity Name identifies an entity object in the policy store and it must be a unique value. This value is for internal use only; the remote partner is not aware of this value.
Specify the URL for the system. For communication with Office 365, this URL must be over an SSL connection. For example, https://fedserver.example.com.
Set this ID only when there are multiple partnerships between the same IP and RP, and your company has separate business units with their own relationship with Office 365. Office 365 uses a single ID to identify itself as an RP. CA SiteMinder® Federation does not allow multiple partnerships with the same IP or RP ID. A disambiguation ID enables the system to differentiate partnerships with a unique logical path suffix for the service URLs given to a specific partner. Only one federation service exists, but the suffix that is combined with the RP ID creates a unique partnership lookup key.
Example: microsoftonline
The Disambiguation ID is appended to federation service URLs so requests go to the correct remote partner.
Example:
Passive Requestor Service URL: https://fedserver1.forwardinc.com/affwebservices/public/
wsfeddispatcher/microsoftonline
"microsoftonline" is the disambiguation ID.
Enter an alphanumeric string but do not use any special characters.
Specifies the URL at the Identity Provider that performs sign-out.
Default: http://ip_server:port/affwebservices/signoutconfirmurl.jsp
ip_server:port
Specifies the server and port number of the Identity Provider system. The system is hosting the Web Agent Option Pack or the SPS federation gateway, depending on which component is installed in your federation network.
For signing and encryption features, import the appropriate key and certificate pairs in the certificate data store.
Important! The public certificate that is associated with this private key must be imported into the Office 365 federation domain.
Unspecified
The UPN is the user principal name.
Assertion Attribute
UPN
Namespace
http://schemas.xmlsoap.org/claims
Note: Microsoft provides this value. Enter the name space value as it is shown. Office 365 requires this exact value.
The ImmutableID is a unique attribute that distinguishes the user in the on-premise Microsoft directory.
Assertion Attribute
ImmutableID
Namespace
http://schemas.microsoft.com/LIVEID/Federation/2008/05
Note: Microsoft provides this value. Enter the name space value as it is shown. Office 365 requires this exact value.
Create a remote Resource Partner that represents Office 365. To define the entity, import metadata, if it is available, or configure the entity using the following procedure.
Follow these steps:
The Create Entity dialog displays.
Note: Click Help for a description of fields, controls, and their respective requirements.
Select WSFED Resource Partner.
SAML 1.1
urn.federation:MicrosoftOnline.
Enter any name that identifies the RP.
Specify the URL for Office 365 security token service. Obtain this URL from Microsoft. This URL must be over an SSL connection. For example, https://login.microsoftonline.com.
Specify the URL for Office 365 sign-out service. Obtain this URL from Microsoft. This URL must be over an SSL connection. For example, https://login.microsoftonline.com.
Note: For Office 365, the URLs for the security token consumer service and the signout URL are the same.
Unspecified
After you create the local IP and remote RP entities, configure a WS-Federation partnership. Steps that are specific to one or the other WS-Federation profile is noted.
Follow these steps:
A dialog opens with the partnership wizard displayed at the top.
https://sps_host/affwebservices/public/FederationMetadata/partnership_name
Note: sps_host is the Secure Proxy Server with STS configured.
The metadata document provides details about the partnership, such as WS-Federation passive and active profile end points and data.
Unspecified
User Attribute
Immutable ID assigned by Office 365
Local
If the WS-Federation Passive Requestor Profile is in use, complete this field. Ignore this field for the Active Requestor Profile.
https://web_agent_optionpack_system/affwebservices/redirectjsp/redirect.jsp
urn:federation:MicrosoftOnline
https://login.microsoftonline.com/
Complete the Signout fields only for the WS-Federation Passive Requestor Profile. They are not relevant for the Active Requestor Profile.
Enter the URL for your deployment, assuming sign-out is configured.
https://login.microsoftonline.com/
You return to the Partnership List.
STS is defined for your federated partnership. Now configure the STS component on the CA SiteMinder® SPS.
To enable SSO between SOAP-based clients and Office 365, configure a trust relationship between the Office 365 Sign-In Service and the on-premise server with STS. Set up this relationship after you purchase an Office 365 subscription and after you configure directory synchronization.
Configure the trust relationship using the Windows Powershell commands. The command that initially configures the trust relationship is Set-MsolDomainFederationSettings. Run this command at your enterprise. For the correct procedure, see the Microsoft documentation on Windows Powershell.
This command can take command arguments such as:
These command arguments are enough to establish a trust relationship from the Office 365 to the on-premises Secure Proxy Server system with STS.
To determine the STS endpoints for the command arguments, view an existing WS-Federation partnership in the CA SiteMinder® Administrative UI. These endpoints are based on the values in the WS-Federation IP-to-RP partnership. Use these end points when configuring Office 365 to trust the Secure Proxy Server system with STS.
Note: To see the configuration of a specific WS-Federation partnership, select Action, View next to that partnership.
For CA SiteMinder® to implement single sign-on using the WS-Federation Active Profile, an STS web service is needed. To manage requests from Office 365, deploy STS on CA SiteMinder® SPS.
Note: The STS web service must be hosted on CA SiteMinder® SPS at your enterprise. The service cannot be hosted on a different CA SiteMinder® platform.
When a client application tries to connect to Office 365, Office 365 issues a token request to STS. STS issues a security token with a SAML 1.1 assertion that Office 365 can consume. The client application is able to access Office 365.
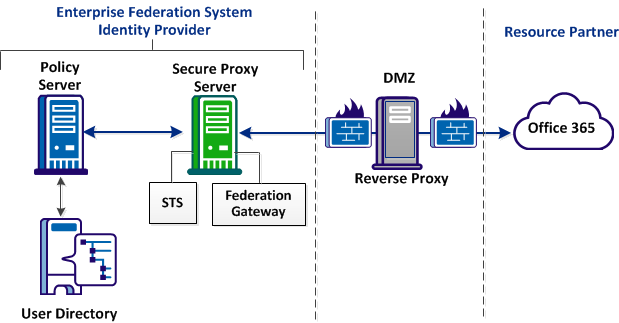
The following graphic shows a recommended deployment for this federated solution. Many ways to route traffic to the STS are available.

Follow these steps:
Before you deploy STS on CA SiteMinder® SPS, complete the following requirements:
Note: Two or more secure proxy server systems behind a load balancer are recommended, but it is not required.
To enable encryption, configure the JVM that is running the CA SiteMinder® SPS so it uses the JSafeJCE Security Provider.
Follow these steps:
Windows
JVM_HOME\lib\security
UNIX
JVM_HOME/lib/security
Defines the location where Java Runtime Environment (JRE) is installed in JDK of your installation.
security.provider.2=com.rsa.jsafe.provider.JsafeJCE
com.rsa.cryptoj.fips140initialmode=NON_FIPS140_MODE
The following example shows the List of Providers section of the java.security file after you configure the JVM:
security.provider.1=sun.security.provider.Sun
security.provider.2=com.rsa.jsafe.provider.JsafeJCE
security.provider.3=sun.security.rsa.SunRsaSign
security.provider.4=com.sun.net.ssl.internal.ssl.Provider
security.provider.5=com.sun.crypto.provider.SunJCE
security.provider.6=sun.security.jgss.SunProvider
security.provider.7=com.sun.security.sasl.Provider
security.provider.8=org.jcp.xml.dsig.internal.dom.XMLDSigRI
security.provider.9=sun.security.smartcardio.SunPCSC
security.provider.10=sun.security.mscapi.SunMSCAPI
com.rsa.cryptoj.fips140initialmode=NON_FIPS140_MODE
To support the WS-Federation Active Requester Profile, deploy STS on CA SiteMinder® SPS.
Follow these steps:
Defines the name of the STS web service. Enter the partnership name that is defined in the Administrative UI.
Defines the STS context path. Specify the name of the WS-Federation partnership that is defined in the Administrative UI. Enter the value using the syntax /partnership_name.
Example: /Office365Cloud
Test SSO
Verify the WS-Federation configuration and the STS deployment by signing in to Lync or Outlook.
Follow these steps:
Troubleshooting SSO Issues
For WS-Federation partnerships and connectivity issues, use the following methods of investigation:
From a web browser, go to http://portal.microsoftonline.com or Microsoft exchange online. Try logging in with enterprise credentials. If you can successfully log in from the browser but not from the enterprise client, check the setup of the on-premise STS.
Shows the information Microsoft has about your domain, that is, your enterprise. Review the settings and confirm whether they are accurate. Incorrect information can be a cause of federated communications problems.
Shows the information Microsoft has about a particular user. Review the user settings and confirm whether they are accurate. Incorrect information can be a cause of federated communications problems.
For any problems with the STS component, use the following logs and files:
Look for a message that says the STS initialization is complete. This message indicates that STS is running.
secure-proxy_install_dir/proxy-engine/conf/sts-config/partnership_name/config/
Also, set the Checkpoint logger setting, <category name="com.ca.CheckPointLogger," to a priority value of "INFO." This setting writes checkpoint log messages for authentication activities and assertion generation. Checkpoint log messages are descriptive messages with codes that reflect the operation of the STS component.
The section Federation Trace Logging describes checkpoint messages.
|
Copyright © 2014 CA.
All rights reserved.
|
|