

Email lets you communicate with end users, such as employees or customers. The mailbox in CA SDM handles inbound emails from users and provides action according to the email. For example, the user sends an email to CA SDM to create an incident. Mailbox checks the email, creates an incident, and sends a notification back to the user stating that the incident has been created successfully.
CA SDM provides a default mailbox (named Default) that is active and that you can use in your organization. You can modify the default mailbox, create additional mailboxes, or both. After you have created a mailbox or modified the Default mailbox, you define the mailbox rules. Mailbox rules let you configure any actions, replies, or both, that must occur for messages retrieved from a mailbox.
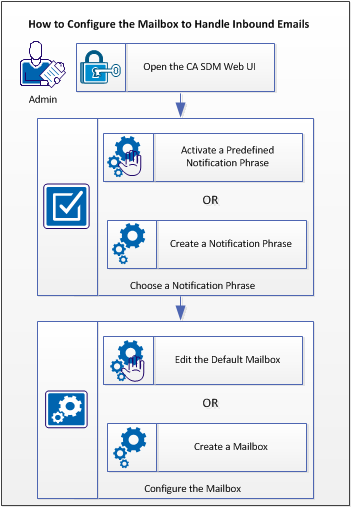
The following diagram shows how to configure the mailbox to handle inbound emails:
Follow these steps:
Log in to the web UI from the following servers, depending on your CA SDM configuration:
The notification phrase is sent to the sender of the email. For example, to confirm that an incident has been created successfully. CA SDM provides predefined notification phrases which are set to inactive by default. You can activate and modify the phrases. You can also create notification phrases to best suit your organization needs.
Choose from the following options:
By default, predefined notification phrases are set to inactive. You activate a notification phrase so that the notifications can use the phrase.
Note: If multi-tenancy is installed, select the appropriate tenant from the drop-down list. The public (shared) option creates the object for all tenants.
Follow these steps:
The Notification Phrase List page opens.
The Notification Phrase Detail page opens.
The Update Notification Phrase page opens.
The Notification Phrase Detail page opens.
The notification phrase is active.
You can create notification phrase that contain standardized text and macros. This notification phrase is sent as a response to emails from users.
Note: If multi-tenancy is installed, select the appropriate tenant from the drop-down list. The public (shared) option creates the object for all tenants.
Follow these steps:
The Notification Phrase List page opens.
The Create New Notification Phrase page opens.
The notification phrase is created.
Notification Phrase Fields
Complete the following fields to edit or create a notification phrase:
Defines a unique identifier for this record.
Specifies a unique value to use for the notification phrase, in the usp_notification_phrase table. The usp_notification_phrase table lists common phrases that notification message templates can use. For information about the usp_notification_phrase table, see the Technical Reference Guide.
Specifies the phrase for the notification. You can specify both plain-text and HTML versions. HTML consolidates most whitespace into single spaces, so you must specify line breaks or paragraph breaks with tags.
For example, the following plain-text phrase is used in the Confidential Notice notification phrase:
This e-mail and any files transmitted with it are for the sole use of the intended recipient(s) and contain information that may be privileged and confidential. Any unauthorized review, use, disclosure or distribution is prohibited. If you are not the intended recipient of this e-mail, please delete this e-mail and any files transmitted with it and notify the sender immediately.
The following HTML phrase can be used to ask the user to view the notification list:
Click on the following URL to view Notification List:
@{call_req_id.web_url}+HTMPL=cr_lr.htmpl+INSTANCE=@{id}
For more information about phrases, see the Notification Codes and Phrases topic.
Notification Codes and Phrases
Notification phrases let you add a standardized piece of information or text to a number of different notification messages, without having to enter and maintain the text or formulae separately in each notification template. For example:
Phrases standardize text for use in multiple message templates. For example, you can maintain a common phrase such as a confidential notice in a single record and use it in multiple message templates. Notification phrases are also useful for message replies, such as a Reply Notice, or a web URL link. CA SDM provides phrases and you can create your own phrases. You can set a phrase as active or inactive for use in a message template globally. (Notification phrases are inactive by default.) When a phrase is inactive, the phrase is suppressed in all message templates that use the phrase.
Notification phrases can also be used in the automatic responses to incoming email messages. The processing context for this type of message is different; omit the prefix (change_id., issue_id., call_req_id.) used in certain macros such as ref_num and web_url for phrases that the message uses. As a result, you cannot share notification phrases between notification templates and email automatic responses.
For example, some of the phrases that CA SDM provides are as follows:
|
Symbol |
Code |
Phrase |
|---|---|---|
|
Notify History - Change |
notify_history_chg |
Click the following URL to view the Notification List: @{change_id.web_url}+HTMPL=chg_lr.htmpl+INSTANCE=@{id} |
|
Notify History - Issue |
notify_history_iss |
Click the following URL to view the Notification List: @{issue_id.web_url}+HTMPL=iss_lr.htmpl+INSTANCE=@{id} |
|
Notify History - Request/Incident/Problem |
notify_history_cr |
Click the following URL to view the Notification List: @{call_req_id.web_url}+HTMPL=cr_lr.htmpl+INSTANCE=@{id} |
Example: New Phrases
The following phrases are examples of phrases that you can create:
|
Symbol |
Code |
Phrase |
|---|---|---|
|
Notify Confidential |
ConfidentialNotice |
This email and any files transmitted with it are for the sole use of the intended recipient(s) and contain information that may be privileged and confidential. Any unauthorized review, use, disclosure or distribution is prohibited. If you are not the intended recipient of this email, please delete this email and any files transmitted with it and notify the sender immediately. |
|
Notify Incident Reply |
IncidentReply |
To add a comment to your Incident, just reply to this email or include the line below (on a line by itself). %incident_id=@{call_req_id.ref_num} |
|
Notify Incident URL |
IncidentURL |
Click the following URL to view: @{call_req_id.web_url} |
Note: Use separate phrases for the plain-text and HTML versions of message templates or email auto-replies. HTML consolidates most whitespace into single spaces, so line- or paragraph-breaks must be specified with tags. HTML tags included in plain-text versions of messages are displayed rather than processed.
Notification Phrase Syntax
You insert notification phrases in message templates and email reply messages using the following macro syntax:
@{notification_phrase[code].phrase}
Specifies the unique Code value, such as ConfidentialNotice, of the Message Phrases (usp_notification_phrase) table.
Note: The usp_notification_phrase table lists common phrases that notification message templates can use. For information about the usp_notification_phrase table, see the Technical Reference Guide.
For example:
@{notification_phrase[IncidentURL1].phrase}
@{notification_phrase[RequestReply].phrase}
When CA SDM locates the macro, the phrase text from the usp_notification_phrase table replaces the syntax. If no matching code exists (or if it is inactive), an empty string replaces the macro. No errors are written to the standard log (STDLOG), instead a warning message is logged to help you resolve potential problems.
Note: Embedding phrases within other phrases is limited to a maximum depth value that you configure by setting the NX_MAX_EXPAND_DEPTH environment variable. This limitation prevents problems which can occur when processing phrases that are accidentally self-referenced (embed themselves) or circular-referenced (when a phrase embeds a phrase into which it is embedded).
Example: How Notification Phrases Appear in a Message
This example demonstrates how notification phrases appear in a notification message. The example uses the following codes and phrases:
|
Code |
Phrase |
|---|---|
|
ConfidentialNotice |
This e-mail and any files transmitted with it are for the sole use of the intended recipient(s) and contain information that may be privileged and confidential. Any unauthorized review, use, disclosure or distribution is prohibited. If you are not the intended recipient of this e-mail, please delete this e-mail and any files transmitted with it and notify the sender immediately. |
|
IncidentReply |
In order to add a comment to your Incident, just reply to this email or include the line below (on a line by itself). %incident_id=@{call_req_id.ref_num} |
|
IncidentURL |
Click the following URL to view: @{call_req_id.web_url} |
The following message template includes the notification phrases:
@{call_req_id.type.sym} @{call_req_id.ref_num} Closed.
Assigned to: @{call_req_id.assignee.combo_name}
Customer: @{call_req_id.customer.combo_name}
Description: @{call_req_id.description}

@{notification_phrase[IncidentURL].phrase}
@{notification_phrase[IncidentReply].phrase}

@{notification_phrase[ConfidentialNotice].phrase}
The phrases appear in a message as follows:
Incident 1234 Closed.
Assigned to: Analyst, Joe
Customer: Doe, John
Description: This is a description of my problem

Click on the following URL to view:
http://helpdesk/CAisd/pdmweb.exe?OP=SEARCH+FACTORY=chg+SKIPLIST=1+QBE.EQ.id=400723

In order to add a comment to your Incident, just reply to this email or include the line below (on a line by itself).
%incident_id=1234

This e-mail and any files transmitted with it are for the sole use of the intended recipient(s) and contain information that may be privileged and confidential. Any unauthorized review, use, disclosure or distribution is prohibited. If you are not the intended recipient of this e-mail, please delete this e-mail and any files transmitted with it and notify the sender immediately.
CA SDM provides a default mailbox to connect to the mail server. You can configure this default mailbox to change the password, user name, hostname, and so on. You can also create additional mailboxes to suit your organization needs. Each mailbox can have its own definition, instead of using a single global set of definitions. You can define multiple mailboxes and use different templates or default values for each mailbox. Multiple definitions let individual tenants use separate mailboxes, or let an individual tenant or organization use different mailboxes, and have different behaviors for each mailbox.
Choose one or both of the following possibilities:
Important! We recommend that you set the associated mailbox to Inactive before you configure a mailbox rule. Otherwise, any messages that the mail server retrieves between your first change and the last change are processed with whatever rules are in effect when the message is retrieved.
CA SDM provides an active default mailbox that you can edit to suit the incoming mail delivery needs of your organization.
Follow these steps:
The Mailbox List page opens.
The Default Mailbox Detail page opens.
Specifies the time after which the mail server is polled for new emails.
Indicates the mailbox status.
Specifies the protocol that the mail server uses. CA SDM supports both POP3 and IMAP4. If you choose IMAP4, CA SDM polls only the Inbox folder from the mailbox.
Specifies the hostname of the email server.
Specifies the port number when the default port number is overridden.
Specifies the user ID on the mail server.
Specifies the password on the mail server.
Specifies the SMTP security level.
Specifies the repository where the email attachments are stored.
Specifies whether to allow entire email as an attachment.
Specifies whether to split all attachments in the email when an entire email is added as an attachment. The email and its attachments are split into separate files and attached to the tickets. Only applicable when the Attach Entire Email option is selected.
Specifies whether tickets can be created from anonymous mails.
Specifies whether to save the emails that the rules defined in the mailbox did not process. These emails are stored in $NX_ROOT/site/mail_unknown.
Specifies whether to use the alternate email address for replies.
Specifies whether to use Transport Layer Security support in emails.
Specifies the path where the trusted certificate has been deployed.
Note: For the advanced availability configuration, ensure that you deploy the trusted certificate on the same location for both background and standby servers. CA SDM supports only Base-64 encoded (PEM) format for CA Certificates.
Note: The rules that are applicable for one mailbox cannot be associated with another mailbox. To reuse the same rules for a different mailbox, recreate them for the other mailbox. You can also copy the existing mailbox.
Important! We recommend that you set the associated mailbox to inactive before you configure a mailbox rule. Otherwise, any messages that the mail server retrieves between your first change and the last change are processed with whatever rules are in effect.
The changes to the default mailbox are saved and applied. The first poll occurs after one second.
CA SDM can process and manage multiple mailboxes. Each mailbox can have its own definition, instead of using a single global set of definitions. You can define multiple mailboxes and use different templates or default values for each mailbox. Multiple definitions let individual tenants use separate mailboxes, or let an individual tenant or organization use different mailboxes, and have different behaviors for each mailbox. You can set up multiple mailboxes by using the Administration interface. Each mailbox uses the following tables:
Because mailbox rules supply Text API defaults, you can establish email interfaces with other software and parameters (such as category, assignee, and so on) that are configured specifically for the interface.
Note: IMAP servers support multiple mailboxes for a single account, but alternate mailboxes are not supported; only the default inbox is supported.
How Multiple Mailboxes Use Rules
The Mail Eater (pdm_maileater_nxd) component on the primary server uses mailbox connections and rules to read and process messages from one or more accounts on one or more mail servers. The Mail Eater processes mailboxes serially (only one mailbox is processed at a time), and processes rules in sequence number order.
Multiple mailboxes use rules as follows:
Represents a connection to a mail server.
Represents the rules that apply to the connection (usp_mailbox).
Represents the Contact Methods used for automatic replies.
Represents the Document Repositories for storing attachments.
The Mail Eater automatically detects changes to the objects in any of these tables, including the addition of additional objects. If a change is made to usp_mailbox or usp_mailbox_rule, the polling interval for the affected mailbox is rescheduled to one second after the change is applied.
For reply emails, the filter string identifies the object and uses the Text API for processing. After processing is complete, the response goes either to the Reply to or the From address.
You can create a mailbox that connects to the mail server, and that you configure to set values for host, user, password, and so on.
Follow these steps:
The Mailboxes List page opens.
The Mailbox Detail page opens.
Specifies the time after which the mail server is polled for new emails.
Indicates the mailbox status.
Specifies the protocol that the mail server uses. CA SDM supports both POP3 and IMAP4. If you choose IMAP4, CA SDM polls only the Inbox folder from the mailbox.
Specifies the hostname of the email server.
Specifies the port number when the default port number is overridden.
Specifies the user ID on the mail server.
Specifies the password on the mail server.
Specifies the SMTP security level.
Specifies the repository where the email attachments are stored.
Specifies whether to allow entire email as an attachment.
Specifies whether to split all attachments in the email when an entire email is added as an attachment. The email and its attachments are split into separate files and attached to the tickets. Only applicable when the Attach Entire Email option is selected.
Specifies whether tickets can be created from anonymous mails.
Specifies whether to save the emails that the rules defined in the mailbox did not process. These emails are stored in $NX_ROOT/site/mail_unknown.
Specifies whether to use the alternate email address for replies.
Specifies whether to use Transport Layer Security support in emails.
Specifies the path where the trusted certificate has been deployed.
Note: For the advanced availability configuration, ensure that you deploy the trusted certificate on the same location for both background and standby servers. CA SDM supports only Base-64 encoded (PEM) format for CA Certificates.
The Create New Mailbox Rule page opens.
Note: The rules that are applicable for one mailbox cannot be associated with another mailbox. To reuse the same rules for a different mailbox, recreate them for the other mailbox. You can also copy the existing mailbox.
Important! We recommend that you set the associated mailbox to inactive before you configure a mailbox rule. Otherwise, any messages that the mail server retrieves between your first change and the last change are processed with whatever rules are in effect.
The mailbox is created.
If you are using multiple mailboxes, the Mail Eater (pdm_maileater_nxd) component uses mailbox connections and rules to read and process messages from one or more accounts on one or more mail servers. The Mail Eater runs on the following servers, depending on your CA SDM configuration:
The Mail Eater polls the mailboxes serially (only one mailbox is processed at a time), and processes rules in sequence number order, as follows:
Represents a connection to a mail server.
Represents the rules that apply to the connection (usp_mailbox).
Represents the Contact Methods that are used for automatic replies.
Represents the Document Repositories for storing attachments.
The Mail Eater automatically detects changes to the objects in any of these tables, including the addition of extra objects. If a change is made to usp_mailbox or usp_mailbox_rule, the polling interval for the affected mailbox is rescheduled to one second after the change is applied.
For reply emails, the filter string identifies the object and uses the Text API for processing. After the processing is complete, the response goes either to the Reply to or the From address.
After the Mail Eater processes all emails for an inbox, the processed and discarded messages are purged from the mail server, and the next processing interval is scheduled.
Create a Mailbox Policy
You can create policies that apply to any actions, replies, or both, that must occur for mail delivery to an inbox.
To create a mailbox policy
The Mailboxes List page appears and lists attributes.
The Mailbox Detail page appears.
Policy details associated with the mailbox appear.
You can edit the fields.
The mailbox policy is set, and takes effect immediately.
Specifies the maximum number of emails per email address per hour. You can specify the following values:
Logs the violation to the standard log. You can specify the following values:
Note: The First violation only option keeps a list of email addresses associated with messages that violate mailbox policies and uses the list for the log to avoid duplicate log entries. The list is cleared when the Mail Eater daemon is restarted. However, if you change the setting from First violation only to one of the other options and back, the list of email addresses which were logged under this setting is not cleared. If a mailbox logs numerous violations while using this setting, we recommend that you restart the Mail Eater daemon periodically to clear the list, or use the Do not log option.
Specifies email addresses or domains that are allowed to process emails—only emails matching the list are allowed. You can specify multiple addresses or domains by delimiting them with a comma, semicolon, space character, or line break. An entry of an asterisk (‘*’) by itself is the “World Domain,” and matches all domains that are not in the Exclusion List.
Specifies email addresses or domains that are not allowed to process emails. You can specify multiple addresses or domains by delimiting them with a comma, semicolon, space, or line break.
Note: Addresses in the Exclusion List override any values in the Inclusion List. Addresses in the Inclusion List override domains in the Exclusion List, and can provide specific exemptions for specific senders in an otherwise-banned domain. Domains in the Exclusion List override the World Domain in the Inclusion List. The World Domain is not valid in the Exclusion List.
Mailbox Policy Fields
You can use the following fields to implement the policy:
Specifies the number of emails per hour that any one email address is permitted to send to that mailbox. If an email address exceeds the limit, the email address is added to the exclusion list. No more messages from that sender email address are processed for that mailbox until you remove the email address from the exclusion list.
Specifies whether to log the email addresses that violate the policy, in the stdlog file.
Specifies the email addresses (for example, user@company.com) or email domains (for example, company.com) that are allowed to send emails.
The default inclusion list for each mailbox is an asterisk (*). An asterisk by itself as a whole name in this list specifies the World Domain, and represents all email domains not included in the exclusion list. This representation prevents ambiguity of whether the inclusion list is the complete list of permitted domains or the exceptions to domains in the exclusion list as follows:
Specifies the email addresses (for example, user@company.com) or email domains (for example, company.com) that are not allowed to send emails.
Note: Mailbox policies pertain to the single associated mailbox only. An address which is added automatically to one mailbox exclusion list for violating the maximum number of emails restrictions is not added automatically to the exclusion list for any other mailboxes, nor is the email count used for other mailboxes.
Complete the following mailbox rule fields, as appropriate:
Specifies the sequence number of the rule. Messages are checked against rules in sequence number order from lowest to highest.
Specifies the mailbox to which this rule belongs.
Sets the rule to active or inactive.
Specifies what part of the email to search for the filter pattern, for example, Subject contains. For more information, see the Pattern Matching in Mailbox Rules topic.
Specifies a regular expression string to match with the email content. For example, [ \t\r\n]request[ \t\r\n]. The placeholder {{object_id}} lets you specify the artifact value for the Text API to use for associating the message with a specific ticket. For more information, see the Filter String Object Identifier Restrictions and Special Characters in Regular Expressions topics.
Specifies whether to consider letter case when matching patterns.
Specifies the action to take when the filter criteria matches, for example, Create/Update Object.
Note: For information about rule actions, see the Administration Guide.
Displays the type of ticket object to which message actions apply, for example, Request.
Sets the minimum type of artifact checking that you want to allow:
Specifies no validation of artifacts. This value is the same as not adding the keyword to the input file. Also accepts Text API ticket ID commands.
Validates a ticket against the hash for confirmation. If confirmation fails, the artifact is considered invalid and the email fails filtering where filtering is looking for an artifact ({{object_id}}).
Validates the ticket number from an encrypted data block. If the value is not a valid encrypted ticket number, the artifact is considered invalid and the email fails filtering where filtering is looking for an artifact ({{object_id}}).
Note: Types that are more secure than what is set are allowed. In other words, if you set the minimum type to PROTECTED, then both PROTECTED and SECURE are allowed, but NONE is not. Also, if PROTECTED or SECURE are selected, Text API ticket ID commands are not accepted. For more information about the artifiacts, see the Artifacts Use Considerations topic.
Specifies a notification method to send an automatic response. For example, Email. If you do not set this option, no response is returned. The response indicates success or failure of the actions performed for the message, and is separate from any notifications. If you are using multiple mailboxes, we recommend you to use the notification method to configure email replies.
Specifies a subject line for the reply, for example, Service Desk Response.
Write email text to the standard log (stdlog) if the filter matches.
Specifies a prefix to add when writing email text to the standard log entries. Use this option to enable matching log entries to rules.
Adds the subject line from the original message to the message body before processing. You can append, prepend, or not add a subject line. The subject line is attached to either the ticket Description or a Log Comment, depending on the actions for the message.
Specifies additional default commands for the Text API when the filter matches. Combines with the contents of the [EMAIL_DEFAULTS] section of the text_api.cfg file. The TextAPI Defaults field includes TextAPI keyword commands that are applied to a ticket when it is created from an email that matches a mailbox rule. The commands are not applied when the message affects an existing ticket.
To specify TextAPI Defaults commands, place each command on a separate line in the TextAPI Defaults field. Format the commands as follows:
OBJECT.FIELD=value
Note: Do not include a leading percentage symbol (%), which is required only for corresponding commands that are embedded in the body of the email.
For example, format the commands as follows:
REQUEST.PRIORITY=3
PROBLEM.CATEGORY=Facilities
INCIDENT.GROUP=Plumbing
Specifies additional Ignore Details for the Text API when the filter matches. Combines with the contents of the [EMAIL_IGNORE_INCOMING] section of the text_api.cfg file.
The TextAPI Ignore Incoming field lists TextAPI keyword commands that are not permitted to be used in the text of the incoming email message. Any commands that are listed in this field are ignored when they are found in an incoming email message.
To specify TextAPI Ignore Incoming commands, do the following steps:
OBJECT.FIELD
Note: Do not include a leading percentage symbol (%), which is required only for the corresponding commands that are embedded in the body of the email.
For example, format the commands as follows:
CHANGE.ASSIGNEE
PROBLEM.GROUP
REQUEST.EFFORT
Specifies information about the rule.
Specifies the plain-text contents of a reply message when the message is processed successfully. For example:
Thank you for submitting an update to your request. A support technician will contact you within the next 24 hours.
You can also enter a notification phrase, if already created. For example, you can use a notification phrase for email auto-replies.
Thank you for submitting your request.
@{notification_phrase[notification phrase code].phrase}
Specifies HTML contents of a reply message when the message processes successfully. The following options let you edit and preview HTML text:
Opens the HTML Editor which you can use to format the HTML.
Previews the HTML.
Shows the HTML source.
You can also use a notification phrase, for example,
Thank you for submitting your request.</p>
@{notification_phrase[notification phrase code].phrase}</p>
Specifies the plain-text contents of a reply message when the message does not process successfully. You can also enter a notification phrase, if already created. For example, you can use the following text:
Thank you for submitting your request.
@{notification_phrase[notification phrase code].phrase}
Specifies HTML contents of a reply message when the message does not process successfully.
Create a Mailbox Rule
You can create rules that recognize specific keywords or elements of the incoming messages, and perform any actions, replies, or both, that must occur for incoming messages which contain those keywords or elements.
Note: The rules that are applicable for one mailbox cannot be associated with another mailbox. To reuse the same rules for a different mailbox, recreate them for the other mailbox. You can also copy the existing mailbox.
Important! We recommend that you set the associated mailbox to inactive before you configure a mailbox rule. Otherwise, any messages that the mail server retrieves between your first change and the last change are processed with whatever rules are in effect.
To create a mailbox rule
The Mailbox Rules List page appears and lists rules.
The Mailbox Rule Detail page appears.
The mailbox rule is created and in effect.
Mailbox Rule Actions
Mailbox rules let you perform any of the following email actions:
This action is useful for system-level messages such as Out of Office or Mail Delivery errors.
This action typically handles email replies where the object identifier is embedded in the email. If no object identifier is present, the failure response message is typically sent.
This action is the standard behavior of the mail daemon (Mail Eater) in which the email does or does not contain Text API keywords.
Note: For information about configuring mailbox rules, see the Online Help.
Pattern Matching in Mailbox Rules
Mailbox rules use regular expressions for pattern matching. Consider the following whitespace characters that apply to regular expressions in mailbox rules:
Specifies a horizontal tab.
Specifies a carriage return character.
Specifies a line feed or new line character.
The characters that represent line breaks in text can vary with the operating system, mail server, and mail client, for example:
In certain circumstances, the mail processing elements of CA SDM exchange substitute one of these line break characters for another to establish or maintain a distinction between different text elements, such as message text and attached parameters. As a result, when you want to use a line or paragraph break, build your filters so that either \r or \n can be matched, whichever is found. If you want to indicate a line break between two keywords, build your filters so that a sequence of one or more \r and \n characters can be matched.
Line wrapping by the mail client that sends a message can cause unexpected line breaks to appear in the middle of the text which is expected to match your filter string, when the filter string searches the body of the message. A space can change to a carriage return, line feed, or both, or the carriage return, line feed, or both can be inserted after a space. If a message is composed in HTML, and contains bulleted or numbered lists or indented paragraphs, tabs can also be present after the mail client converts and sends the message. When you include spaces in the middle of a filter string, use a Regular Expression block which represents any whitespace of variable size. This block is [ \t\r\n]+ (open-bracket, space, backslash, t, backslash, r, backslash, n, close-bracket, plus sign), and represents any sequence of one or more spaces, tabs, carriage returns, and line feeds.
Example: Use [ \t\r\n] to Match a Keyword Exactly
This example demonstrates how you can use whitespace characters to match the keyword "request" and not match other possible keywords such as the following words:
requester
requesting
requested
orequestra
To match only the keyword request, precede and follow the keyword request by one or more whitespace characters as follows:
[ \t\r\n]request[ \t\r\n]
The Mail Eater matches only the word request or the word as part of a sentence, and not as part of another word such as requester.
Filter String Object Identifier Restrictions
Restrictions apply to the mailbox rule filter strings which determine the object identifier (for example, %Incident:{{object_id}}%) in an email. Text that surrounds an object identifier ({{object_id}}) must be unambiguous in both content and length; the text must clearly define the beginning and end of the ticket ID artifact value that is between the text.
The following restrictions apply to how the Mail Eater interprets the start of the ticket ID artifact value:
The following restrictions apply to how the Mail Eater interprets the length of the ticket ID artifact value:
Any of these characters can exist within the ticket ID artifact value. When a bracketed set (several characters between brackets, of which the filter check can match any one), precedes or follows the {{object_id}} placeholder, the bracketed set must not contain any of these characters.
Special Characters in Regular Expressions
Pattern matching for the filters in mailbox rules follows the rules for ASCII Regular Expressions with C-style special characters.
Important! We recommend that you are familiar with Regex syntax to use special characters in regular expressions.
For example, consider the following special characters for Regex patterns that apply to regular expressions in mailbox rules:
Specifies a horizontal tab. In filter strings for mailbox rules, \t matches the beginning and end of text (and tabs), and is specific to the Mail Eater.
Specifies a carriage return (return to the beginning of the current line).
Note: Do not use \r for searching message subjects or sender addresses.
Specifies a newline (combination of line feed and carriage return).
Note: Do not use \n for searching message subjects or sender addresses.
\t, \r, and \n are the special characters that occur most often in regular expressions for mailbox rules.
Example: \t, \r, and \n Use
[ \t]request[ \t]
Searches text for the word request. The brackets match any one character from the set, including the space, so [ \t] matches a space or a tab.
[\r\n]+critical[ \t\r\n]
Searches text for the word critical at the start of a line, the start of the message, or as the entire contents of a line. The brackets match any one character from the set, and the + (plus sign) matches one or more of the previous, so [\r\n]+ matches one or more carriage returns and newlines.
Sample Text for Notification Phrases in a Mailbox Rule
This example shows sample text that you can use to include notification phrases in a mailbox rule. You define separate versions of a notification phrase for plain text and for HTML when the phrase contains any line breaks or other formatting.
Use the following text in Success Text, Success HTML, or both fields on the Update Mailbox Rule page, Reply Success tab:
Thank you for submitting your request.
@{notification_phrase[IncidentURL1].phrase}
Thank you for submitting your request.</p>
@{notification_phrase[IncidentURL1H].phrase}</p>
Note: For more information about Notification Phrases that is defined under Administration Tab, Notifications, Notification Phrases, see the Online Help.
Artifacts Use Considerations
An email artifact refers to something that arises from the mail process, for example, an email address that is included in a forwarded email. The Text API uses artifacts that contain a ticket ID (such as a reference number) for reply support. When the ticket ID is found, an existing Text API keyword (such as %INCIDENT_ID) is set and added to the input for the Text API. The Mail Eater identifies that a reply is associated with a particular ticket by finding the artifact in the message.
The Mailbox rules let you specify the artifact and the value that the Text API uses. For example, you can define a rule for incidents as Incident:{{object_id}}%. When a rule finds Incident:1234, the Text API uses %INCIDENT_ID=1234 (1234 is the ref_num for the Incident). Because the artifact must be unique in an email and easy to find, you can make the artifact more distinctive such as %Incident:{{object_id}}%. A percentage sign (%), whitespace, or some other character that cannot appear in an artifact value must follow {{object_id}}. Uppercase and lowercase letters, numbers, forward slashes, commas, and plus symbols are potentially part of a value. The secure artifacts are Base64-encoded after encryption. If you do not use the Secure artifacts, the characters that follow the artifact must not be contained in the ticket ID suffix, if any, which has been configured for that type of ticket.
When using the filter string of the mailbox rules to identify the ticket ID Artifact, the keyword {{object_id}} represents the position in the filter string where the ticket ID artifact is expected. This keyword is case-sensitive, even if the mailbox rule is not.
Example: Email Artifact Use
The following example shows an ARTIFACT format for use in a mailbox rule for a change request ticket.
Usage: %REQUEST=@{call_req_id.ref_num}%
Example: %REQUEST=1234%
When you construct the filter string of the mailbox rule, consider the following conditions:
Administration Guide - How to Create a Mailbox Rule That Matches Every Inbound Message
This new topic is for the Administration Guide in the chapter "Implementing Policy," in the section Email Administration, Mailbox Rules.
You can create a mailbox rule that matches every inbound message that another mailbox rule does not filter.
To create this type of rule, set the filter as Subject Contains and the filter string as a period and an asterisk (".*").
As a result, this combination matches zero or more characters that are not line breaks.
Example: A "Catch-All" Mailbox Rule
This example demonstrates how you can use a ".*" combination to match every inbound message:
Filter = "Subject contains"
Filter String = ".*"
How to Use the Mailbox Rules TextAPI Defaults and TextAPI Ignore Incoming Settings
The TextAPI Defaults and TextAPI Ignore Incoming fields let you specify default values for incoming mailbox rules, and specify TextAPI commands that should not be accepted in incoming emails. These fields work with the default values that are set in the [EMAIL_DEFAULTS] section and with the forbidden-commands list in the [EMAIL_IGNORE_INCOMING] section of the text_api.cfg file. When a conflict occurs between the definition in a mailbox rule and the definition in the text_api.cfg file, the value set in the mailbox rule applies.
The TextAPI Defaults field includes TextAPI keyword commands that are applied to a ticket when it is created from an email that matches a mailbox rule. The commands are not applied when the message affects an existing ticket.
To specify TextAPI Defaults commands, do the following:
OBJECT.FIELD=value
Note: Do not include a leading percentage symbol (%), which is required only for corresponding commands that are embedded in the body of the email.
For example, format the commands as follows:
REQUEST.PRIORITY=3
PROBLEM.CATEGORY=Facilities
INCIDENT.GROUP=Plumbing
The TextAPI Ignore Incoming field lists TextAPI keyword commands that are not permitted to be used in the text of the incoming email message. Any commands that are listed in this field are ignored when they are found in an incoming email message.
To specify TextAPI Ignore Incoming commands, do the following:
OBJECT.FIELD
Note: Do not include a leading percentage symbol (%), which is required only for the corresponding commands that are embedded in the body of the email.
For example, format the commands as follows:
CHANGE.ASSIGNEE
PROBLEM.GROUP
REQUEST.EFFORT
|
Copyright © 2013 CA.
All rights reserved.
|
|