

Identity Management Service › Getting Started with Identity Management › Set Up Identity Management Provisioning with Active Directory
Set Up Identity Management Provisioning with Active Directory
You can use Active Directory Server (ADS) to synchronize attribute data to supported endpoints. You do this by configuring CA IAM Connector Server to propagate local changes in Active Directory to a cloud-based identity store using a connector.
For example, assume that you have a SalesForce installation in the cloud. You could create an ADS group named "SalesForce" and then configure the CA IAM Connector Server to monitor that group. CA IAM Connector Server synchronizes any changes to the SalesForce environment in the cloud.
If you add a user to the ADS Salesforce group, CA IAM Connector Server uses the SalesForce connector to trigger a "Create User" action in the SalesForce environment proper.
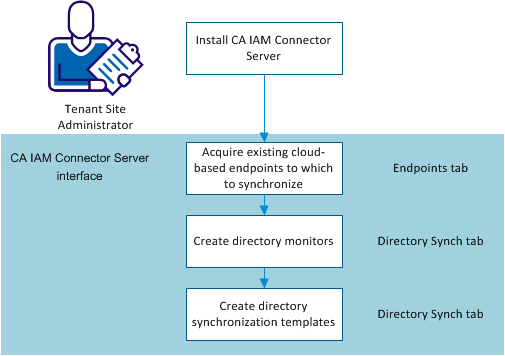
To set up directory synchronization, follow this process:
- Install CA IAM Connector Server in your environment.
- Acquire the endpoints that you want to synchronize with. Consult the appropriate connector configuration documentation. You must acquire endpoints in order to create templates in step 4.
- Create one or more directory monitors. Monitors capture changes that you make in your local Active Directory, and report them for the synchronization.
- Create one or more synchronization templates. Templates control settings for the directory synchronization.
Install CA IAM Connector Server
Install CA IAM Connector Server to set up directory synchronization to endpoints such as SalesForce
Follow these steps:
- Download CA IAM Connector Server from support.ca.com, and launch the installer.
- The C++ connector server is not required for directory synchronization.
- Clear the "Register this installation with a Provisioning Server" checkbox if it is selected. This setting is not required.
- You need not enter any information about the Cloud Connector Server screen for the purpose of this configuration.
- Enter the admin password on the Connector Server Configuration screen, and accept the default LDAP port values.
- On the Port Configuration screen, accept the default values.
- Complete the wizard.
Create a Directory Monitor
Create a directory monitor to find and report changes in your on-premise Active Directory installation. Monitors receive change notifications. Directory synchronization templates then control how the changes are processed.
Follow these steps:
- Select the Directory Sync tab, and click Add in the Monitor area.
The Add Monitor dialog appears. Both the ADS domain and forest you want to monitor must be Windows 2003 or later.
Note: if you are using ldaps, first import the ADS certificate in the Certificates tab. See Directory Synchronization with Active Directory for more information.
- Enter the URL of the Active Directory installation you want to monitor. Type it, or modify the default URL template with the appropriate hostname and port number.
- Enter User Distinguished Name information to grant access to ADS for synchronization. The user DN you enter must correspond to a valid user object in the Active Directory instance you want to monitor.
- Enter a password, if necessary for your active directory installation.
- Click Browse to connect to the ADS and locate a valid Search Base.
- You can test the LDAP connection if you have entered a password.
- Click OK.
You can also set connection pool details, such as how many connections can be active at any time.
Create a Directory Synchronization Template
Synchronization templates control how local changes are propagated to your endpoints, and how they are formatted. You can create synchronization templates for each of the endpoint types you want to control from your ADS installation. You can also create multiple templates for a single endpoint to subdivide the synchronization data, by business unit, for example.
Add one or more templates to each directory monitor in your environment. Add directory monitors before you can add synchronization templates.
Follow these steps:
- Log in to CA IAM Connector Server, and select the Endpoints tab to see the available endpoints that you can synchronize with.
- Select the Directory Sync tab, then click the monitor entry where you want to add a synchronization template, and click Add in the Template area.
The Add Template dialog appears.
- Select the template type that you want from the drop-down menu, and then select an available endpoint name.
- Select the User Store tab to set User Store details:
- Click Add in the Trigger Groups area.
- Enter a filter value if you want to refine the search for available groups. You can also accept the default in the Add Trigger group dialog.
- Click Search.
A list of available Active Directory groups appears.
- Select the group or groups you want using the shuttle control, and click OK.
- Select the Attributes tab to configure how the template maps Active Directory source information to the target endpoint:
A list of default attributes appears. Attributes that are required for your template type are displayed in bold type.
- Set required attribute mappings by selecting available mapping targets from the Maps To pull-down menu. You can also type a literal string.
- Set mappings for other available attributes as desired. Select a policy setting (WEAK or STRONG) for each mapping you add.
For single-value attributes, you need only be sure that the policy is not NONE. For multivalue attributes, Strong replaces any existing attribute value in the endpoint, and weak adds the new attribute value to any existing endpoint values.
- If the standard mapping table does not meet your needs, use the advanced editor. Click Advanced to display the editor. The advanced editor allows you to:
- Use JavaScript evaluated attribute values.
- Pick object references for association values.
- Set alternate attribute mappings or default values that apply when the primary mapping cannot be resolved.
- Click OK.
Copyright © 2015 CA Technologies.
All rights reserved.
|
|