

CA SSO Agent for SAP Guide › Configuring SAP Web AS 7.1-7.4 and CA SSO Agent for SAP to Work Together
Configuring SAP Web AS 7.1-7.4 and CA SSO Agent for SAP to Work Together
This section contains the following topics:
Guidelines for Updating CA SSO Policies
Change the Configuration of the SAP J2EE Engine
Deploy the SiteMinderLoginModule.sca
Add SiteMinderLoginModule Property Using the AS Java Config Tool
Set the CAPKIHOME Environment Variable
Configure SiteMinderLoginModule Using SAP NetWeaver Administrator
Create an Authentication Template Using SAP NetWeaver Administrator
Configure an Authentication Scheme for the Enterprise Portal
Guidelines for Updating CA SSO Policies
Guidelines for updating the CA SSO policies:
- Do not modify the CA SSO policies configured in Configure CA Single Sign-On Policies. The CA SSO login module uses these policies for Tier 2 authentication.
- Create additional policies for protecting each of the Web AS applications and the Enterprise Portal. See Configure CA Single Sign-On Policies.
- The name of the protected resource for Web AS applications depends on the particular Web AS application. For Enterprise Portal, /irj/ is usually the protected resource. For webdynpro applications, protect the /web-dynpro/ resource.
- Verify that all users accessing the Web AS or Enterprise Portal applications are included in the policies you created for the /smwebasagent/ validation realm.
More information:
Configure CA SSO Policies
Change the Configuration of the SAP J2EE Engine
Use the AS Java Config Tool to add a parameter named smwebas.home that identifies the path to the CA SSO Agent configuration directory that contains the SmWebAsSSO.conf file.
Follow these steps:
- Start the AS Java Config Tool. See the SAP documentation for details on how to start the tool on your operating system.
- Perform the following steps for each WebAS instance:
- Click the appropriate instance-ID entry.
- Click the VM Parameters tab.
- Click the System tab.
- Click the New button.
- Complete the fields in the New parameter dialog to create the smwebas.home parameter as follows:
Name: smwebas.home
Value (Windows): SMagent_install_dir\sapwebas\conf
Value (UNIX): SMagent_install_dir/sapwebas/conf
Note: On Windows, if the pathname contains spaces, use DOS notation.
Deploy the SiteMinderLoginModule.sca
SAP uses SAP Component Archives (SCAs) as the mechanism for deploying components with NetWeaver. To deploy the SiteMinderLoginModule, use SAP Java Support Package Manager (JSPM) or NetWeaver Developer Studio.
For JSPM, follow these steps:
- To locate the SCA file, navigate to the following location:
<AGENT_INSTALL_DIR>/sapwebas/lib/
- Copy the SCA file to the following JSPM Inbox directory:
<DIR_EPS_ROOT>/in
- Start JSPM and log in.
- Deploy the SiteMinderLoginModule as a hotfix as follows:
- Select the Hot fixes option on the Select Package Type page and click Next.
- Review the information that is displayed on the Specify Queue page and click Next.
- Review the information that is displayed on the Check Queue page and click Next.
- Verify that the status of the SiteMinderLoginModule is DEPLOYED on the Completed page.
- Click Exit to close JSPM.
For NetWeaver Developer Studio, follow these steps:
- Open NetWeaver Developer Studio and connect to the SAP system using Window, Preferences, SAP AS Java.
- Navigate to Deploy View.
- Add the SiteMinderLoginModule.sca to External Deployable Archives.
- Right-click the SiteMinderLoginModule and select Deploy.
Add SiteMinderLoginModule Property Using the AS Java Config Tool
Use the AS Java Config Tool to add the value "library:ca.com~SiteMinderLoginModule" to the LoginModuleClassLoader property.
Follow these steps:
- In the AS Java Config tool, click Instance-ID, Services, Security.
- Add the value library:ca.com~SiteMinderLoginModule to the LoginModuleClassLoaders key.
- Save the changes and restart SAP Web AS.
Set the CAPKIHOME Environment Variable
In UNIX, the [insert SiteMinder version number] Agent for SAP needs the CAPKIHOME environment variable.
Follow these steps:
- Open <SID>_<Java_Instance>_<hostname> file available in the following location:
<SAP_home>/<SID>SYS/profile/
- SAP home
-
Specifies the installation directory of SAP.
- Add the following line to the file:
SETENV_<xx> = CAPKIHOME=<Agent_install_dir>/sapwebas/CAPKI
Note: If the above profile has 6 SETENV variables (SETENV_00 to SETENV_05), then set “<xx>” as 06.
- Restart SAP Web AS.
Configure SiteMinderLoginModule Using SAP NetWeaver Administrator
Use the SAP NetWeaver Administrator to configure SiteMinderLoginModule.
Follow these steps:
- From the NetWeaver Application Server Java interface, click SAP NetWeaver Administrator.
The SAP NetWeaver Administrator opens at the Welcome page.
- Click the Configuration Management tab, and then click Authentication and Single-sign on.
- Click Login Modules and then click Create.
- Enter the following details for SiteMinderLoginModule in the New Login Module dialog and then click Create:
- Display Name: SiteMinderLoginModule
- Class Name: com.netegrity.siteminder.sap.webas.jaas.SiteMinderLoginModule.
Note: After creating the login module, do not specify any options.
Create an Authentication Template Using SAP NetWeaver Administrator
Use SAP NetWeaver Administrator to create an authentication template.
Follow these steps:
- Click the Configuration Management tab, and then click Authentication and Single-sign on.
- Click Components and click Create.
- Enter the following details for the authentication template in the New Custom Configuration dialog and then click Create:
- Configuration Name: SiteMinder
- Type: Custom
- On the Authentication Stack tab, click Edit.
- Click Add to assign the login module to the template. Select SiteminderLoginModule as the Login Module Name from the drop-down menu and set the value to Requisite.
- To the SiteminderLoginModule, add the options as follows:
- Click Add in the options section.
- Enter redirectOnError in the Name column and set the values to true.
- Click Add, to add the CreateTicketLoginModule, and set the value to Required.
- To the CreateTicketLoginModule, add the options as follows:
- Click Add in the options section.
- Enter ume.configuration.active in the Name column and set the value to true.
- Save the work on the Authentication Stack tab.
Configure the LogOff URL of the Enterprise Portal
Configure the LogOff URL of the Enterprise Portal to the LogOffURI parameter of the Web Agent.
Note: For more information about configuring the LogOffURI parameter of the Web Agent, see the CA SSO documentation.
Follow these steps:
- Run the Config Tool.
- Click Cluster data, Global server configuration, services, com.sap.security.core.ume.service.
- Set the value of the ume.logoff.redirect.url key to the URL of the LogOff page that you want to use for the Enterprise Portal. The value must match the value of the LogOffURI parameter for the Web Agent.
- Restart the WebAS J2EE engine.
The LogOff URL is configured.
Configure an Authentication Scheme for the Enterprise Portal
Create an authentication scheme to integrate SiteMinderLoginmodule with the Enterprise Portal.
Follow these steps:
- Create a backup of the existing authschemes.xml file, as follows:
- Start the Web AS Java Config Tool by executing SAPJ2EEEngine_installation\j2ee\configtool\configtool.bat.
- Click the symbol for Switch to configuration editor mode.
- In the tree, navigate to cluster_config, system, custom_global, cfg, services, com.sap.security.core.ume.service, Persistent, authschemes.xml.
- Click the symbol for Switch between view and edit mode to switch to edit mode.
- In the tree, select authschemes.xml and click the symbol for Show the details of the selected node.
- In the Change File dialog, click Download and save the file to a local directory. Leave the Change File dialog open.
- Make a duplicate copy of the authschemes.xml file with a different name.
- Edit the local authschemes.xml file in a text editor:
- Create a new authscheme by copying the elements of the existing uidpwdlogon authscheme. Rename the new authscheme to SiteMinder.
See the following example:
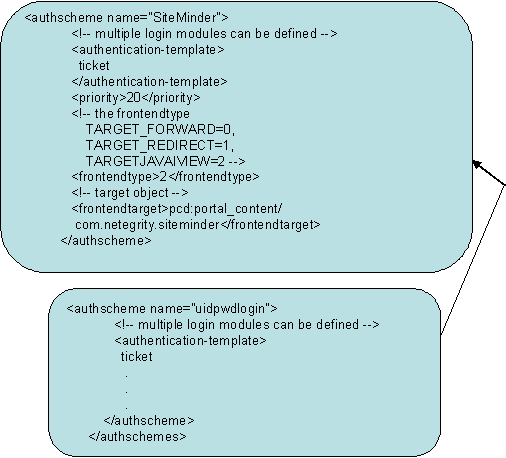
- Modify frontendtarget of the SiteMinder authscheme to point to a URL iView, which must refer to an error page. This page is presented to the user if authentication is unsuccessful or if the authentication stack fails. For details on creating a URL iView, see the SAP documentation.
Note: The value of frontendtarget that is shown here is merely for reference; change it appropriately for the user environment. Also if the frontendtarget value given here is an iView, give Read access to the Everyone group.
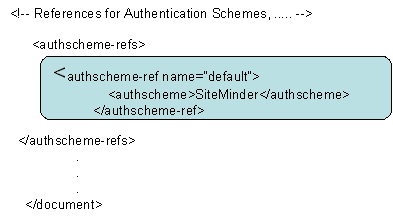
- Modify the default authscheme-ref so that it points to the SiteMinder authscheme.
- Save your changes to the authschemes.xml file and close the text editor.
- In the Web AS Java Config Tool Change File dialog that you left open in step 1f, click Upload and select the local authschemes.xml file you edited previously.
- Open the SAP NetWeaver Administrator
- Navigate to Configuration, Security, Authentication and Single Sign-On.
- Click on the "ticket" template.
- (Optional) Remove other Login Modules (BasicPasswordLoginModule, EvaluateTicketLoginModule) from the ticket authentication template stack.
- Add the following modules to the ticket authentication template stack, in the order that is shown and after the EvaluateTicketLoginModule, if present:
- SiteMinderLoginModule
- CreateTicketLoginModule
- Click on the SiteMinderLoginModule entry and add a redirectOnError option as follows:
- Click Add in the options section.
- Enter redirectOnError in the Name column and set the values to true.
- Click on the CreateTicketLoginModule entry and add a ume.configuration.active option as follows:
- Click Add in the options section.
- Enter ume.configuration.active in the Name column and set the value to true.
- Do one of the following steps:
- Restart the Web AS J2EE engine for the changes to take effect.
Configure CA SSO to Protect the Enterprise Portal
To configure CA SSO to protect the Enterprise portal, use the following process:
- Configure CA SSO to protect the /irj/ realm.
- Verify that the WASUSERNAME response attribute configured in this CA SSO policy is defined to return a valid Enterprise Portal user ID for the corresponding CA SSO user.
- Access the following URL:
http://webserver:port/irj/portal
- When challenged, enter CA SSO credentials for authentication.
On successful authentication, the portal page is displayed.
More information
Configure CA SSO Policies
Configure an Authentication Scheme for the Enterprise Portal
Guidelines for Updating CA SSO Policies
Copyright © 2015 CA Technologies.
All rights reserved.
|
|