

To specify metrics to be displayed:
Performance Manager displays an Instrument Metric Selections dialog, as shown in the following screen:
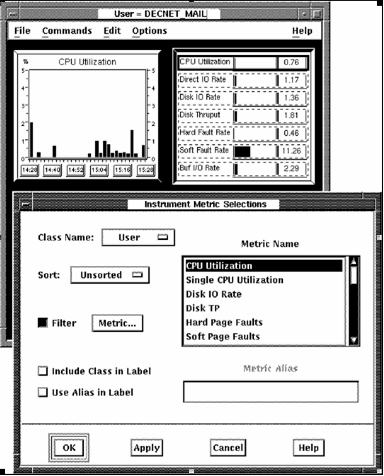
When Assign Metrics is chosen, the first metric field in the instrument to be assigned a metric will appear with a solid outline. If the instrument has more than one field, the others will appear with a dashed outline.
The Instrument Metric Selection dialog lets you perform the following actions:
The first metric field will automatically be selected, as shown by the solid outline. If another field is desired, click the instrument's outlined metric field. You may have to move the dialog out of the way if it occludes the instrument being modified. The Instrument Metric Selections dialog displays the instrument's current metric name and class. Hold MB1 down on the class name option menu to see all available choices. Release MB1 on the desired class name. A list of applicable metrics is displayed. Click the metric name you want to display. See Appendix C for a description of each metric.
Once you are satisfied with the metric selection for the field and you wish to specify another field in the instrument, press Apply and then select another field by clicking with MB1 within the dashed outline defining the field.
A sort option can be selected for all metric classes other than System.
To display only the data that matches a specific filtering criteria
This makes available the Metric... button.
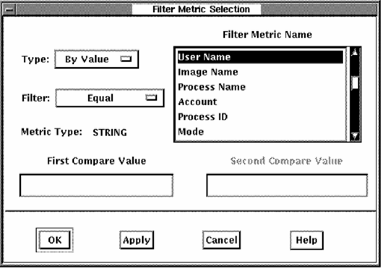
The Filter Metric Selection dialog lets you perform the following actions:
To enable filtering, position the mouse cursor over the Type option menu and hold down MB1. The following options are displayed:
To enable filtering based on a metric value, select the By Value option. To enable filtering based on a specific data item identifier such as a specific user name, process name, disk name, and so on, select the By Instance option.
For the By Value option, you can then specify the range of values to be displayed using the Filter option menu. Press and hold MB1 over the Filter options to see the following range of options:
The value to be compared for range determination can be entered in the Compare Value fields or can be based on a value from a parent panel, as described below.
If the Filter metric is a string then the value specified is interpreted as all uppercase unless the string is contained within double quotes.
If the instrument being modified is launched from another panel, then a value may be implicitly passed to this panel. In this case, this value is considered the instance value. See the Launching Panels section for more information. If you want to use this instance value, select By Instance in the Type option menu and select the applicable Filter Metric Name corresponding to the passed value and leave the Compare Value field empty.
Clicking on the Apply button, applies your choices without closing the dialog. The OK button applies your choices and closes the dialog.
|
Copyright © 2008 CA.
All rights reserved.
|
|