

Tenants are created and configured as separate steps. A tenant definition can contain one or multiple user account roles. Custom tenant roles are useful for specific requirements, such as a user who can search the Inventory and can drill down into data sources but can only view dashboards within a single tenant.
The operator who logs in with each tenant role only has permission to view data from managed items that belong to that tenant.
Users with the predefined Administrator role can also create tenant administrator roles, which grant the ability to:
Unlike the global administrator, a tenant administrator does not have access to data or Admin features in any other tenant environment. For more information, see Roles for Multi-Tenancy Support.
Follow these steps:
Or set the tenant scope to access tenant configuration as a global administrator.
The tenant indicator appears to show that you are administering the selected tenant environment.
The Manage Roles for [Tenant Name] page opens.
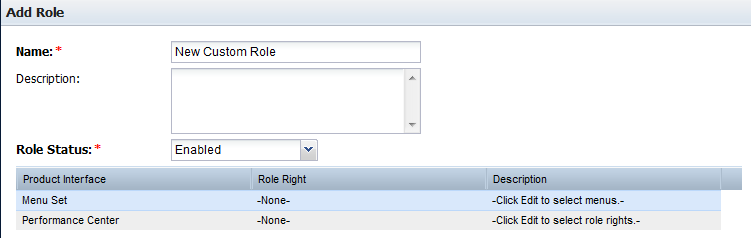
The Add Role for [Tenant Name] page opens.
Is a name for the new role. Limited to 45 characters.
(Optional) Describes the new role.
Lets you enable the role to make it active. The role must be enabled to give users with this role the appropriate rights.
A table indicates that no role rights have been selected for the role.
The Edit Menu Set dialog opens, where you can select menus for this role. Menus listed in the 'Available Menus' area can be added to the role.
The selected item moves to the Selected Menus list.
Use Shift + Click or Ctrl + Click to select multiple items in the list.
You return to the Add Role page.
The Edit Role Rights dialog opens, where you can select individual access rights for this role.
Use Shift + Click or Ctrl + Click to select multiple items in the list.
You return to the Add Role page.
The new role appears in the Role List, which is scoped for the current tenant.
|
Copyright © 2014 CA.
All rights reserved.
|
|