Custom Reports › Set Up Custom Reports › Add, Delete, and Exclude Interfaces for Custom Reports › Select Interfaces and Interface Groups
Select Interfaces and Interface Groups
Before you specify other settings for a new Custom Report, you must add at least one interface or interface group. The Select Interfaces page provides options for specifying individual interfaces and interface groups, which you can use to create useful reports quickly.
Note: Custom groups are defined and managed in CA Performance Center. If CA Network Flow Analysis is not registered as a data source for CA Performance Center, the only available interface groups are the default groups that are defined by type.
Follow these steps:
- Select Custom Reporting from the NFA console menu if the Custom Reporting page is not already open.
- Put the report that you want to change in editable mode: Click the name of the report. If the report has been run previously, it will run again. In this case, click Edit in the Report Settings section at the top of the report page.
The Report Definition Summary page opens, which contains links to the Custom Report wizard pages.
Note: You can edit a report that appears in the Reports list as long as it has a status other than Running.
- (Optional) Click Add Interface Filter and select one or more interfaces to include in the report. You can add individual interfaces, interface groups, or both. You must specify some kind of interface filter, however.
The Select Interfaces page of the Custom Report wizard opens.
- Expand the interface list for the desired router, then select the check box for each interface you want to include in the report.
- Click Submit to add all selected interfaces to the list and close the Interface Index.
- (Optional) Click Add Interface Group Filter and select one or more interface groups to include in the report. You can add individual interfaces, interface groups, or both. You must specify some kind of interface filter, however.
The Interface Group Selection page opens.
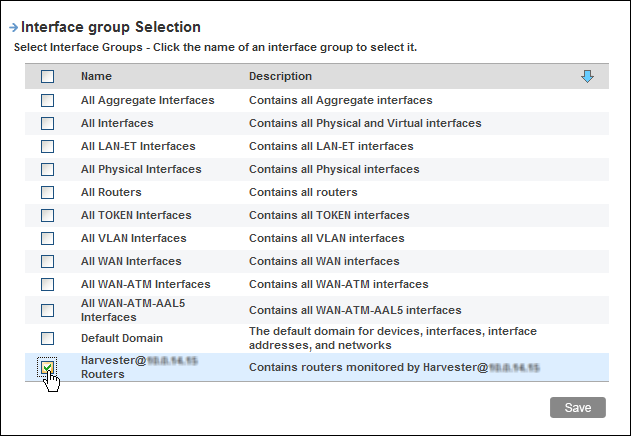
- Select check boxes for the groups to add from the Interface Group Selection list.
- Click the blue arrow near the upper right corner to jump to the bottom of the list, then click Save.
You return to the Select Interfaces page of the Custom Report wizard. The Select Interfaces list now includes the interfaces and interface groups you selected.
- Check the list of interfaces and interface groups and their Inclusion values.
Note: Items that have a value of Include are in the report. You can temporarily remove an interface or interface group from the report by setting the Inclusion value for that item to Exclude.
- Click Save Changes.
Your changes are saved and you return to the Report Definition Summary.
Note: To save the report definition, you must have at least one interface set to be included.
- (Optional) Return to the report list by clicking one of these buttons:
- Return to Listing: Return to the Custom Reporting page without queuing the report to run.
- Queue Report: Queue the current report to run and return to the Custom Reporting page.
More information:
Delete Interfaces and Interface Groups
Exclude Interfaces or Interface Groups Temporarily

