

|
|
|
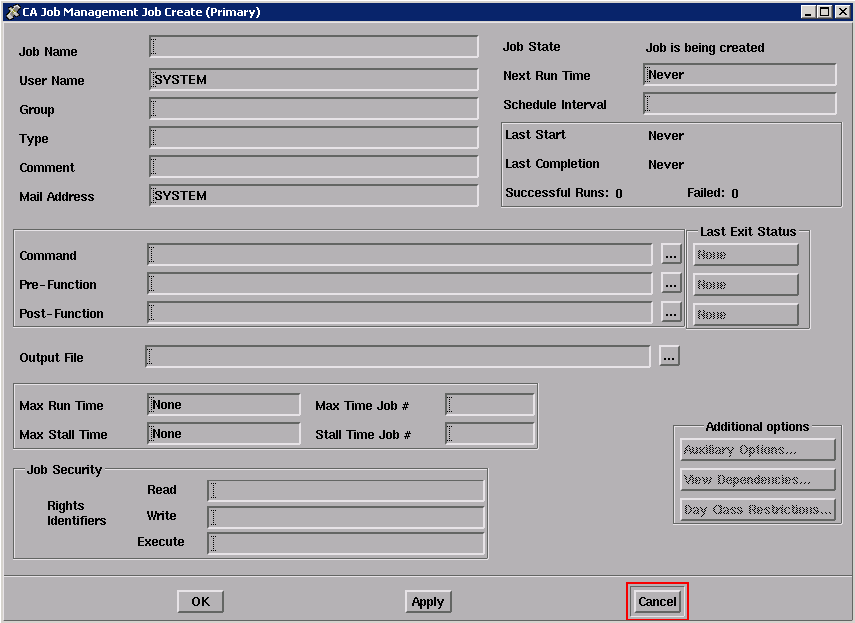
Use the Job Create dialog box to create a job. This dialog box contains text entry fields for entering job attributes and buttons for displaying three additional related dialog boxes. The three buttons at the bottom of the dialog box are grayed out until you create the job by clicking on the Apply button.
The following figure shows the primary Job Create dialog box, which is similar to the Job Edit dialog box:
To create a job in the Job Management Manager database:
The Job Create dialog box is displayed.
Characters appear in the fields as you type.
A highlighted message reporting the job creation is displayed in the Real Time Message Display dialog box, and a small DECwindows message box also appears.
The Job Create dialog box is removed from the screen.
The following table describes the fields you can use to enter job attributes in the Job Create dialog box.
|
Use this field... |
To enter... |
|---|---|
|
Job Name |
The name of your job. |
|
User Name |
Your OpenVMS user name. |
|
Group |
The name of the group that this job belongs to. |
|
Type |
The name of the job type that this job belongs to. |
|
Comment |
Any miscellaneous comments you want to add. |
|
Command |
The primary system-level command to perform when this job is run. |
|
PreFunction |
A command to perform before the job’s primary command. |
|
PostFunction |
A command to perform after the job’s primary command. |
|
Output File |
The name of the file to receive the output of this job. |
|
Schedule Interval |
The Job Management Manager delta time interval for running the job. Example: D 01:00 specifies to run the job daily at 1:00 A.M. |
|
Stall Time Job # |
A local job to execute if the job’s stall time is exceeded. Note that you must use Job Management Manager delta time in this field (+DDDD HH:MM:SS.) |
|
Max Time Job # |
A local job to execute if the job’s maximum time is exceeded. Note that you must use Job Management Manager delta time in this field (+DDDD HH:mm:ss). |
|
Read Identifier |
A Privilege identifier that overrides the normal UIC protection. |
|
Write Identifier |
A Privilege identifier that overrides the normal UIC protection. |
|
Execute Identifier |
A Privilege identifier that overrides the normal UIC protection. |
|
Next Run Time |
When to run the new job for the first time (default: Never). |
|
Maximum Run Time |
The maximum Job Management Manager delta time for the job to run before the Max Time Job is started (default: None). Use the format +DDDD HH:MM:SS. You cannot use this field if you do not specify a Max Time Job. |
|
Stall Time |
The maximum Job Management Manager delta time for the job to stall before the Stall Time Job is started (default: None). Use the format +DDDD HH:MM:SS. You cannot use this field if you do not specify a Stall Time Job. |
|
Mail Address |
The address to which to send Mail (default: your username). |
After you have filled in the fields’ necessary to create your job, you can click on Apply to create the job and then click on Auxiliary Options... and/or Day Class Restrictions..., if you need to use these dialog boxes to enter more information.
| Copyright © 2012 CA. All rights reserved. | Tell Technical Publications how we can improve this information |