

As a system administrator, you can use a Linux-based boot image to deploy Linux operating systems and Hypervisors like VMware ESXi and Citrix Xen Server in an unattended mode.
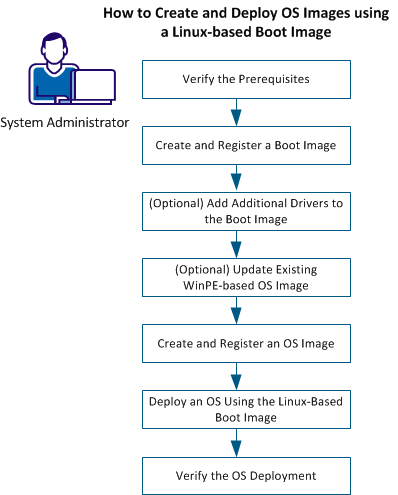
The following diagram describes the steps for creating and deploying the OS images using Linux-based boot image:
Using the new Linux-based boot image, you create and deploy OS images. See Supported Operating Systems for the list of Operating Systems supported.
Perform the following steps:
CA ITCM provides a new Linux-based boot image that is based on CentOS 6.3 64-bit OS. Verify you have access to the media with a customized version of this Linux-based boot image.
Note: You can create, update, and register the boot and OS images using the corresponding Image Prepare System wizards in DSM Explorer or the CLI. You need administrator privileges on the IPS installed computers.
On the computers with pre-Windows Vista, such as Windows XP, Windows Server 2003, or lesser versions, the user must be a part of the Local Administrators Group.
On Windows Vista and above such as Windows 7, Windows Server 2008, and higher, where the user is not the built-in administrator, the user must be part of the local administrators group, and run the tools using Run as administrator in an elevated mode.
You can create a Boot image by using the corresponding wizards in DSM Explorer or the corresponding commands from the Command Line Interface (CLI).
For more information, see Create and Register a Boot Image using DSM Explorer and Create and Register a Boot Image using CLI
Follow these steps:
The wizard displays the introduction content. Click Next.
The New Boot Image: The Command Execution page shows that the boot image is successfully created.
You can now register the boot image.
Follow these steps:
Register Boot Image: The Command Execution page shows that the boot image is successfully registered.
You can proceed to create and register the OS image.
You can create and register a boot image using CLI.
Follow these steps:
Execute one of the following commands to create a boot image:
CreateBTImages -i <Image Name> -o LINUXPEx64
CreateBTImages -i <Image Name> -o LINUXPEx64 -m <Path to the Customized CentOS image>
Where –m specifies the location of the folder where the extracted customized CentOS boot files exist. For example, the DVD is extracted to C: drive, the path is C:\linuxpe\x86_64
Follow these steps:
Use the following command to register the boot image:
RegisterBTImages {-s <manager>} [-i <imagenames>[-u <user> -p <password> -d <domain>]
Add drivers to the boot image when the Linux boot image does not contain the drivers that are required for the target hardware. A Linux-based machine is required for the same. CentOS 6.3x64 is the preferred OS.
Follow these steps:
# mkdir initrd
# cd initrd
# gzip -dc ../initrd.img | cpio -idv
When additional drivers (for example: myscsidriver.ko) are added for SCSI disk, copy the myscsidriver.ko files to the appropriate /lib/modules/ 2.6.32-279.el6.x86_64/kernel/drivers/scsi directory of the initrd image.
# cp myscsidriver.ko /lib/modules/2.6.../kernel/drivers/scsi/
#mv ../initrd.img ../initrd.bak
# find.| cpio -H newc -o > ../initrd.cpio
#gzip ../initrd.cpio
#mv../initrd.cpio.gz ../initrd.img
Note: When you create initrd.img, use a separate directory to create initrd.cpio and initrd.img. If you use the same directory that contains all the unpacked files, cpio attempts to create initrd.cpio recursively (packing again and again), and may fail due to lack of sufficient space on the hard disk.
You can update the existing Linux OS images that use WinPE as the boot image to use the new Linux-based boot image for deployment. See the Compatibility Matrix available on support.ca.com for the list of Operating Systems supported.
Use the following methods for updating the OS images.
This updates the existing OS images with new scripts and utilities needed to work with the new Linux-based boot image and sets up the OS image to use this new boot image.
With the new boot image support, administrators do not have to copy syslinux manually in the OS Image.
|
Copyright © 2013 CA.
All rights reserved.
|
|