

Extended Network Connectivity (ENC) › ENC Deployment Scenarios › ENC Deployment Scenario - The Pilot Scheme
ENC Deployment Scenario - The Pilot Scheme
This scenario is expected to be the first that an organization deploys and is intended to give experience on how the system works. It also serves as a simple example to help understanding the ENC Gateway.
This scenario is based simply on three computers, two are agent computers behind Windows personal firewalls and the third is an ENC Gateway Server that provides connectivity.
The following illustration shows the layout of the pilot scheme scenario:
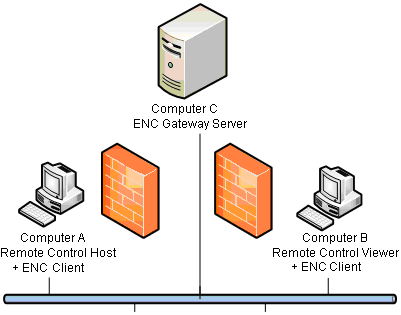
In this scenario, computer A is running a Remote Control Host, computer B is running a Remote Control Viewer, and computer C is running an ENC Gateway Server. Computer B cannot connect to computer A because it is behind a firewall. All computers are running ENC Clients which are connected to the ENC Gateway Server on computer C. It is computer C that provides connectivity from computer B to A. The setup is unmanaged by a domain manager because we want the scenario to be as simple as possible.
To set up a small ENC Gateway network, follow these steps:
On Computer A:
- Enable the Windows firewall.
- Start a custom install of CA ITCM. Select "Remote Control" and "Agent."
- When the installer asks for the address of the scalability server, accept the preset default value. When the installer asks you if that is OK (since there is no server), click Yes. This allows an unmanaged installation to work.
- Click the ENC Client button to start configuring the client. Enter the address of computer C for the client’s server address.
- Click the Remote Control button and select only "Install host functionality."
- When installation completes, do not start CA ITCM but instead execute the following commands:
ccnfcmda -cmd setparametervalue -ps itrm/rc/host/managed -pn centralizedsecurity -v 0
ccnfcmda -cmd setparametervalue -ps itrm/rc/host/managed -pn standalone -v 1
- Start CA ITCM using the "caf start" command.
On Computer B:
- Enable the Windows firewall.
- Start a custom installation. Select "Remote Control" and "Viewer".
- No scalability server specification (proceed as on computer A).
- Configure an ENC Client in the same way as on computer A.
- Click the Remote Control button and select only "Install Viewer functionality."
- When installation completes, do not start CA ITCM but instead execute the following command:
ccnfcmda -cmd setparametervalue -ps itrm/rc/viewer/managed -pn managedmode -v 0
- Start CA ITCM using the "caf start" command.
On Computer C:
- Verify that the windows firewall is disabled.
- Start a custom installation. Clear all products. On the custom installation dialog, clear everything except "ENC Gateway" and "Agent."
- No scalability server specification (proceed as on computers A and C).
- On the dialog for configuring the ENC Gateway, select all three roles: Manager, Server and Router.
- Do not start up CA ITCM on this computer right now. The security for the Gateway server is not configured yet and will reject all connections from clients. To configure ENC security, we can create a text file containing a rule that allows anyone to connect. The file is then imported into the common store for the server to pick up.
Important! Note that this is just an example. In a real production environment, you would never use rules that allow open access!
- Create a text file called defrules.txt, containing the following text:
[authz]
RulesVersion=5
REALM
{Name "ENC" Notes "The default realm to which everyone belongs"}
end
TimeRange
{Name "all-days" enabled "1" Hours "00:00 - 00:00" Type "normal" Weekdays "sunday - saturday"}
end
TimeACL
{Name "policy1" enabled "1" RuleType "allow" Events "AuthenticatedConnection ManagerRegisterServer ServerRegisterRouter ManagerRegisterRouter ServerRegisterAgent ManagerRegisterAgent ManagerNameLookup AgentConnect RouterAgentConnect ManagementAccess" TimeRange "all-days" SecPrincType "realm" SecPrinc "ENC" SecObj "ENC" SecObjType "realm"}
end
URIMapping
{URI ".+" enabled "1" Type "pattern" Realm "ENC"}
end
IPAddWhiteList
{IPAddress ".+" enabled "1" Type "pattern"}
end
- Import this rule file using the encUtilCmd command, as follows:
encUtilCmd import -i defrules.txt -fl
The ENC Gateway Server now has a rule that allows all connections.
- Finally, install ENC certificates on all computers. For more information, see Setting Up Certificate Services for Use by ENC Gateway.
To test the scenario, perform the following steps:
- On computers A and B start up CA ITCM using the command "caf start". Do not start up computer C yet because we want to test without ENC Gateway functionality.
- Start up the host configuration dialog by selecting it from the system tray on computer A. Select the Users tab and verify that the local administrator is a user of Remote Control on that computer.
- On computer B, start up the viewer and try to connect. This should be blocked by the firewall on computer A.
- Start up CA ITCM on computer C. After a few minutes, check that the ENC Clients have registered with the ENC Gateway Server using the "encclient status" command. This should report that the client has registered successfully and is ready.
- Repeat the connection attempt; it should now work. All data is being routed via computer C. The "encclient status" command should report that a connection is in progress via computer C.
- You can adjust the rules by modifying the defrules.txt file and reimporting, but using the encUtilCmd command with the -o option to override the existing rules. This allows experimentation with different authorization rules so you can get a feel for the system.
(For the detailed description of the encUtilCmd utility program and all its options, see the EncUtilCmd Command Reference, which you can find in the CA Bookshelf under the Reference Guides category.)
Copyright © 2013 CA.
All rights reserved.
|
|