

This section contains the following topics:
Questions and Answers About Using DMA
Define a New Migration: Sequence of Screens
Define a New Migration: Overview
Complete First Steps Using DMA
1. Describe the Migration Environment
2. Specify a New Starting Point
3. Accept or Override Defaults
4. Specify Starting Point Overrides
5. Include/Exclude Source Types (Current Starting Point)
6. Include/Exclude Load Types (Current Starting Point)
7. Obtain CA IDMS Dictionary Migrator Reports
8. Store Setup into a PARMFILE
Use a Series of Commands from the Menu
Limit Entities for Overall Migration
Submit Parameters and JCL Online
Submit Parameters and JCL from the Batch Environment
Copy CA IDMS/Dictionary Migrator JCL to DMA
CA IDMS Dictionary Migrator Assistant (DMA) is an online tool that assists you in selecting parameters to supply to CA IDMS Dictionary Migrator. This section provides an overview of DMA requirements and user authority, and tells you how to use it.
The system and storage requirements for operating DMA are listed below.
You must upload CA IDMS Dictionary Migrator JCL to DMA before you can use DMA. For information on installing DMA and uploading CA IDMS Dictionary Migrator JCL to DMA, see the Installation Guide.
System requirements include the operating environment, terminal type, and security.
DMA supports 3270 or 3270-compatible terminals, models 2, 3, 4, or 5.
You can limit access to Dictionary Migrator Assistant by setting security on the task code DMA, or on the modified task code specified in your sysgen tables.
Within a DMA session, you can delete or modify your own parameter files. You cannot delete or modify another user's parameter files. You may have authority to copy another user's parameter files. Consult your DBA.
DMA requires program storage, working storage, scratch storage, and database storage.
Because all DMA modules are reentrant, only one copy of DMA is required to support multiple users. When DMA is in use, 498K is the most program storage required at any one time.
Each user who is currently using DMA may require up to 25K of working storage.
Scratch records are used during each DMA session. For each user, 0.5K of scratch storage is required unless the SHOW or JCL function is in use. If the SHOW and/or the JCL function is in use, 5K is required.
For each parameter file stored in the PARMFILE database, 4K of database storage is required.
Security may be in effect for your company's dictionaries. If so, you need authority to read the source dictionary and modify the target (object) dictionary. See your DBA concerning any questions you may have about dictionary authority.
In addition, security may be in effect in your company for using CA IDMS Dictionary Migrator. If so, you need authority to use CA IDMS Dictionary Migrator. Again, see your DBA for any questions you may have concerning authority to use CA IDMS Dictionary Migrator.
You may also need authority to perform DMA activities. Depending upon your company policy, you may need authority for all or selected DMA activities, including:
DMA displays messages either in the message areas on DMA screens or on confirm screens.
DMA displays informative, warning, and error messages in the message area on the third line of every screen. These messages, along with reasons for occurrence and suggested actions, are listed in the chapter "Messages".
DMA displays confirmation messages on separate screens. A confirm screen appears when you enter:
Sample confirm screens are shown in the next screen.
The confirm screen reminds you of the consequences of executing the command. It also gives you a choice of either executing the command or returning to the current setup without executing the command.
To execute the command:
To return to the current setup without executing the command:
CA IDMS/DMA Rnn.nn ---  Confirm Setup RESET  ---------------------hh:mm mm/dd/yy
COMMAND ===>                                                             XDMACFM
********************************************************************************
*                                                                              *
*       WARNING ----------------- WARNING ------------------- WARNING          *
*                                                                              *
*                                                                              *
*       A RESET command has been entered. If the RESET is executed:            *
*                                                                              *
*            1)  The current setup will be erased.                             *
*                                                                              *
*            2)  You will go to the 'Select DMA Activity' to restart the setup *
*                                                                              *
*       Press "ENTER" to execute the RESET.                                    *
*                                                                              *
*       Use the "PREVIOUS" command to continue the setup.                      *
*                                                                              *
********************************************************************************
CA IDMS/DMA Rnn.nn ---  Confirm Session Exit  --------------------hh:mm mm/dd/yy
COMMAND ===>                                                             XDMAXFM
********************************************************************************
*                                                                              *
*       WARNING ----------------- WARNING ------------------- WARNING          *
*                                                                              *
*                                                                              *
*       An EXIT command has been entered. If the EXIT is executed:             *
*                                                                              *
*            1)  The current setup will be erased.                             *
*                                                                              *
*            2)  You will Exit CA-IDMS/Dictionary Migrator Assistant.          *
*                                                                              *
*       Press "ENTER" to execute the EXIT.                                     *
*                                                                              *
*       Use the "PREVIOUS" command to continue the session.                    *
*                                                                              *
********************************************************************************
DMA commands allow you to execute DMA functions, transfer to other functions, or view more data within the same function.
In the next screen, all of the valid DMA commands are listed. For each command that implements a transfer to another screen, that screen is listed. Otherwise the function is described. The table also lists a default PF key for each command.
The screen currently displayed determines which commands are active. For example, when you are viewing the Confirm Session EXIT screen, the only active commands are HELP, KEYS, ENTER, and PREVIOUS.
To enter a command press the PF key associated with that command or:
CA IDMS/DMA Rnn.nn --- Display PF Key Values ---------------------hh:mm mm/dd/yy
COMMAND ===>                                                             XDMAKEY
PF KEY VALUES:  PRIMARY KEYS
PF1   ==> HELP
PF2   ==> NEXT
PF3   ==> PREVIOUS
PF4   ==> START
PF5   ==> SPOVER
PF6   ==> FILES
PF7   ==> UP
PF8   ==> DOWN
PF9   ==> OUTPUT
PF10  ==> ENVIRON
PF11  ==> JCL
PF12  ==> MENU

INSTRUCTIONS:  PRESS "ENTER" KEY TO PROCESS CHANGES AND DISPLAY ALTERNATE KEYS
               Enter "PREVIOUS" command to process changes and RETURN
CA IDMS/DMA Rnn.nn --- Display PF Key Values ---------------------hh:mm mm/dd/yy
COMMAND ===>                                                             XDMAKEY
PF KEY VALUES:  ALTERNATE KEYS
PF13  ==> RESET
PF14  ==> OVERRIDE
PF15  ==> SWAP
PF16  ==> KEYS
PF17  ==> STORE
PF18  ==> SHOW
PF19  ==> WITHSRC
PF20  ==> SUBMIT
PF21  ==> SLISTT
PF22  ==> WITHLOAD
PF23  ==> ENTER
PF24  ==> =X

INSTRUCTIONS:  PRESS "ENTER" KEY TO PROCESS CHANGES AND DISPLAY ALTERNATE KEYS
               Enter "PREVIOUS" command to process changes and RETURN
DMA commands can be selected from the System Commands menu. At any time after you have selected a DMA activity, you can access the System Commands Menu by typing MENU in the command line and pressing the ENTER key, or by pressing PF12.
The System Commands Menu is shown in the next screen.
To select a command from the menu:
You can also enter a command in the command line on the System Commands screen.
CA IDMS/DMA Rnn.nn --- System Commands ---------------------------hh:mm mm/dd/yy
COMMAND ===>                                                             XDMAMNU
(S)elect one or more of the following functions OR enter one COMMAND:
       FILES    - LIST of PARMFILES
       STORE    - Store Setup into PARMFILE
       ENVIRON  - Describe the Migration Environment
       OVERRIDE - Specify Migration Overrides
       OUTPUT   - Specify Migration Output
       START    - Specify a new STARTING POINT
       SPOVER   - Specify STARTING POINT Overrides
       SLIST    - LIST of STARTING POINTS
       WITHSRC  - Include/Exclude SOURCE Types
       WITHLOAD - Include/Exclude LOAD Types
       JCL      - Edit JCl for Migration
       SHOW     - BROWSE Parameters for Migration
       RESET    - ERASE setup and RESTART
       SUBMIT   - SUBMIT current setup to CA-IDMS/Dictionary Migrator
       KEYS     - DIsplay Key Values
       HELP     - Display HELP Screen
       X        - EXIT from DMA
To specify more than one command on the System Commands menu:
The first (nearest the top) command is executed.
When you have finished with the first screen, Press PF3. .
The next command on the System Commands menu is then executed.
To provide quick access to DMA functions, all of the system commands are assigned to PF keys. Values assigned to the primary and alternate PF keys are displayed on the Display PF Key Values screen. The default values of the PF keys are shown in the next screen.
To access the Display PF Key Values screen:
To change the value of a PF key:
For example, to change PF5 to OUTPUT, place the cursor at the beginning of SPOVER after PF5, and type OUTPUT. If you then press the ENTER key without changing PF9, both PF5 and PF9 will have the value OUTPUT.
If you change any PF key values, the PF keys retain the new values throughout your current DMA session, until you exit DMA.
The screen currently displayed determines which commands are active. For example, when you are at the Confirm Session EXIT screen the only active commands are HELP (PF1), KEYS (PF16), ENTER (PF23), and PREVIOUS (PF3).
CA-IDMS/DMA Rnn.nn --- Display PF Key Values ---------------------hh:mm mm/dd/yy
COMMAND ===>                                                             XDMAKEY
PF KEY VALUES:  PRIMARY KEYS
PF1   ==> HELP
PF2   ==> NEXT
PF3   ==> PREVIOUS
PF4   ==> START
PF5   ==> SPOVER
PF6   ==> FILES
PF7   ==> UP
PF8   ==> DOWN
PF9   ==> OUTPUT
PF10  ==> ENVIRON
PF11  ==> JCL
PF12  ==> MENU

INSTRUCTIONS:  PRESS "ENTER" KEY TO PROCESS CHANGES AND DISPLAY ALTERNATE KEYS
               Enter "PREVIOUS" command to process changes and RETURN
CA-IDMS/DMA Rnn.nn --- Display PF Key Values ---------------------hh:mm mm/dd/yy
COMMAND ===>                                                             XDMAKEY
PF KEY VALUES:  ALTERNATE KEYS
PF13  ==> RESET
PF14  ==> OVERRIDE
PF15  ==> SWAP
PF16  ==> KEYS
PF17  ==> STORE
PF18  ==> SHOW
PF19  ==> WITHSRC
PF20  ==> SUBMIT
PF21  ==> SLISTT
PF22  ==> WITHLOAD
PF23  ==> ENTER
PF24  ==> =X

INSTRUCTIONS:  PRESS "ENTER" KEY TO PROCESS CHANGES AND DISPLAY ALTERNATE KEYS
               Enter "PREVIOUS" command to process changes and RETURN
Here is a list of some questions that may arise in your use of DMA, and some recommended actions to take.
If you are unsure of the values assigned to PF keys, type KEYS in the command line of any screen and press the ENTER key, or press PF16.
If you are unsure of what the system commands are, type MENU in the command line and press the ENTER key, or press PF12.
If you are unsure of what to enter on a DMA screen, type HELP in the command line and press the ENTER key, or press PF1.
Contact your DBA if you have questions about your authority to perform the following activities:
You may be unsure what entities are to be extracted from the source dictionary. Or, you may be unsure how a migration would affect the target dictionary. To find out, on the Specify Migration Output screen select VERIFY, MIGRATE, or AUDIT. Then, submit the parameters to CA IDMS Dictionary Migrator. By selecting VERIFY, MIGRATE, or AUDIT, you can expect CA IDMS Dictionary Migrator to perform the migration-related activities and then produce reports that display the information you need.
If you have questions about using the dictionary, contact your DBA and/or see the appropriate CA IDMS manuals.
You must complete the steps described below any time you begin using DMA.
To access DMA, type the task code DMA on the CA IDMS/DC system prompt screen. Once you have done this, DMA displays the Select DMA Activity Screen. To return to the CA IDMS/DC system prompt screen from the DMA entry screen, press the CLEAR key.
From the Select DMA Activity screen, you can begin to perform any of the major DMA activities. Choose one:
After you have made one choice on the screen, press the ENTER key.
CA IDMS/DMA Rnn.nn ---  Select CA-IDMS/DMA Activity  -------------hh:mm mm/dd/yy
COMMAND ===>                                                             XDMAWHA
       Do You Want to:
        Define a NEW Migration? ===> N  (Y)es or (N)o
 See a LIST of Parameter Files? ===> N  (Y)es or (N)o
Start from Parameter File Name? ===>
                      Get HELP? ===> N  (Y)es or (N)o


Please Make a Choice and Press the "ENTER" key
If you want to begin a new DMA migration setup without exiting DMA, use the RESET command; if you want to exit DMA, use the exit command (X). A migration setup terminates when you execute a RESET or an exit command.
Resetting DMA permits you to:
To RESET DMA, type RESET in the command line and press the ENTER key, or press PF13. After using the RESET command, DMA displays the Confirm Setup RESET screen (see the next screen). This screen reminds you of the consequences of executing the RESET.
To execute the RESET function, press the ENTER key.
If you enter the RESET command by mistake, type PREVIOUS in the command line and press the ENTER key, or press PF3. DMA displays the System Commands screen.
CA IDMS/DMA Rnn.nn ---  Confirm Setup RESET  ---------------------hh:mm mm/dd/yy
COMMAND ===>                                                             XDMACFM
********************************************************************************
*                                                                              *
*       WARNING ----------------- WARNING ------------------- WARNING          *
*                                                                              *
*                                                                              *
*       A RESET command has been entered. If the RESET is executed:            *
*                                                                              *
*            1)  The current setup will be erased.                             *
*                                                                              *
*            2)  You will go to the 'Select DMA Activity' to restart the setup *
*                                                                              *
*       Press "ENTER" to execute the RESET.                                    *
*                                                                              *
*       Use the "PREVIOUS" command to continue the setup.                      *
*                                                                              *
********************************************************************************
Exiting DMA permits you to:
To exit DMA, type X in the command line and press the ENTER key, or press PF24. When you enter the exit command, DMA displays the Confirm Session EXIT screen (see next screen). This screen reminds you of the consequences of executing the EXIT.
To execute the exit function, press the ENTER key.
If you enter the exit command by mistake, type PREVIOUS in the command line and press the ENTER key, or press PF3. DMA returns to the previous screen.
CA IDMS/DMA Rnn.nn ---  Confirm Session Exit  --------------------hh:mm mm/dd/yy
COMMAND ===>                                                             XDMAXFM
********************************************************************************
*                                                                              *
*       WARNING ----------------- WARNING ------------------- WARNING          *
*                                                                              *
*                                                                              *
*       An EXIT command has been entered. If the EXIT is executed:             *
*                                                                              *
*            1)  The current setup will be erased.                             *
*                                                                              *
*            2)  You will Exit CA IDMS/Dictionary Migrator Assistant.          *
*                                                                              *
*       Press "ENTER" to execute the EXIT.                                     *
*                                                                              *
*       Use the "PREVIOUS" command to continue the session.                    *
*                                                                              *
********************************************************************************
Several fields are common to all DMA screens. Here are descriptions of the fields, designated in the next screen.
CA IDMS/DMA Rnn.nn --- System Commands ---------------------------hh:mm mm/dd/yy
COMMAND ===>                                                             XDMAMNU
DMA0060I MIGRATION JOB SUBMITTED
(S)elect one or more of the following functions OR enter one COMMAND:
       FILES    - LIST of PARMFILES
       STORE    - Store Setup into PARMFILE
       ENVIRON  - Describe the Migration Environment
       OVERRIDE - Specify Migration Overrides
       OUTPUT   - Specify Migration Output
       START    - Specify a new STARTING POINT
       SPOVER   - Specify STARTING POINT Overrides
       SLIST    - LIST of STARTING POINTS
       WITHSRC  - Include/Exclude SOURCE Types
       WITHLOAD - Include/Exclude LOAD Types
       JCL      - Edit JCl for Migration
       SHOW     - BROWSE Parameters for Migration
       RESET    - ERASE setup and RESTART
       SUBMIT   - SUBMIT current setup to CA-IDMS/Dictionary Migrator
       KEYS     - DIsplay Key Values
       HELP     - Display HELP Screen
       X        - EXIT from DMA
Once you have accessed DMA, the Select DMA Activity screen is displayed. From this screen, four activities are available:
CA IDMS/DMA Rnn.nn ---  Select CA IDMS/DMA Activity  -------------hh:mm mm/dd/yy
COMMAND ===>                                                             XDMAWHA
       Do You Want to:
        Define a NEW Migration? ===> N  (Y)es or (N)o
 See a LIST of Parameter Files? ===> N  (Y)es or (N)o
Start from Parameter File Name? ===>
                      Get HELP? ===> N  (Y)es or (N)o

Please Make a Choice and Press the "ENTER" key
The sequence of screens for defining a new migration is displayed in the next flowchart. When you have finished entering information on a screen, to access the next screen in the sequence enter the NEXT command (or press PF2).
To begin defining a new migration, enter information on the following two screens:
DMA supplies defaults governing the overall migration. After you provide source dictionary, target dictionary, and starting point values on the two screens listed above, DMA displays another screen:
This screen lists two choices:
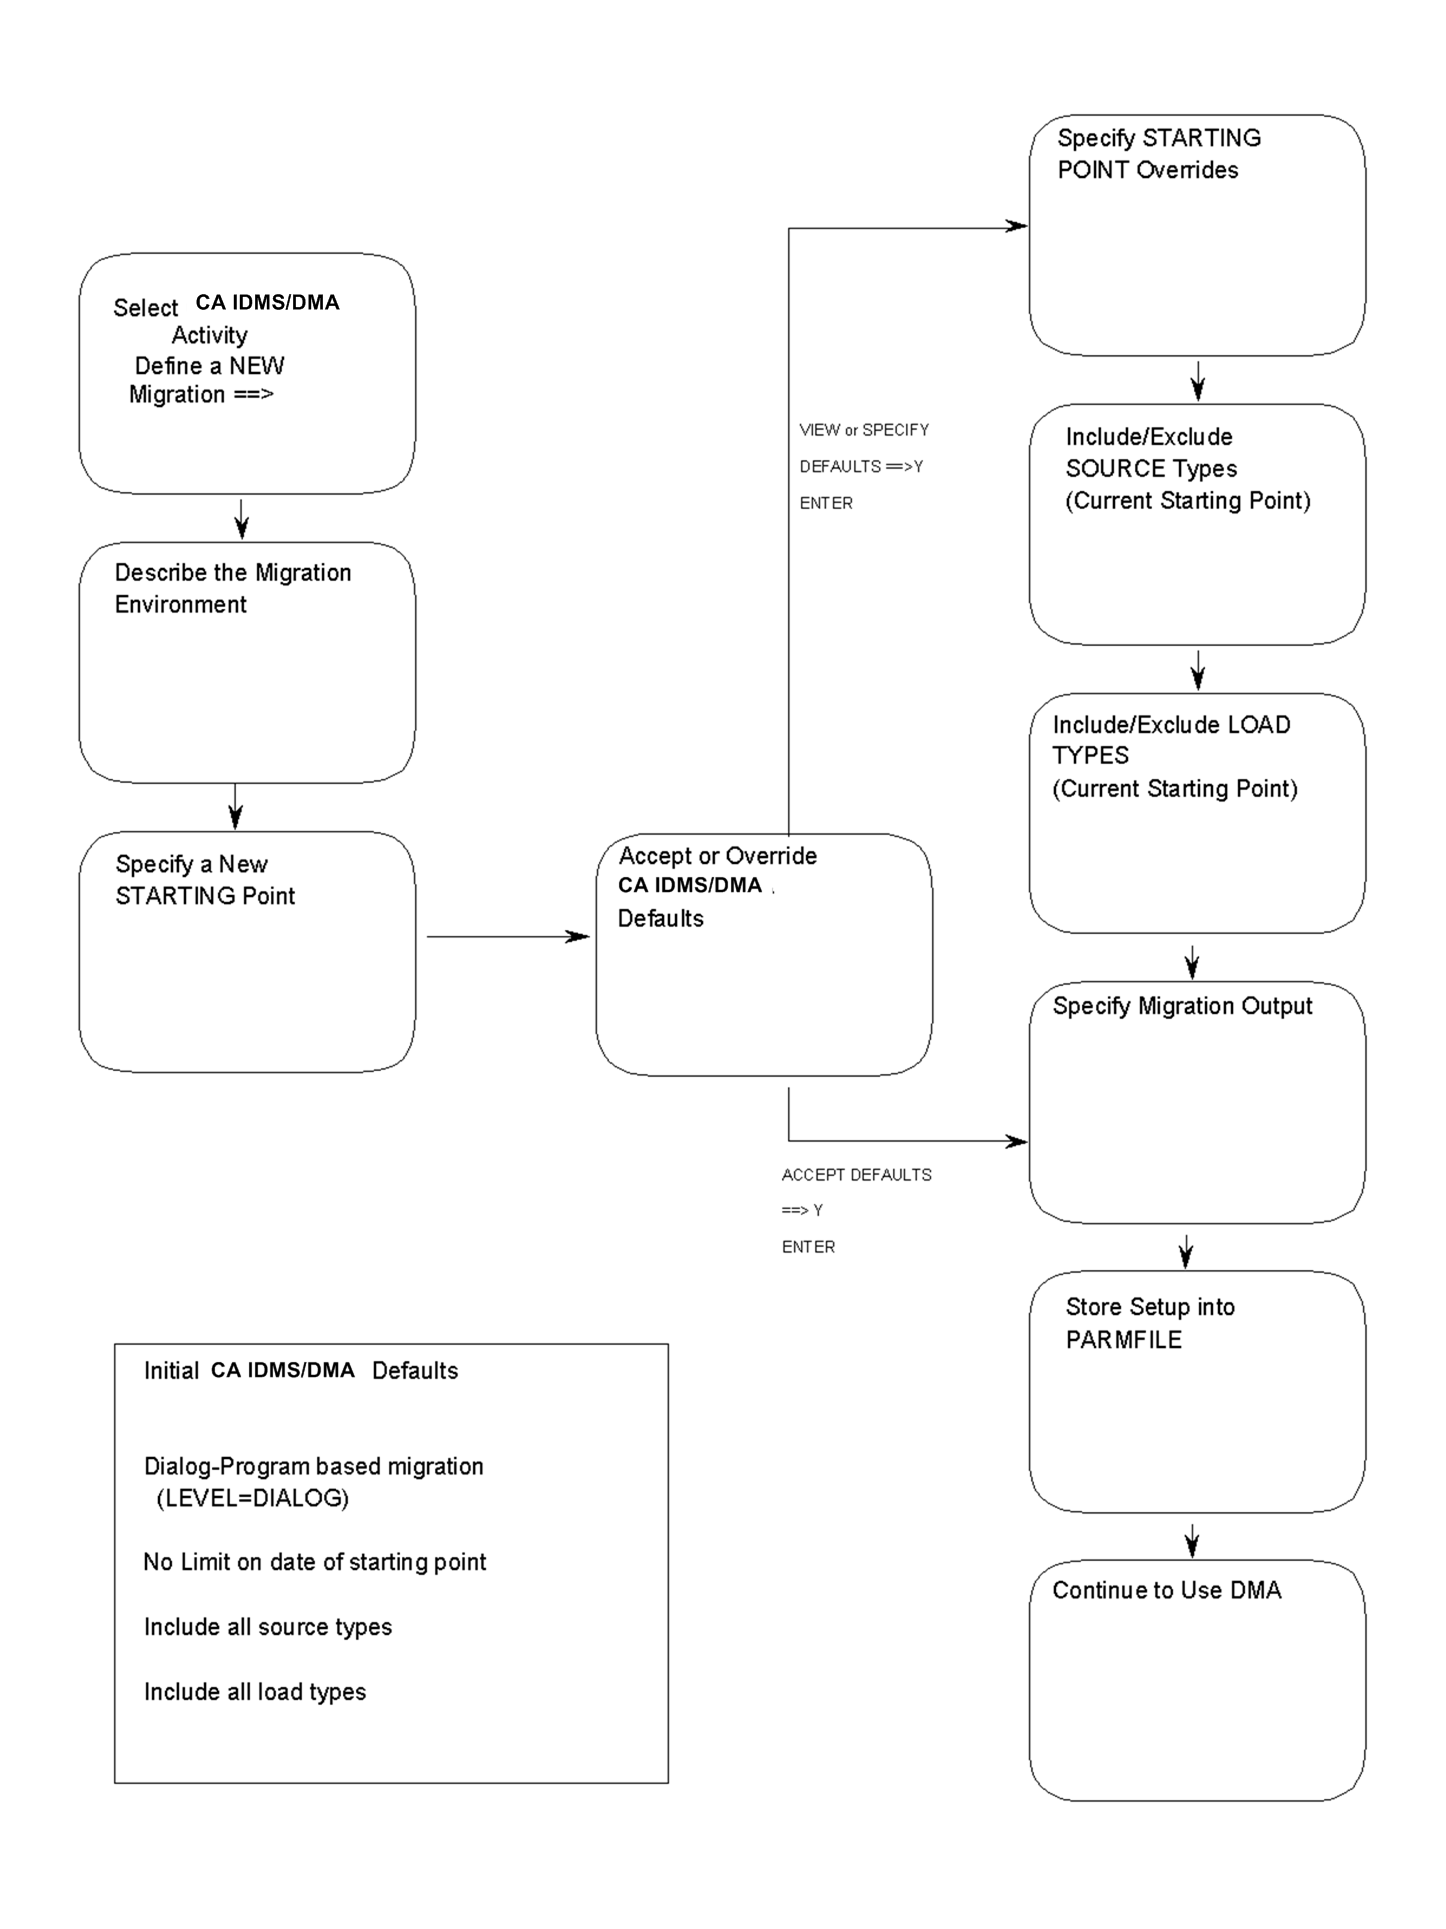
If you choose to specify overrides to the DMA-supplied defaults, then DMA presents the following sequence of screens:
If you accept the DMA-supplied defaults, then DMA presents the last three screens in the sequence:
To define a new migration, use the sequence of screens as they are presented by DMA. Follow the instructions given below and on the following pages.
Sign on to DMA, completing the steps described under First Steps Using DMA. At the Select DMA Activity screen, type Y to the right of the question:
Define a NEW Migration? Y
Provide values for the source dictionary and the target dictionary on the Describe the Migration Environment screen. Other sections in this user guide refer to the target dictionary as the object dictionary.
Type the values for the source dictionary and the target dictionary in the appropriate positions.
Type HELP in the command line and press the ENTER key or press the PF1 key to access information on the fields on the Describe the Migration Environment screen.
Even if you do not change the values presented on Describe the Migration Environment screen, if you press the ENTER key, you have established a migration setup. DMA has collected enough information to generate parameter statements for CA IDMS Dictionary Migrator. To use the setup, you must store it in a parmfile.
To access the next screen in defining a new migration, type NEXT in the command line and press the ENTER key, or press PF2.
On the Specify a New STARTING POINT screen you can:
Type HELP in the command line and press the ENTER key or press the PF1 key to access information on the fields on the Specify a New STARTING POINT screen.
You can specify as many starting points as you need for a migration. To specify more than one starting point:
To access the next screen in defining a new migration, type NEXT in the command line and press the ENTER key, or press PF2.
To view a list of starting points:
An arrow points to the current (active) starting point.
You can select another current (active) starting point or delete non-current starting points from this screen by typing S or D to the left of a starting point and pressing the ENTER key.
By this time you have provided values for the source dictionary, the target dictionary, and the starting point; or, you have accepted the dictionary and starting point values collected and supplied by DMA. DMA supplies additional defaults for the overall migration. The defaults DMA supplies depend on whether:
Accept DMA-supplied defaults?
View or Specify overrides of defaults?
Obtain more information about your options?
After typing Y for one choice, press the ENTER key to go to the next screen in defining a new migration.
Source dictionary values and three starting point overrides, which govern the extraction of entities from the source dictionary, are displayed on the Specify STARTING POINT Overrides screen.
Consider the source dictionary values and each override separately. You can specify information for one, any, or all of the overrides displayed on this screen.
Type HELP in the command line and press the ENTER key or press the PF1 key to access information on the Specify a New STARTING POINT screen.
To access the next screen in defining a new migration, type NEXT in the command line and press the ENTER key, or press PF2.
EXTRACT--IDSOURCE, LEVEL, DATE, DOMAIN, DICTIONARY
When using DMA, you can limit the entities for migration by excluding some or all source types associated with the current starting point. You can also choose to retain all source types associated with the current starting point.
Type HELP in the command line and press the ENTER key or press the PF1 key to access information on the Include/Exclude SOURCE Types screen.
To access the next screen in defining a new migration, type NEXT in the command line and press the ENTER key, or press PF2.
EXTRACT--EXSOURCE
When using DMA, you can limit the entities for migration by excluding some or all load types associated with the current starting point. You can also choose to retain all load types associated with the current starting point.
Type HELP in the command line and press the ENTER key or press the PF1 key to access information on the Include/Exclude LOAD Types screen.
To access the next screen in defining a new migration, type NEXT in the command line and press the ENTER key, or press PF2.
EXTRACT--EXLOADS
When you submit parameters to CA IDMS Dictionary Migrator, you are not updating the target dictionary. Instead, CA IDMS Dictionary Migrator performs migration activities and produces reports that show the results of each activity. You obtain information about the requested entities located in the source and target dictionaries.
If you provided information about the target dictionary only on the Describe the Migration Environment screen, you can select the output for the IMPORT run. If you provided information about the intended source dictionary only, you can select output for the EXPORT run.
Note: For more information about CA IDMS Dictionary Migrator reports, see the chapter "Reports."
Type HELP in the command line and press the ENTER key or press the PF1 key to access information on specifying the migration output and detailed information about each type of report that CA-IDMS/Dictionary Migrator produces.
To access the next screen in defining a new migration, type NEXT in the command line and press the ENTER key, or press PF2.
PROCESS--RUN
NOXREF
CLIST CLISTVERSION
At any time after you have established a setup by:
you can store your current DMA setup.
A user would usually store a current setup after supplying to DMA all source dictionary, target dictionary, and starting point values for a migration.
From the Store Setup into PARMFILE screen you can use DMA to store:
To store the current DMA setup into a PARMFILE (parameter file), type appropriate responses in the fields identified in on the Store Setup into PARMFILE screen.
Type HELP in the command line and press the ENTER key or press the PF1 key to access information on the Store Setup into PARMFILE screen.
To access the next screen in defining a new migration, type NEXT in the command line and press the ENTER key, or press PF2.
The Continue to Use DMA screen gives control over what happens after a new migration is defined. At this point, you can continue to use DMA by selecting one of the major DMA functions, or you can exit.
Type Y to the right of the one function you want to use and press the ENTER key.
Type HELP in the command line and press the ENTER key or press the PF1 key to access information about the DMA processing options presented on the Continue to Use DMA screen.
You may want to set up global conditions for most or all of the entities in the migration. The screens for global overrides differ from the screens for starting point overrides in that the global override screens all have the words "OVERALL migration" or simply "migration" either in the title or in the first line of text.
An example of a typical sequence of screens and commands for setting up global conditions is shown in the next flowchart. Many of the screens in the sequence are described on the following pages. You can find descriptions of the other screens in the section Define a New Migration: Sequence of Screens.
In the sequence shown, the user has specified most of the sequence on the System Commands screen, by typing S to the left of each command in order. Then PF3 automatically takes the display to the next screen in the sequence. Each screen can be accessed individually if the user enters a command when ready for a screen.

If you select CA IDMS Dictionary Migrator output without specifying a starting point, DMA supplies a default value for the starting point: user ID entered when you accessed DMA.
The System Commands menu allows you to select one command or several commands in a series.
In the example shown in the next screen, the user wants a series of six screens. Each screen will be displayed in order, from top to bottom, when the user presses PF3 after finishing with the current screen.
CA IDMS/DMA Rnn.nn --- System Commands ---------------------------hh:mm mm/dd/yy
COMMAND ===>                                                             XDMAMNU
(S)elect one or more of the following functions OR enter one COMMAND:
       FILES    - LIST of PARMFILES
       STORE    - Store Setup into PARMFILE
       ENVIRON  - Describe the Migration Environment
    S  OVERRIDE - Specify Migration Overrides
       OUTPUT   - Specify Migration Output
    S  START    - Specify a new STARTING POINT
       SPOVER   - Specify STARTING POINT Overrides
       SLIST    - LIST of STARTING POINTS
    S  WITHSRC  - Include/Exclude SOURCE Types
    S  WITHLOAD - Include/Exclude LOAD Types
    S  JCL      - Edit JCl for Migration
    S  SHOW     - BROWSE Parameters for Migration
       RESET    - ERASE setup and RESTART
       SUBMIT   - SUBMIT current setup to CA-IDMS/Dictionary Migrator
       KEYS     - DIsplay Key Values
       HELP     - Display HELP Screen
       X        - EXIT from DMA
Several migration overrides, which govern the extraction of entities from the source dictionary, are displayed on the Specify Migration Overrides screen. Consider each override separately. You can specify values for one, any, or all of the overrides displayed on this screen.
The values you enter on the Specify Migration Overrides screen are retained as default values unless you enter other values on the Specify STARTING POINT Overrides screen.
Type HELP in the command line and press the ENTER key or press the PF1 key to access information about the Specify Migration Overrides screen.
To access the next screen in the command sequence, type N[EXT] in the command line and press the ENTER key, or press PF2.
PROCESS--LEVEL, DATE, VERSION, NEWVERSION, COBOLFORMAT, DISCONNECT
Using DMA, you can limit the entities for migration by excluding some or all source types and load types. You can also retain all source and load types associated with the overall migration.
The values entered on the Include/Exclude SOURCE Types screen for the OVERALL Migration are retained as default values unless you enter other values on the Include/Exclude SOURCE Types screen for the Current STARTING POINT.
This permits you to specify just one time the starting point information that does not change for the migration, and to enter only the entity values that change for each of the starting points you are using.
Type HELP in the command line and press the ENTER key or press the PF1 key to access information about the Include/Exclude SOURCE Types Screen.
To switch back and forth between the values specified for the Overall Migration and the values specified for the Current Starting Point, type SWAP in the command line and press the ENTER key, or press PF15.
To access the next screen in defining a new migration, type N[EXT] in the command line and press the ENTER key, or press PF2.
PROCESS—EXSOURCE
By including some or all load types, and by excluding all source Types, you can set up a run-time environment without a dictionary. To update this type of environment you need to again perform a similar migration.
The values entered on the Include/Exclude LOAD Types screen for OVERALL Migration are become default values unless you enter values on the Include/Exclude LOAD Types screen for the Current STARTING POINT.
This permits you to specify just one time the starting point information that does not change for the migration, and to enter only the entity values that change for each of the starting points you are using.
Type HELP in the command line and press the ENTER key or press PF1 to access information about the Include/Exclude LOAD Types screen.
To switch back and forth between the values specified for the Overall Migration and the values specified for the Current Starting Point, type SWAP in the command line and press the ENTER key, or press PF15.
To access the next screen in defining a new migration, type NEXT in the command line and press the ENTER key, or press PF2.
PROCESS—EXLOADS
The parameter statements generated by the typical sequence of screens shown on the preceding pages are available for viewing on the Browse - Syntax for Migration screen.
An example of JCL is shown later in the DMA Parameters section.
To change the parameter statements, follow the procedure described in Modifying a DMA Parameter File.
Be sure to STORE (PF17) the setup into a parameter file before trying to submit it.
A DMA parameter file contains parameter statements and JCL.
To select a DMA parameter file:
See a List of Parameter Files?
and press the ENTER key.
Alternate action: Enter the FILES command from any screen.
DMA displays the list of parameter files stored under your user ID. Use the UP and DOWN commands if the list of files is longer than one screen.
To select more than one DMA parameter file, follow the steps above, but type S to the left of each of the parameter files you want to examine.
After you have completed your examination of a parameter file, type PREVIOUS on the command line and press the ENTER key, or press PF3. DMA displays the next parameter file you selected.
To specify a DMA parameter file:
Start from Parameter File Name?
You can modify all parameter files stored under your DMA user ID. You can examine all parameter files stored under other users' IDs. You cannot modify or delete other users' parameter files, but, as explained on following pages, if you have authority, you can copy them, modify the copies, and store them as parmfiles under your user ID.
To modify a DMA parameter file, first select or specify a parameter file, as described on the previous pages. (If you are already in a DMA setup, you can use the SHOW command.) Then, follow the appropriate steps described below.
To modify the dictionary and/or starting point values, use any of the following commands. Select a command to display an appropriate specification screen.
To modify parameters:
In this case, when you store the parameter file, DMA re-converts the values into a new set of parameter statements.
BROWSE - SYNTAX FOR MIGRATION                                   COLUMNS 001  079
COMMAND ===>                                                    SCROLL ===> PAGE
*** TOP OF DATA ***************** CA-IDMS/DMA **********************************
PROCESS
   RUN=MIGRATE
   CVSOURCE=(015,233)
   CVOBJECT=(015,233)
   DICTIONARY=DICT1,
   OBJDICTIONARY=DICT2,
   IDSOURCE=
   IDOBJECT=
   LEVEL=DIALOG
   CXSOURCE=(COMMENT,MAP),
   DATE=(mmddyy),
   NEWVERSION=0005,
   VERSION=0004,
EXTRACT
   PROGRAM=DIALOG1,
   LEVEL=DIALOG,
   VERSION=0002
*** BOTTOM OF DATA ************** CA-IDMS/DMA **********************************
Before submitting JCL and parameters, you should modify the CA IDMS Dictionary Migrator JCL to reflect conditions at your site. See Operations for more information.
Be sure that there is a job card and that sample parameters are deleted in USMXTRCT.
If you already have CA IDMS Dictionary Migrator JCL prepared, you can copy it to DMA at installation time.
To display the JCL for modification or insertion of comments:
The EDIT JCL screen is displayed.
Then use the Dictionary Migrator Assistant JCL Editing Commands to edit the JCL. The editing commands are described in the DMA online documentation. To access editing HELP, while viewing the Edit JCL screen enter the HELP command or press PF1.
To save any modifications, you must use the STORE command or press PF17.
EDIT --- JCL FOR MIGRATION                                      COLUMNS 001  079
COMMAND ===>                                                    SCROLL ===> PAGE
*** TOP OF DATA ***************** CA-IDMS/DMA **********************************
000001  //XDMEXEC JOB (ARG,4083S),CLASS=A,MSGCLASS=R,TYPRUN=SCAN
000002  /*ROUTE PRINT IRCVM.ARG
000003  //*
000004  //*
000005  //*    MODIFY THE FOLLOWING SAMPLE JCL. SEE THE OPERATIONS SECTION OF
000006  //*    THE CA IDMS/Dictionary Migrator USER GUIDE FOR DETAILS.
000007  //*    SUBSTITUTE INFORMATION SUITABLE TO YOUR SITE'S STANDARDS FOR THE
000008  //*    FOLLOWING VARIABLES:
000009  //*
000010  //*       CA LOAD LIBRARY DSN: REPLACE 'YOUR.LOADLIB' WITH THE
000011  //*       DATASET NAME OF THE LIBRARY IN WHICH CA-IDMS/DICTIONARY
000012  //*       MIGRATOR AND THE SPECIAL VERSIONS OF THE CA-IDMS UTILITIES
000013  //*       RESIDE. IF THE BLOCK SIZE OF YOUR.LOADLIB IS LESS THAN THAT
000014  //*       OF THE IDMS.LOADLIB, SPECIFY THE LARGER BLOCK SIZE IN THE
000015  //*       DCB PARAMETER OF THE FIRST LIBRARY IN THE STEPLIB STATEMENT.
000016  //*
000017  //*       CA-IDMS LOAD LIBRARY DSN: REPLACE 'IDMS.LOADLIB' WITH THE
000018  //*       DATASET NAME OF THE LIBRARY IN WHICH THE IDMS MODULES RESIDE.
000019  //*
000020  //*       SYNTAX FILES DSN: THESE FILES WERE ALLOCATED IN A SEPARATE
*** BOTTOM OF DATA ************** CA-IDMS/DMA **********************************
To store the modified JCL in the DEFAULT parameter file for your user ID, follow these steps:
Ask your DBA if you have the authority to copy another user's parameter files to your list of PARMFILES. If you have the authority:
A copy of the parameter file is now stored under your user ID. That copy can be modified.
To submit JCL for running CA-IDMS/Dictionary Migrator with the parameter statements generated by DMA concatenated:
DMA takes the parameter statements and JCL contained in the parameter file and submits the job to your operating system reader.
Allocations for a VSAM work file and syntax files must either be included in the JCL or have been previously allocated. These allocations are described in Part 1 and Part 2 of the model JCL in Operations. The file allocations may be included in the JCL installed as the DMA default JCL.
To submit parameter statements generated by DMA to CA IDMS/Dictionary Migrator, and the job containing JCL to run CA IDMS/Dictionary Migrator, from the batch environment:
//MIGPARM DD *
with:
//MIGPARM DD your.migrator.syntax
where your.migrator.syntax represents the name of the sequential file into which the parameters generated by DMA are to be copied.
You must copy CA IDMS/Dictionary Migrator JCL to DMA before you can use DMA.
After you have installed DMA, you may want to use JCL other than the assigned default JCL. You can do so by using the JCL batch upload utility to upload JCL from a sequential file to a DMA parameter file (PARMFILE). The JCL batch upload utility, contained in XDMBJCL, is the same utility that was used to upload the assigned default JCL when DMA was installed.
To copy JCL from a sequential file to a DMA parameter file:
Examine the output report for error messages. If the job ran successfully, the JCL from the sequential file is stored in the specified parmfile.
Note: The migrator z/OS JCL to be uploaded should contain //MIGPARM DD*. The JCL must not contain any migrator parameter statements.
|
Copyright © 2014 CA.
All rights reserved.
|
|