

Now that you have enhanced dialog XXXDUPD, the sample Department application is complete. You can execute the application to test out all application features and see how end users would use them. You will:
When testing functions MODDEP and DELDEP, you can modify and delete the sample departments that you added when you tested function ADDDEP in chapter "Adding Process Logic to a Dialog". When you modify departments in this chapter, it is a good idea to write down the changes that you make.
To invoke the Department application from IDMS-DC/UCF, you enter the task code (XXXDEPT) for the application. For example, when using IDMS-DC, you invoke the Department application as shown:
ENTER NEXT TASK CODE:
xxxdept

                                                                [Enter]
For more information on invoking the application, see Instructions For Executing the Application.
You can display the MODDEP function and modify a department, as shown below for a sample department named TEST DEPARTMENT:
x MOD
                                                                [Enter]
Select the MOD response to display MODDEP.
The MODDEP function screen is displayed. Specify the department to be modified.
   FUNCTION: MODDEP
   DATE....: 10/30/99
                              DEPARTMENT INFORMATION


   DEPARTMENT ID .......: 9876
              NAME .....:
              HEAD ID ..: 0000


   RESPONSE:

MODIFY -- ENTER THE DEPARTMENT ID, OR SELECT: BACK OR EXIT
[Enter]
You defined the message in premap process XXXDUPD-PREMAP.
Modify the displayed information by typing over and erasing old values.
Remember that to promote data integrity, you protected the DEPARTMENT ID variable field (which contains a department's unique ID number) from user updates.
   FUNCTION: MODDEP
   DATE....: 10/30/99
                              DEPARTMENT INFORMATION


   DEPARTMENT ID .......: 9876
              NAME .....: TEST DEPARTMENT -- purchasing
              HEAD ID ..: 5555


   RESPONSE:

MODIFY -- ENTER THE DEPARTMENT ID, OR SELECT: BACK OR EXIT
[Enter]
The department is modified.
Notice the message you defined in response process XXXDUPD-ENTER for display when department data has been modified.
   FUNCTION: MODDEP
   DATE....: 10/30/99
                              DEPARTMENT INFORMATION


   DEPARTMENT ID .......: 0000
              NAME .....:
              HEAD ID ..: 0000


   RESPONSE:

DEPARTMENT MODIFIED--SPECIFY ANOTHER DEPARTMENT TO MODIFY
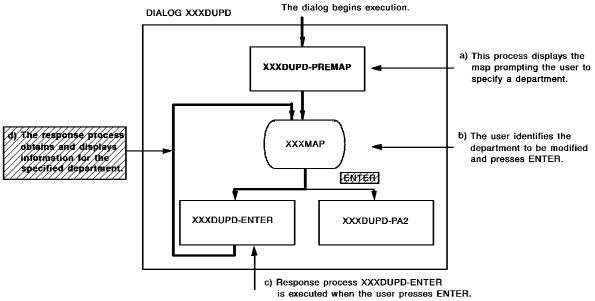
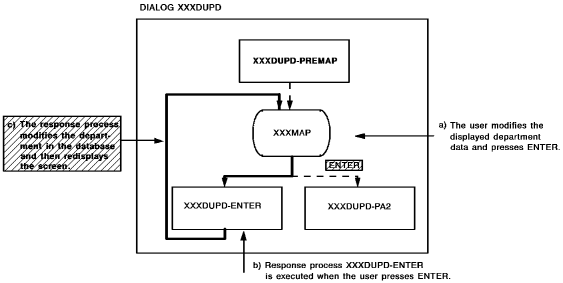
The process logic that you defined for dialog XXXDUPD allows you to modify department records in two steps:
The following diagram shows how components for dialog XXXDUPD are executed at run time when you use the dialog to modify a department record. Response process XXXDUPD-ENTER executes twice when you use dialog XXXDUPD to modify a department.
After you modify a department, you can verify that your modifications have been updated to the database by specifying the department ID again:
DEPARTMENT ID.......:  9876
                                                              [Enter]
Modified values are retrieved from the database and the modified department is redisplayed.
   FUNCTION: MODDEP
   DATE....: 10/30/99
                              DEPARTMENT INFORMATION


   DEPARTMENT ID .......: 9876
              NAME .....: TEST DEPARTMENT -- PURCHASING
              HEAD ID ..: 5555


   RESPONSE:

MODIFY DEPARTMENT AND PRESS ENTER (PA2 TO CANCEL)
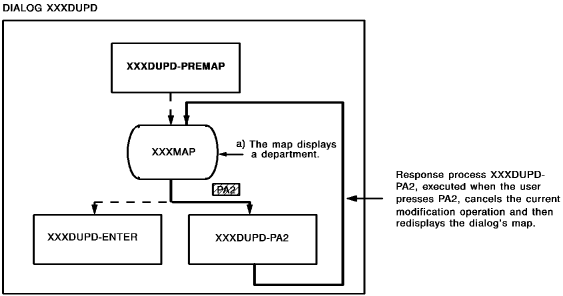
Instead of modifying this department again, you can try pressing [PA2] to see how process module XXXDUPD-PA2 allows you to cancel a modification operation:
   FUNCTION: MODDEP
   DATE....: 10/30/99
                              DEPARTMENT INFORMATION


   DEPARTMENT ID .......: 0000
              NAME .....:
              HEAD ID ..: 0000


   RESPONSE:

MODIFICATION CANCELLED--SPECIFY A DEPARTMENT TO MODIFY
You defined this message in response process XXXDUPD-PA2 to confirm cancellation of a modification operation.
When you press [PA2], response process XXXDUPD-PA2 is executed. This response process cancels your current operation without modifying the database. The following diagram shows how components for dialog XXXDUPD are executed when you press [PA2] to cancel a modification operation. XXXDUPD-PA2 and cancel a modification operation.
While executing the Department application, you also can test out how dialog XXXDUPD handles deletion operations. To do this:
Deleting a Sample Department
Function DELDEP allows you to delete existing departments from the database. You should be careful, when you test this function, that you delete only your own sample departments from the database.
You can use the DELDEP function to delete a department.
Specify the department to be deleted by entering the ID number for an existing department.
DEPARTMENT ID........: 9876
                                                              [Enter]
The department record is display for your verification.
   FUNCTION: DELDEP
   DATE....: 10/30/99
                              DEPARTMENT INFORMATION


   DEPARTMENT ID .......: 9876
              NAME .....: TEST DEPARTMENT -- PURCHASING
              HEAD ID ..: 5555


   RESPONSE:

PRESS ENTER TO DELETE THIS DEPARTMENT (PA2 TO CANCEL)
[Enter]
When you press [Enter], the screen is redisplayed with the message you defined in response process XXXDUPD-ENTER:
DEPARTMENT DELETED--SPECIFY ANOTHER DEPARTMENT TO DELETE
The process logic that you defined for dialog XXXDUPD allows you to delete a department record in two steps:
You can verify that process module XXXDUPD-ENTER actually deleted the department from the database by specifying the department ID number again:
DEPARTMENT ID........: 9876
                                                              [Enter]
When you press [Enter], the screen is redisplayed with the message you defined in response process XXXDUPD-ENTER:
DEPARTMENT DOES NOT EXIST--PRESS ENTER TO SPECIFY ANOTHER
While testing dialog XXXDUPD, you also can verify that [PA2] allows an end user to cancel a deletion operation. To do this, you specify an existing department, as shown:
DEPARTMENT ID.........: 9876

                                                                [Enter]
Then, when dialog XXXDUPD displays the department record, you press [PA2].
Before you exit from the application, you can use the DELDEP function to delete all sample departments that you've added to the database.
While you are executing this production version of the Department application, you also can test out all other capabilities of the sample Department application to see how the application allows you to perform all operations needed to add, modify, and delete departments in the database.
When you are ready to exit from the Department application, you can select the EXIT response.
|
Copyright © 2013 CA.
All rights reserved.
|
|