- In order for our Web application to load the component, we need to copy the component's JAR file to the Web Application Server's lib folder. Copy the DJS_CAP_HANDICAPPER_01_00_I components operations JAR file into the JBoss_Tomcat\server\default\lib folder. The operations JAR file is called djscap10.jar, and can be found in the Java sub-directory within the components model (djscap1a.ief).
Note: The directory where you place the JAR file will be different depending on your version of Tomcat or on your application server.
- From the Tree Control, scroll down to the Construction folder and double-click Generation.
- From the Tool Palette, select Cooperative Code
 generation.
- For the Web, we are going to be targeting two slightly different environments. One is for the clients targeting the Web server. The other is for the servers targeting a Web Application Server. We can define both of these environments from the Cooperative Code Generation diagram.
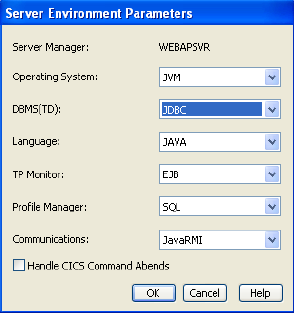
Select the Server Manager (Server Mangr) WEBAPSVR. From the Toolbar, select the Server Environment…  icon. In the Server Environment Parameters dialog, set the selections as indicated below and select the OK push button.
- Double-click the Server Manager (Server Mangr) WEBAPSVR to open its properties dialog, then select the EJB/RMI tab and make the following entries.

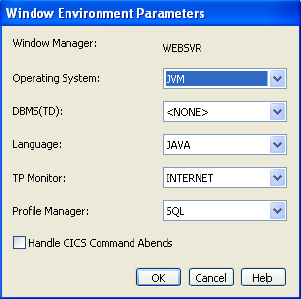
- Select the Window Manager (Window Mangr) WEBSVR. From the Toolbar, select the Client Environment…
 icon. In the Window Environment Parameters dialog, set the selections as indicated below and select the OK push button.
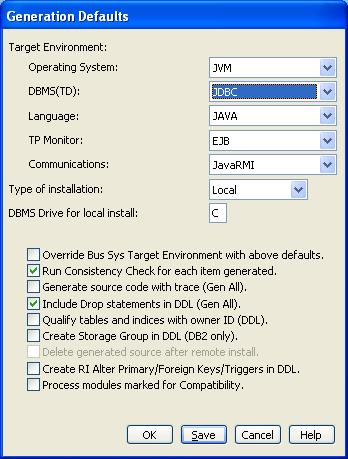
- Finally, we need to specify the environment for the Triggers. From the Menu Bar, select Options and then Generation Defaults. Set the generation defaults as indicated below.
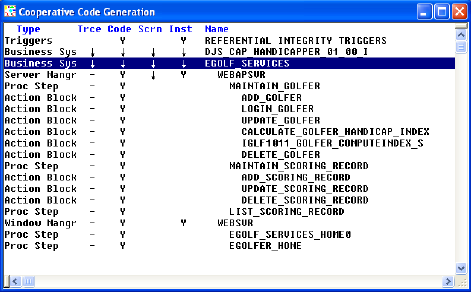
- Generate all Cooperative Code and Triggers as shown below. See the earlier generation exercise if you need help in submitting these.
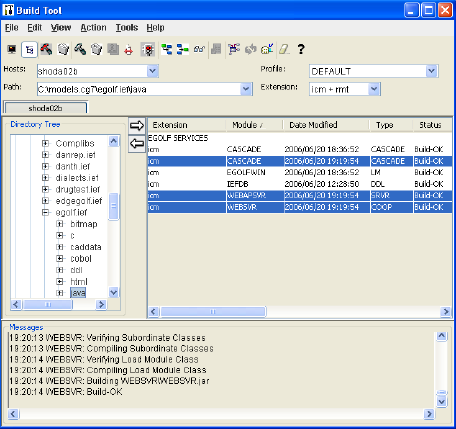
Remember, the source code generation happens in foreground, while the compilation happens in background. When complete, you should see the three new modules listed in the Build Tool as shown below.
- Now we need to deploy the application to the Web Server. In the Build Tool, select (highlight) just the load modules WEBAPSVR and WEBSVR, and not the CASCADE line item. Select the Assemble
 push button.
- In the EAR File Deployment Details dialog, uncheck the check box Package runtime in EAR [file]. Select the OK push button.
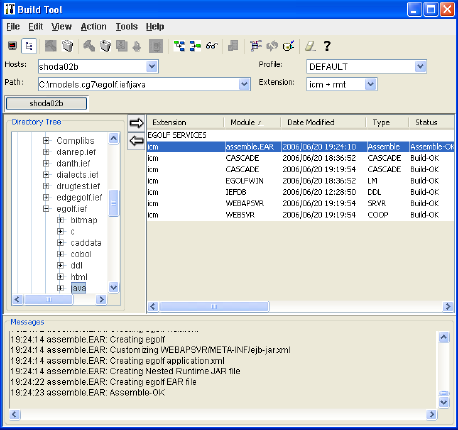
- After receiving the Assemble-OK status message as shown above, locate the egolf services ear file in your model's java\deploy.j2ee directory. Copy it into the JBoss_Tomcat\server\default\deploy folder.
- Since we did not package the Runtime with the EAR file, we want to copy it to the Web Application Server's lib folder, so it will be available to both the component and the application. Having the Runtime in more than one location can cause problems. Locate the Runtime jar file (genrt.##.jar) in your model's java\deploy.j2ee directory and copy it into the JBoss_Tomcat\server\default\lib folder.
- To start the JBoss Web Application Server and the Tomcat Web Server, navigate to the JBoss_Tomcat\bin directory and execute the run.bat file.
- To test the application, open Internet Explorer and enter the following URL: http://localhost:8080/egolf/egolfse1.

