Previous Topic: Perform View MaintenanceNext Topic: Add the Process Logic to LOGIN GOLFER


Add Action Diagram Statements

Follow these steps:

  1. Select the blank line in the action diagram.
  2. When we performed the Process Logic Analysis, we determined that we first wanted to read the golfer, and then we would update the golfer. So, with the blank line highlighted, select Edit from the Menu Bar, select Add Statement from the drop-down menu, and then select Read… from the choice of statements.

    There are no choices in the bottom panel of the Add Statement dialog. This is because the Toolset has already made the choice for us. Looking at the statement we are trying to build in the upper panel, we can see that it has already selected the golfer for us to read. As mentioned before, the Toolset tries to assist us by automating some tasks and selections. In this particular case, we only had one entity action view defined. Entity action views are the only views that can be read, updated, created, or deleted. Since we were trying to add a read statement, the tool knows we want to use an entity action view, and since we only had one entity action view defined, it selected it for us. If we had two or more entity action views, it would have waited for us to select one.

    As such, the Add push button is enabled. If we wanted to, we can add the statement as is. And we would read some golfer, but the golfer we read would not likely be the golfer we wanted to update, unless we only had one golfer in the database. Therefore, in virtually every case, when performing a read, you will want to qualify the read, to get a particular occurrence of the thing being read.

    As mentioned before, the Toolset tries to assist you in making your selections. So when qualifying the read statement, the Toolset will present you with what essentially amounts to a series of filters. There are many ways to construct a read statement; providing only an all-inclusive listing of choices would be daunting. However, if you select the wrong filter up front, you likely will not see what you are looking for, as you get further down constructing the statement. Therefore, if you have decided you have taken the wrong path, you can simply select the Undo push button to back up one or more choices.

    In the vast majority of cases, you will qualify the thing being read either by an attribute of itself, or by its relationship to something else. In addition, if you qualify it by its relationship to something else, then you generally need to qualify the something else with an attribute of it.

    For example, in this particular case, we want to read the golfer by an attribute of the golfer. We want to read the golfer whose (attribute) user ID is equal to the user ID passed to us in the import golfer user ID. Another example of an attribute qualification would be if we wanted to read all of the golfers whose (attribute) last name is equal to the last name provided to us in the import golfer last name field.

    An example of a relationship qualifier would be if we wanted to read all of the scoring records for a golfer. We do not want to read the golfer, only the golfer's scoring records. So we would read each of the scoring records, where the desired scoring records (relationship) were maintained by some golfer, [and then we would use an attribute qualifier to qualify which particular golfer] and that golfer (attribute) user ID is equal to the import golfer user ID.

    Therefore, the next step is to qualify the golfer being read.

  3. On the Add Statement dialog, select the Qualify push button.
  4. From the bottom panel, select the expression attribute view.
  5. While the more common situation is to qualify something by an attribute or a relationship in which it participates, you can qualify it based upon other attributes or relationships in the model. To qualify it by an attribute of the thing you are trying to read, you would select DESIRED persistent view, and the Toolset will automatically fill in the thing that you are reading (for example, the thing you desire). If you wanted to read it based on some attribute of something you have already read, then selecting CURRENT persistent view would provide you with a list of entity action views you have already read. If you wanted to read it based on an attribute of an entity action view that you have not yet read and do not want to read, then you would select SOME persistent view. If none of those applies, select transient view. In this case, we want to read it based on an attribute of the thing we desire. From the bottom panel, select the occurrence phrase DESIRED persistent view.
  6. Since in our read statement we only desired to read one thing—the golfer—the Toolset automatically selected golfer for us. However, it is possible to write a single read statement to read several things. For example, the read list in our read statement could have contained both golfer and scoring record as:

    READ golfer

    scoring record

    WHERE …

    If this had been the case, then after selecting DESIRED persistent view, the Toolset would have shown us both golfer and scoring record (since we desire them both), and then asked us to select the one which we want to qualify first. However, since we only had one entity action view in our read list, it selected it for us. Since (from number step four) we specified attribute (qualifier) view, it is now asking us to select the attribute of golfer that we want to use as the qualifier. Select userid.

  7. From the bottom panel select the relational operator IS EQUAL TO.
  8. Since golfer user ID has the domain of text, the Toolset will only allow us to compare it to other text-based (character-based) views. Since we want the golfer with a user ID equal to the import golfer user ID (a transient, text-based view), from the bottom panel we want to select the expression character view, and then transient view.
  9. Since we only have one transient view—import golfer—the Toolset selected it for us. Now it is showing us a list of the character (text) attribute views in that transient view. We want the user ID, so select userid.
  10. If the read needed further qualification, we can select AND or OR, but in our case we are finished. Select the Add push button at the bottom of the Add Statement dialog.
  11. From the Tool Palette, select Exit State and then (with the crosshair) select the WHEN not found clause of the read statement. In the Exit State Selection dialog, expand Global Exit States if necessary and select GOLFER NF, then select the Select push button. In the Add Statement dialog, select the Add push button to add the statement.
  12. From our Process Logic Analysis, the second action we wanted to do was an update. Select the WHEN successful clause of the read statement. From the Menu Bar, select Edit, Add Statement, and then the Update… statement.
  13. In the Add Statement dialog, the Toolset has already selected golfer, since that was the only entity action view we had. In the bottom panel of choices, select Set All Attributes, and then select import golfer as the view from which to set the attributes. Select the Add push button to add the statement to the action diagram.
  14. When the update is successful, we do not need to do anything. However, we need to set exit states for the other two conditions. From the Tool Palette, select Exit State and then select the WHEN not unique clause of the update statement. If necessary, expand the Global Exit States and select GOLFER NU, select the Select push button, and then select the Add push button to add the statement to the action diagram.
  15. Do the same to add the GOLFER PV exit-state-value to the WHEN permitted value violation clause of the update statement.

    The completed UPDATE GOLFER action diagram should look as follows. Remember that the order of the attribute views within the entity views is not important.
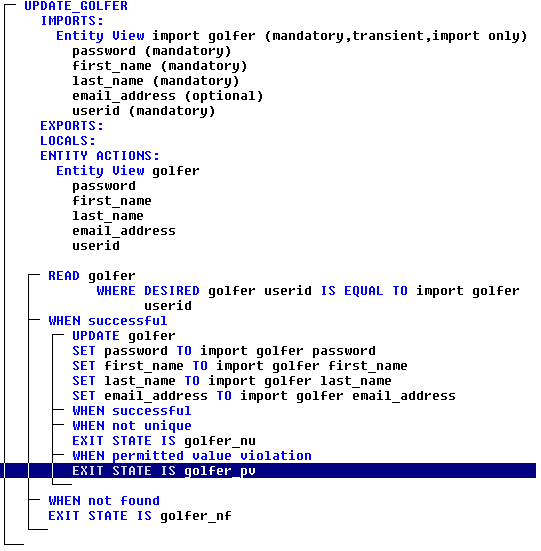
    Add Action Diagram Statements

    Save your model and close the UPDATE GOLFER action diagram.