
Analysis › Detailing the Business Rules › Lesson Activity › Add the Process Logic to UPDATE GOLFER › Perform View Maintenance
Perform View Maintenance
In the ADD GOLFER action diagram, we created the views as we needed them. For this diagram, we are going to create the views we need in advance.
Since we are going to both read and update a golfer, we need an entity action view. To read the correct golfer, we need to know the user ID of the golfer we plan to update. The user ID will be passed to this diagram through its import view. Likewise, after we read the golfer, we are going to update it with new values. The new values will be passed to this diagram through its import views.
Therefore, we need both an entity action and an import view of a golfer. In addition, like the ADD GOLFER action diagram, we do not need the handicap index; since that will be calculated and updated by the process CALCULATE GOLFER HANDICAP INDEX.
Follow these steps:
- From the Tool Bar, select the View Maintenance
 icon.
icon.
- In the UPDATE GOLFER – View Maintenance panel, select Entity Action Views.
- Select the Add Entity View icon from the Menu Bar.
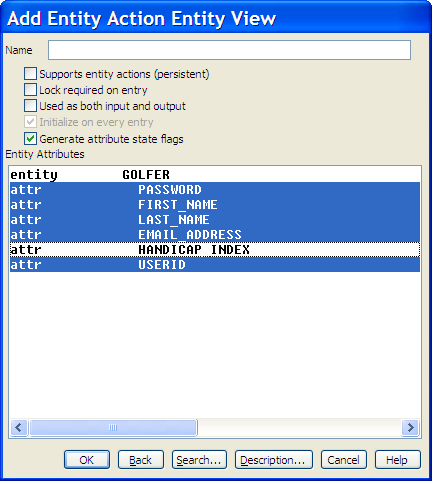
- In the Add Entity Action Entity View dialog, select entity GOLFER.
- In the Add Entity Action Entity View dialog, select entity GOLFER to select all of the attributes, and then select HANDICAP INDEX to
un-highlight it. Alternatively, select each attribute except HANDICAP INDEX individually. The dialog should look like the following example:

- Select the OK push button to add the view to the entity action views. If you have multiple adds turned on, select the Cancel push button to close the Add Entity Action Entity View dialog and return to the UPDATE GOLFER – View Maintenance panel.
- The import view is going to look exactly like the entity action view, so we can repeat the previous steps for the import view, or we can copy the entity action view to the import view. We are going to copy the entity action view to the import view.
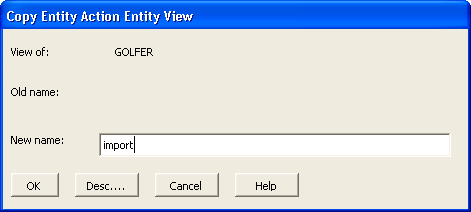
Select view of <unnamed> under the Entity Action Views. From the Menu Bar, select Edit, then Copy, and with the cursor (which now looks like a hand), select Import Views. In the Copy Entity Action Entity View dialog, enter import in the New name: entry field and select the OK push button.

Note: If you select OK without naming the view, you will receive this error message: The name matches one already in the Import Subset.
- Within an action diagram, you will likely have several views of the same thing, as we do of a GOLFER. The action diagram statements act on these views, and therefore need to be able to distinguish one from the other. If we said, SET golfer name TO golfer name, it is not clear which attribute value is being replaced by which attribute value. However, if we said, SET golfer name TO import golfer name, it is now clear: the value of golfer name is being replaced with the value of import golfer name. For these reasons, you must name your views.
Throughout this tutorial, import views will be named IMPORT. Export views will be named EXPORT. Local views will be named LOCAL. Entity Action views will be left unnamed. If all of the other views have names, and entity action views do not have names, we can still tell each of the views apart.
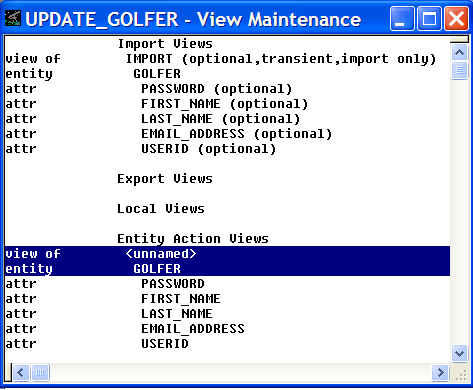
The UPDATE GOLFER – View Maintenance diagram should look as follows:

- Close the UPDATE GOLFER – View Maintenance diagram. Expand the views in the UPDATE GOLFER – Action Diagram
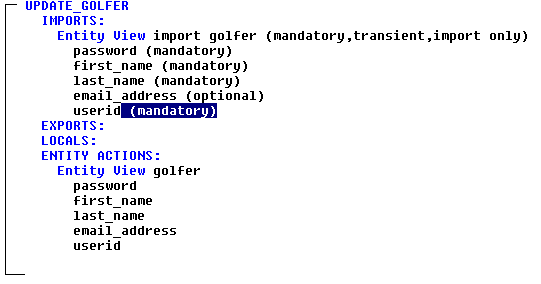
- The last thing we want to do with the views is determine which should be marked optional or mandatory. Since we are going to update the golfer by setting each of it is attributes to the values supplied in the import views, we want to require values for each mandatory attribute as defined in the data model. All of the attributes were mandatory except email address, so we want to double-click the optional property for each view except the email address and mark it as always used as input.
The action diagram should now look like the following example:

Copyright © 2013 CA.
All rights reserved.
 
|
|


 icon.
icon.


