
There is nothing to do when this process executes successfully. We can export the golfer information, but there is really no point in that since everything we know about the golfer was passed to us in the import view in the first place. Passing it back out through the export view would be simply handing the same information back to whomever or whatever provided us with the information in the first place, and they already have it. Remember, elementary processes ultimately are simply subroutines called by another program. If we had created some new information internally, like we had randomly generated a golfer id or something, then we would have wanted to export that. So for the WHEN successful condition of the Create statement, we do not need to do anything. We do not even need to set any kind of a message or flag, since elementary processes are expected to work successfully.
However, when processes do not execute successfully, they are expected to indicate that somehow, usually by setting a special system attribute called the exit state to some value. Later on in the Design phase, we will decide how we want to handle these conditions. Therefore, we need to set the exit state in two places, once for when the golfer we tried to create already exists, and once for when we have a permitted value violation. A golfer would already exist if we already had a golfer in the database with the same value for the user ID (identifier) as the one we are trying to create. A permitted value violation would exist if we had defined specific values for an attribute (like employee gender can be either M or F) and we tried to set it to something else. We have not defined any permitted values for any attributes in our data model, but it is good practice to set an exit state for the condition anyway.
Follow these steps:
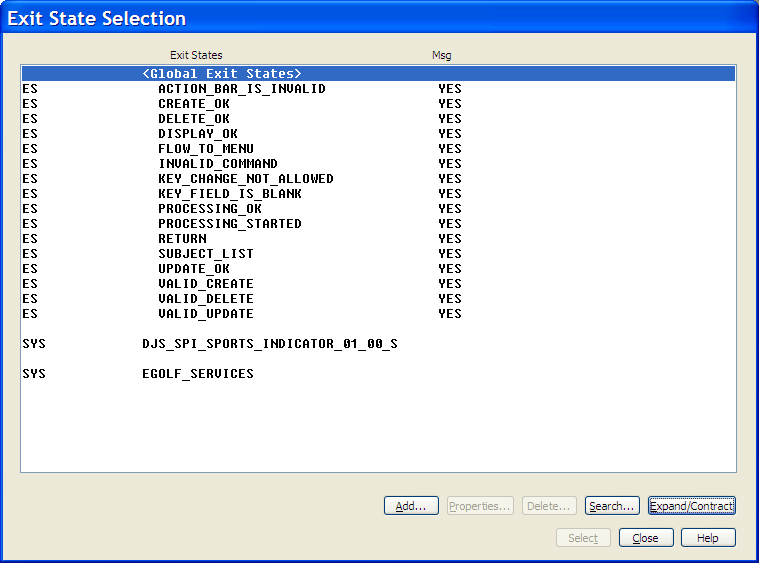
 push button, and then (with the crosshair) select the WHEN in the statement WHEN already exists. An Add Statement dialog will open, and an Exit State Selection dialog will open in front of the Add Statement dialog.
Note: If the action diagramming Tool Palette is not visible on the right side of the Toolset, you can open it by selecting Options from the Main Menu and then selecting Tool Palette.
Rather than set each of these properties individually each time the Exit State needs to be set, pre-defined exit-state-values are created, and then used to set all four properties of the exit state at once. It becomes a little confusing to the new user, however, in that when referring to the special system attribute Exit State, and the pre-defined exit-state-values with which you can set it to, the term Exit State is used somewhat interchangeably.
We are going to pre-define four exit-state-values that will be used in almost all of our process action diagrams. Since they will be used in most of the PADs, we will add them to the list of Global Exit State values. In Design, when we are working more with PrADs, we will also be defining some exit-state-values, but they will be added to the EGOLF SERVICES business system.
In the Exit State Selection dialog, select <Global Exit States>, and then select the Expand/Contract push button at the bottom of the dialog to expand the list of global exit states.


Referring to the following table, enter the following exit-state-values. Pay particular attention to entering the exact exit state name as shown in the table. Later on when we do action block synthesis, the tool will generate new exit-state-values if the ones that it wants do not exist. We want it to reuse these. If you have multiple adds turned on, the (new objects) Properties dialog will remain open after you select the OK push button. Select the Cancel push button after you have entered the last exit-state-value. If you do not have multiple adds turned on, you will have to select the Add… push button on the Exit State Selection dialog to reopen the (new object) Properties dialog each time.
Note: If you think you may have made a mistake after adding the new exit state, you can select it from the Exit State Selection list and then select the Properties… push button to review or change its properties.
|
Exit State Name |
Termination Action |
Message Type |
Message Text |
|---|---|---|---|
|
GOLFER AE |
Normal |
Error |
User ID entered is already in use. Try another User ID. |
|
GOLFER NF |
Normal |
Error |
GOLFER not found. |
|
GOLFER NU |
Normal |
Error |
GOLFER not unique. |
|
GOLFER PV |
Normal |
Error |
GOLFER permitted value violation. |
 push button, and then (with the crosshair) select the WHEN in the statement WHEN permitted value violation. An Add Statement dialog will open, and an Exit State Selection dialog will open in front of the Add Statement dialog. If necessary, expand the global exit states and select GOLFER PV, then select the Select push button followed by the Add push button on the Add Statement dialog.
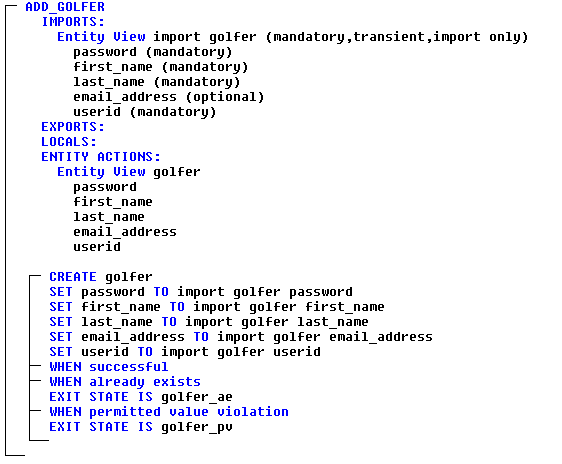
The completed action diagram should look like the following example:

|
Copyright © 2013 CA.
All rights reserved.
|
|