

Only cooperatively packaged Server Manager load modules are eligible for proxy generation. A model does not need to have a client defined. A proxy is a generated programmatic interface of a Server Manager.
The following steps describe how to generate a proxy. This example uses Toolset Menu navigation to designate diagrams and dialogs. You can use alternate navigation techniques to achieve the same result.
Follow these steps:
The Server Environment Parameters dialog opens where you can define the parameters.
Note: Server Environment Parameters can be set at the Business System level or for each individual Server Manager. If the Server Environment Parameters are set at the Business System level, they become the default setting for each Server Manager within the Business System.
The Proxy Code Generation dialog opens.
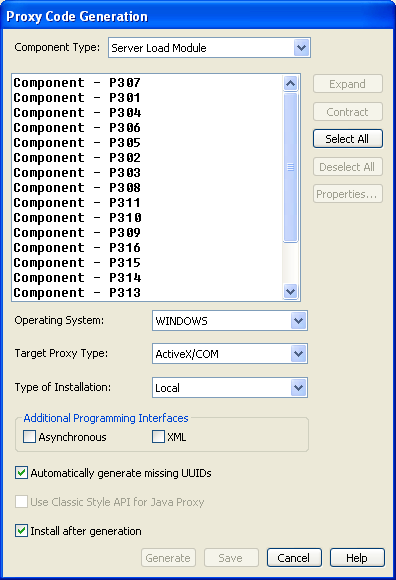
Note: When a model does not contain any CBD or CBD 96 component, but contains cooperative server load modules, the Server Load Module component type is automatically selected.
Note: The Generation process always generates all interfaces and methods associated with the selected component.
Note: The Java proxy generates only for the JVM operating system. The Windows Build Tool builds the generated code, and you can deploy it to any Java-compliant environment.
From the Target Proxy Type list, select the type of generated code you want for the proxy.
For a Remote install, generated files are packaged into one installation file that you can manually transfer to any target system. For a Local install, generated files are compiled and prepared for copying onto a server running on the same type of machine as the Toolset. The default is Local.
Note: The Additional Programming Interfaces option is disabled when generating C Proxies. The C proxy is a generated C language header file. The C proxy runtime provides the supported programming interfaces.
By default, this option is selected. ActiveX/COM proxies require a UUID for each component, interface, and method objects.
To specify the missing UUIDs manually, click Properties.
Note: This option is disabled if you have selected Custom Proxies option for Component Type.
Note: The Install after generation option is disabled when generating C Proxies. The C proxy is a generated C language header file. The C proxy does not need the Build Tool, as the generated source code is compiled by the user.
Note: Generation fails if proper licensing does not exist for the proxy.
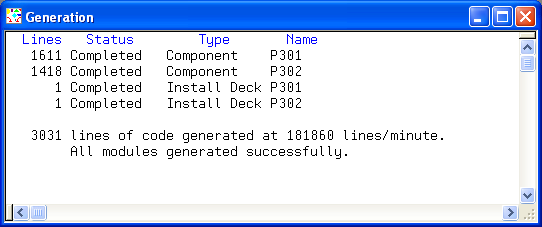
On successful generation, the Generation window displays the following message:
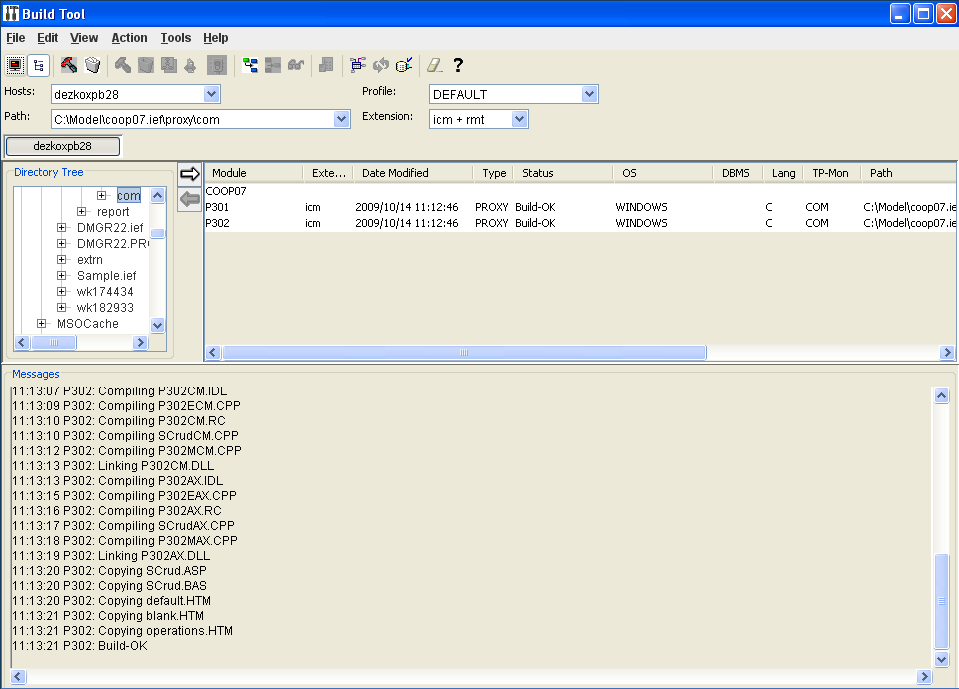
The Build Tool appears and a successful build displays a Build-OK message.
The following table lists the Target Proxy Type options for a given operating system:
|
Operating System |
Target Proxy Type |
|---|---|
|
Windows |
ActiveX/COM, C |
|
JVM |
Java |
|
CLR |
.Net |
|
UNIX |
C |
|
Copyright © 2015 CA Technologies.
All rights reserved.
|
|