

This section applies only if you have installed—or plan to install—the catalog management hook and DFHSM SVC hook. Using the pool support is completely optional.
The purpose of the pool support in the Auto-Restore facility is to allow the maximum flexibility possible in determining the target volume to which the data set is restored. Although this capability is not essential to the basic function of Auto-Restore, it does relieve the DASD administrator of a lot of the manual effort required to manage free space distribution among packs. Perhaps the best way to explain its advantages is to show what management is like without it.
Without pool support, any data set that is Auto-Restored is required to go back to the volume from which it came. Two problems become obvious:
The answer is that the restore fails and the task that requested the restore fails. This is not too serious if a TSO/ISPF user caused the restore, but it can cause problems if a production job abends because it could not gain access to the data set.
Pool support within the Auto-Restore facility is accomplished separately for VSAM and non-VSAM data sets.
For VSAM data sets, pooling is technically complex, and must be accomplished by CA Allocate, CA's Volume Allocation Manager, or some other allocation control product. It is not done within CA Disk itself. If CA Allocate or some other allocation control product is not used, Auto-Restore must place VSAM data sets back on the volumes from which they were archived. If you do not have an allocation product available, consider using RESPRIEX—Screen Restore Requests. See the Systems Guide.
For non-VSAM data sets, pooling can be accomplished through either or both of two methods. The first method is by using CA Allocate or some other allocation control product. The second method is accomplished within CA Disk Auto-Restore facility, and can be used alone or in conjunction with CA Allocate.
Several advantages become apparent when volume pooling is implemented, such as:
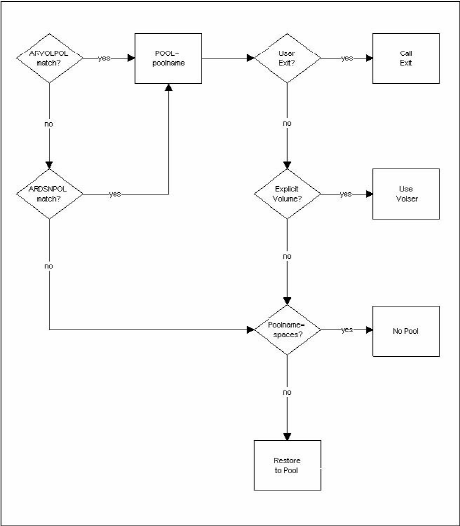
Pool support can be thought of as the algorithm used to determine the destination volume for a data set being Auto-Restored. It consists of several possible steps, depending on options you specify. The following is a schematic of the process.
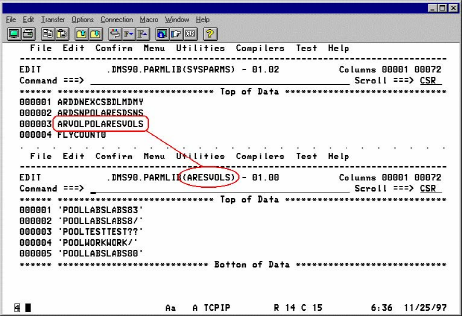
The following illustrations illustrate typical examples of how the syntax works for DASD Pools. These illustrations are then followed by a series of explanatory notes to help describe the illustration.
Notes for setting up DASD pool support for DMSAR:
To use CA Allocate or another allocation control product for non-VSAM data set pooling, create an ARVOLPOL with at least one volume in it (a volume that is normally empty or used for temporary data sets only). This is for two reasons:
Going back to the schematic, we start at Step (a) to determine if a source volume pool match is found. There are actually two steps to this process, which also applies to Step (b). First CA Disk retrieves sysparm ARVOLPOL. If you have not specified this sysparm, a no-match condition is assumed. If you do specify the sysparm, the value you supply for it must be the name of the member in your parmlib that contains the pool entries. For instance, if a value of ARVOLPOLVOLPOOL is specified, you must code your entries for this pool in the member VOLPOOL in your parmlib. Assuming this pool is defined, CA Disk compares the data set's original source volume to each explicit or pattern volume in the table. If a match is found, the pool name associated with that entry is used and processing continues to Step (d). If no match is found, or if sysparm ARVOLPOL is not specified, processing goes on to Step (b).
Step (b) follows the same general logic as Step (a). You notify CA Disk of the presence of a data set name pool by specifying sysparm ARDSNPOL with the member name that contains the pool associations. In this pool, CA Disk compares each entry to the data set name being restored. As soon as an explicit or pattern name is matched, that pool name is used and processing continues with Step (d). If no match is found, the pool name is initialized to spaces (Step (c)), indicating that no pool name is used in the restore.
We are now at Step (e), which is an optional user exit that can be coded. If you want to write a special pool selection routine, this is where you add it. CA Disk calls the exit (Step (f)) when sysparm ARPOOLEX is specified with the module name to be called. For more information, see the User Exit description for ARPOOLEX—Auto-Restore DASD Pool Exit in the Systems Guide. With this exit, you can see if any pool was selected, based on the entries in the ARDSNPOL and ARVOLPOL members. If no match was found or neither of the members was defined, the pool name is blanks (Step (i)); otherwise, it contains the name of the pool that is used (Step (k)). You can change the pool name to another valid pool name or it can be blanked out to suppress pool support for the restore. You also have the option of passing back an explicit target volume (Step (g)), which overrides any pool specification (Step (h)). The illustration shows that there is no requirement to use the pool support that CA Disk provides—just by coding the user exit you can customize pool support.
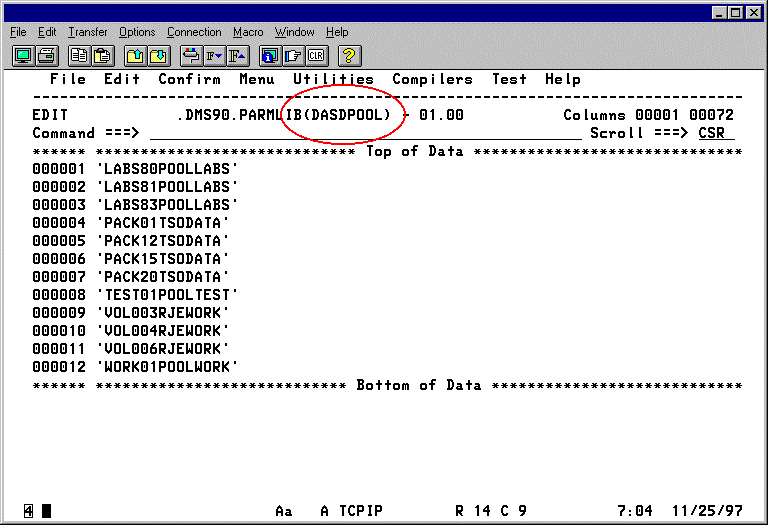
If, after the processes above, you exit with the name of a pool, this pool must be defined in the member DASDPOOL in your parmlib. The eligible volumes to which the data set can be restored are all the entries in this member that have the same pool name.
At this point, read the Restore/Recover section in the User Guide. A detailed description of the rules CA Disk follows in determining the volume to which a data set is restored.
|
Copyright © 2015 CA Technologies.
All rights reserved.
|
|