

|
|
|
These instructions describe how to add the UNSPSC namespace to the existing Democorp DIT.
To set up the UNSPSC namespace partition
Specifies the name of the namespace partition that you are creating. This name is used in DXmanager displays.
Enter: UNSPSC
Specifies the context prefix of the DIT that the DSA publishes that it serves. If Native prefix is also set, then this becomes the logical prefix rather than the physical prefix and prefix mapping is done in the server.
Enter: o=UNSPSC,c=au
Specifies the port for this namespace partition. The DSAs created when you deploy this namespace partition to a host uses this port as their listen address.
Enter: 19489
Specifies the port on which the DSA accepts connections from the local computer only. If this is not specified, there is no console for the DSA.
Enter: 19490 (automatically populated when you enter the Port).
Specifies the port on which the DSA accepts connections from remote computers.
Enter: 19491 (automatically populated when you enter the Port).
Specifies the SNMP port for this partition. This is the port the DSA will use to send SNMP traps. This is needed by the DXmanager to be able to monitor DSAs.
Enter: 19489
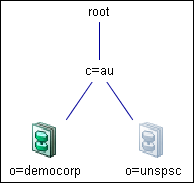
The Maps tab appears, showing the Namespace map. It should appear similar to the following:
You can now set up the Root namespace partition.
| Copyright © 2011 CA. All rights reserved. | Email CA Technologies about this topic |