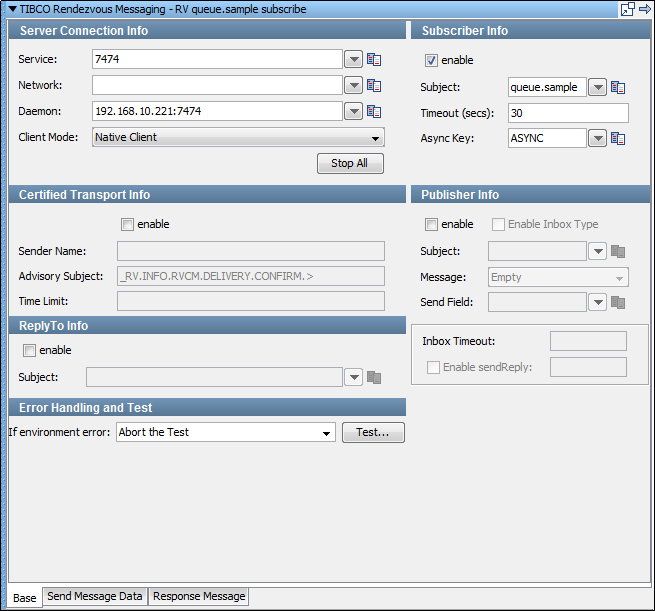

The TIBCO Rendezvous Messaging step lets you send and receive messages from Rendezvous "Subjects" using Native Rendezvous protocol. You can also receive, change, and forward an existing message.
The TIBCO Rendezvous Messaging step is configured using a single editor regardless of the messaging requirements. The input options vary on the messaging requirements. The editor only allows valid configurations, so when you enable some features others could become inactive.
The default TIBCO Rendezvous Messaging step uses the following convention: RV queuename publish. If there is not a publish queue name, the default step name is RV queuename subscribe. If another step also uses the default step name, a number is appended to the step name. You can change step names at any time.
Prerequisites: Using DevTest with this application requires that you make one or more files available to DevTest. For more information, see Third-Party File Requirements in Administering.
Parameter Requirements: This step requires the connection parameters and the subject names that are used in the application under test. The following sections describe the parameters that you require. There could be other required parameters, depending on your environment. Get these parameters from the developers of the application.

The editor for the TIBCO Rendezvous Messaging step contains the following tabs:
The Base tab is divided into the following sections:
To enable and disable the Subscriber Info, Publisher Info, and ReplyTo Info sections, use the enable check box in the top left corner of each section. To configure the step to be a publish step, a subscribe step, or both, use these check boxes. You can also select to include a JMS reply to component in the step.
When you finish configuring the test step, click Test in the Error Handling and Test section to test the configuration settings.
Server Connection Info
Enter the connection information specific to Rendezvous information in the Server Connection Info area.
The following parameters are available for the system under test:
These parameters enable connection to the RV network that you want to communicate on.
Select either the Rendezvous Native client or Java Client mode. Usually you use the more versatile client mode.
To simplify changing the system under test, parameterize these values with properties from your configuration.
Publisher Info
To set up the ability to send messages, select the enable check box.
Complete the following fields:
The name of the subject to use. You can define your own subjects. A valid subject name is: queue.sample. An invalid subject name is: queue…..My_Samples (null element) or .My.Queue.. (three null elements).
Select the type of message you are sending. The supported types are Empty, Text, Object, Bytes, Message, and Mapped (Extended).
RV messages are actually maps of fields and values. This field is used to enable quick single field messages. When you enter a value here, the Send Message data is put into the value of a field with this name. This value is overridden with Mapped (Extended) type messages as they let you do multiple fields and values in a single message.
To enable the Inbox Timeout and Enable sendReply fields, select this check box.
To specify an Inbox Timeout or to enable sendReply functionality for the publisher, select the Enable Inbox Type.
Certified Transport Info
To provide transport information, select the enable check box.
The name that is the correspondent name of the CM transport.
Rendezvous software constructs the subject names of system advisory messages using this template: _RV.class.SYSTEM.name. Rendezvous certified message delivery software constructs the subject names of advisory messages using these templates: _RV.class.RVCM.category.condition.subject and _RV.class.RVCM.category.condition.name. Distributed queue software constructs the subject names of advisory messages using this template: _RV.class.RVCM.category.role.condition.name. Rendezvous fault tolerance software constructs the subject names of advisory messages using this template: _RV.class.RVFT.name.group.
The time limit in which a message exists.
Subscriber Info
Selecting the enable box turns on the subscriber function and lets you set up the ability to receive messages.
Complete the following fields:
The name of the subject to use. You can define your own subjects.
Indicates the number of seconds before DevTest interrupts waiting for a message. For no timeout, leave this field blank.
Enter the value that is necessary to identify asynchronous messages. This value is only required in asynchronous mode. This value is used in a subsequent Message Consumer step to retrieve asynchronous messages.
ReplyTo Info
To set up a destination subject, select the enable check box.
If your application requires a destination, it is set up in this section.
Enter the following parameter:
The name of the subject to use.
Error Handling and Test
If an error occurs, the Error Handling and Test section lets you redirect to a step.
Specifies the action to take or the step to go to if the test fails because of an environment error.
Default: Abort the test.
Click Test to test your step configuration settings.
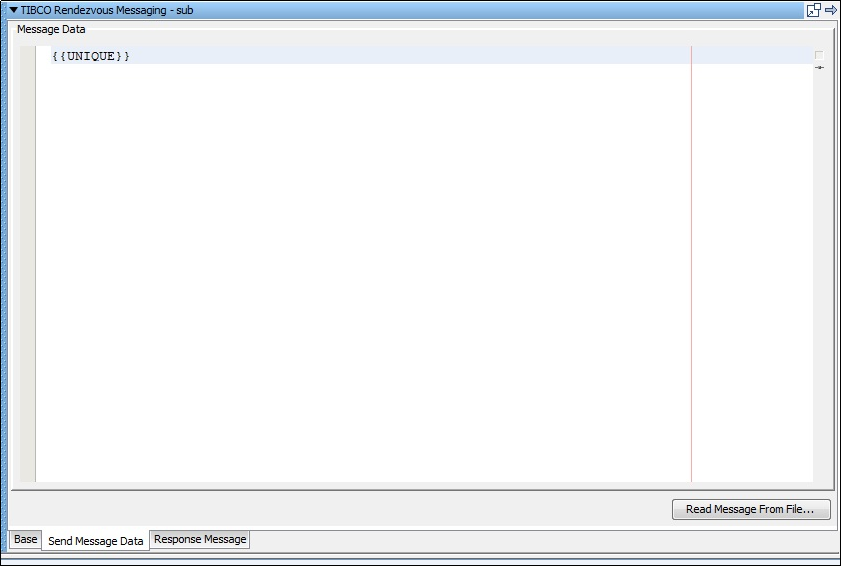
If your step is configured to publish, compose the message on this tab. The Send Message Data tab view in the following example shows a text message.

This example shows an XML fragment with properties being used. You can type the text, or you can click Read Message From File to read from a file. The text can also be stored in a property, in which case you would place the property in the editor: for example, LISA_PROP.
Notice that properties are used in the message XML allowing the message to be created dynamically during the test run.
If your step is configured to subscribe, the response is shown. For more information, see JMS Messaging (JNDI).
|
Copyright © 2014 CA Technologies.
All rights reserved.
|
|