

The WebLogic JMS (JNDI) step lets you send messages to, and receive messages from, topics and queues. You can also receive, change, and forward an existing message.
WebLogic JMS (JNDI) supports all the common message types including Empty, Text, Object, Bytes, Message, and Mapped (Extended).
The WebLogic JMS (JNDI) step is configured using a single editor, regardless of the messaging requirements. The input options vary on the messaging requirements. The editor only allows valid configurations. When you enable some features, others can become inactive.
Prerequisites: Using DevTest with this application requires that you make one or more files available to DevTest. For more information, see Third-Party File Requirements in Administering.
Parameter Requirements: This step requires the connection parameters and the subject names that are used in the application under test. The following sections describe the necessary parameters. There can be other parameters that are required, depending on your environment. Get these parameters from the developers of the application.
The editor for the WebLogic JMS (JNDI) step contains the following tabs:
The Base tab is where you define the connection and messaging parameters.
The Selector Query tab lets you specify a selector query to be run when listening for a message on a queue.
The Send Message Data tab is where you create the message content.
The Response Message tab is where the response messages are posted.
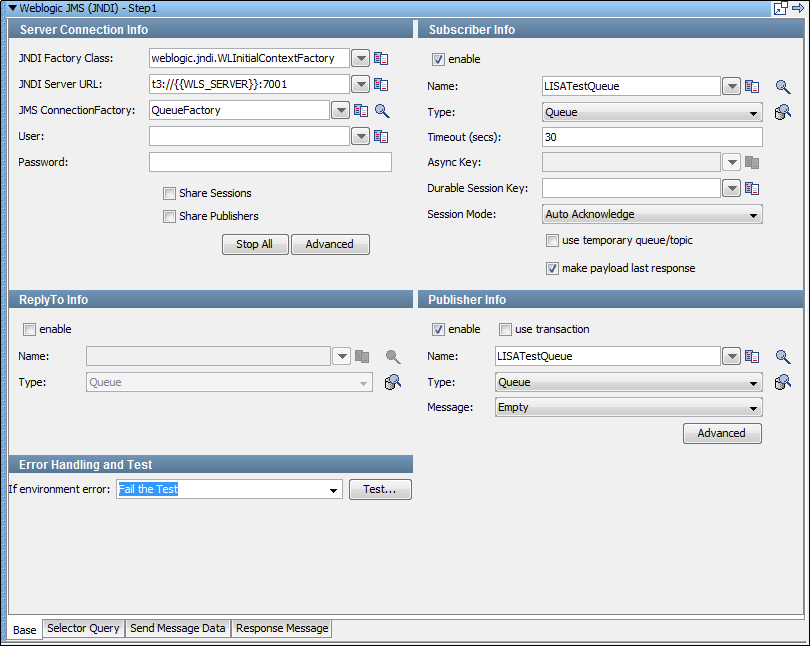
The Base tab is divided into the following sections:
To enable and disable the Subscriber Info, Publisher Info, and ReplyTo Info sections, use the enable check box in each section. Using these check boxes, you can configure the step to be a publish step, a subscribe step, or both. You can also include a JMS reply to component in the step.
When you finish configuring the test step, click Test in the Error Handling and Test section to test the configuration settings.
Server Connection Info
Enter the JNDI information.
These values are parameterized with properties from your configuration. These propertiessimplify changing the application under test. By default, the WLS_SERVER property in the JNDI Server URL is used. This property must be added to your configuration if you plan to use it.
The five parameters are available to you for the system under test. The pull-down menus contain common examples or templates for these values.
The fully qualified class name of the context factory for the JNDI provider.
The URL for connecting to the JNDI server. The format of the URL depends on the specific JNDI provider being used.
Use Search ![]() to browse available resources on the server. Select or enter a connection factory to use for this step execution according to the JMS specification.
to browse available resources on the server. Select or enter a connection factory to use for this step execution according to the JMS specification.
The user name for connecting to the JNDI provider and getting a handle to the connection factory.
The password for connecting to the JNDI provider and getting a handle to the connection factory.
To share JMS sessions and publishers throughout the test case, use these check boxes. This approach can lower overhead, but does not always provide a realistic simulation because typically JMS clients want to release resources. If you select the Share Publishers check box, the Share Sessions check box is also selected. You cannot share publishers without sharing sessions. For more detailed information about these parameters, see the Deliberate Delays in VSE knowledge base article.
Lets you stop any listeners at design time now. Some listeners can get orphaned, but still consume messages. When they do, it is difficult to create test cases.
Displays a panel where you can add custom properties that are sent with the connection information and you can configure the second-level authentication.
Publisher Info
To set up the ability to send (publish) messages, select the enable check box. To execute a commit when the message is sent, select the use transaction check box.
Enter the following parameters:
The name of the topic or queue. Use Search ![]() to browse the JNDI server for the topic or queue name.
to browse the JNDI server for the topic or queue name.
Select whether you are using a topic or queue. To see what messages are waiting to be consumed from a queue (only), use Browse ![]() to the right of this field.
to the right of this field.
Select the type of message you are sending. The supported types are Empty, Text, Object, Bytes, Message, and Mapped (Extended).
Displays a panel where you can edit the message headers and can add message properties.
Subscriber Info
Select the enable check box to set up to enable the ability to receive (subscribe to) messages.
Enter the following parameters:
The name of the topic or queue. Use Search ![]() to browse the JNDI server for the topic or queue name.
to browse the JNDI server for the topic or queue name.
Select whether you are using a topic or queue, and whether to listen in synchronous or asynchronous mode. For the asynchronous mode, you must also have an entry in the Async Key field. Use Browse ![]() to the right of this field to see what messages are waiting to be consumed from a queue (only).
to the right of this field to see what messages are waiting to be consumed from a queue (only).
The period to wait before the application interrupts waiting for a message (this field can be left blank for no timeout).
The value that identifies asynchronous messages. This value is only necessary in asynchronous mode. This value is used in a subsequent Message Consumer step to retrieve asynchronous messages.
By entering a name here you are requesting a durable session. You are also providing a key for that session. A durable session lets you receive all of your messages from a topic, even if you log out and then you log back in.
To execute a Commit when a message is received, select the use transaction check box.
To have the JMS.provider set up a temporary queue/topic on your behalf, select the use temporary queue/topic check box. When a temporary queue/topic is used, the JMS ReplyTo parameter of the message you send to the temporary queue/topic is automatically set. The temporary queue/topic feature must always be used with a publisher so that a reply can be sent. If you use a temporary queue/topic, the ReplyTo section is disabled.
To make the payload the response of this step, select the make payload last response check box.
ReplyTo Info
To set up a destination queue or topic, select the enable check box.
If your application requires a destination, it is set up in this section.
Enter the following parameters:
The name of the topic or queue. Use Search ![]() to browse the JNDI server for the topic or queue name.
to browse the JNDI server for the topic or queue name.
Select whether you are using a topic or queue. To see what messages are waiting to be consumed from a queue (only), use Browse ![]() to the right of this field.
to the right of this field.
Error Handling and Test
If an exception occurs, the Error Handling and Test section lets you redirect to a step.
Specifies the action to take or the step to go to if the test fails because of an environment error.
Default: Abort the test.
Click Test to test your step configuration settings.
You can enter a JMS selector query in this editor. The syntax closely follows SQL and is a subset of SQL92. A JMS selector query can be specified when listening for a message on a queue that is a response to a published message. The previous graphic shows a specific query for a JMSCorrelationID that matches one set in a property as sent with the original message.
A built-in mechanism allows a test creator to set the JMSCorrelationID for a message before sending it. Before the message is sent, you can set the correlation ID by setting the lisa.jms.correlation.id property.
A non-zero value is detected, and the message JMSCorrelationID property is set before the message is sent.
If your step is configured to publish, this tab lets you compose your message. The Send Message Data tab view in the following example shows a text message.
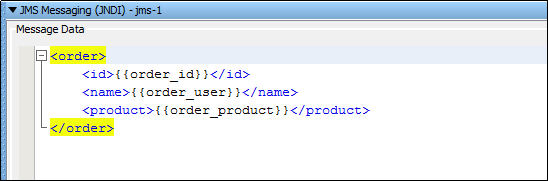
This example shows an XML fragment with properties being used. You can type the text, click Read Message from File to read from a file, or you can store the fragment in a property. If you store the text in a property, simply place the property in the editor: for example, LISA_PROP.
Notice that properties are used in the message XML allowing the message to be created dynamically during the test run.
If your step is configured to subscribe, your response is shown here. For more information, see JMS Messaging (JNDI).
|
Copyright © 2014 CA Technologies.
All rights reserved.
|
|