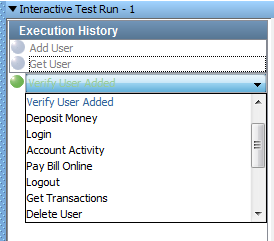

The Run tab on the ITR window shows the steps that have been executed (in gray) and the next step that will be executed (in green).
In the following graphic, the first two steps (Add User and Get User) have been executed. The third step (Verify User Added) is the next step that will be executed.

Each step has a pull-down menu that contains all the steps in the test case. You can use this menu to change the next step that will be executed. Select a step, and it will replace the current next step with the one of your choice. After you change the step, the workflow will continue from the new step.
You manage the ITR by using the toolbar at the bottom of the Run tab.
![]()
|
|
Run the next step in the test case. After the step has run, you can examine the results in the right panel. Click the icon again to run the next step that is listed, or select a different step to run as described previously. |
|
|
Run all of the steps in the test case. While the test is running, the icon changes into a Stop icon. You can stop the test by clicking the Stop icon. When the last step has been executed, a dialog indicates that the test is complete. |
|
|
Start the test again. This feature is useful if you change your test case and you want to execute it from the beginning. |
|
|
Save the current ITR state. In the dialog, enter the name of the save file. The suffix .itr is appended to the name. Subsequent saves overwrite this file. |
|
|
Load a saved ITR. Browse to the .itr file that you want to load. The Saved ITR State contains the information that is displayed in the tabs, capturing all the testing performed. To use the Saved State, first open the test case that was used when the original tests were run. |
|
|
To add or watch properties, open the property watch window. |
|
Copyright © 2014 CA Technologies.
All rights reserved.
|
|