

Getting Started › CA Application Test Tutorials › Tutorial 9 - Examine and Test a Database
Tutorial 9 - Examine and Test a Database
In this tutorial, you examine and test a database table that is part of the web application in Tutorial 5.
You use the SQL Database Execution (JDBC) step to interact with a database in a test case and test the response with an assertion. You examine the Users table from a Derby database that is part of the application.
Tutorial Tasks
In this tutorial, you:
- Use the SQL Database Execution (JDBC) step.
- Store application properties in a configuration.
- Add and modify an assertion.
- Add a filter.
Prerequisites
- You have completed Tutorial 5.
- DevTest Workstation is open.
- You have access to the demo server.
Step 1 - Create a Test Case
Follow these steps:
- In the Project pane, right-click on the Tests folder and select Create New Test Case.
- Set the file name to tutorial9.
- Click Save.
Step 2 - Add Database Properties to the Configuration
Store the properties that are necessary to connect to the database in the configuration. This practice is a standard DevTest practice that increases the portability of test cases.
Follow these steps:
- If project.config is not the active configuration, then right-click project.config in the Project pane and select Make Active.
- Open the project.config configuration.
- Add the following properties:
- DBDriver
-
org.apache.derby.jdbc.ClientDriver
- DBConnect
-
jdbc:derby://localhost:1529/lisa-demo-server.db
- DBUserID
-
sa
- DBPwd
-
sa
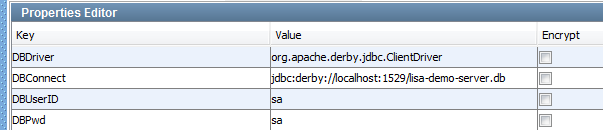
- Click Save.
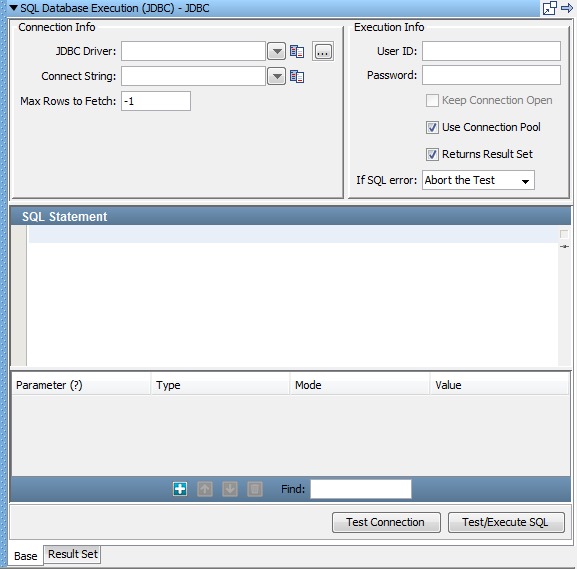
Step 3 - Add a SQL Database Execution (JDBC) Test Step
The SQL Database Execution (JDBC) test step enables you to connect to a database using JDBC and make SQL queries on the database.
Follow these steps:
- Click the tutorial9 tab.
- Click
 Add Step.
- Select Other Transactions and select SQL Database Execution (JDBC).
JDBC is added to the model editor.
To open the step editor, double-click the JDBC step.
Step 4 - Connect to the Database
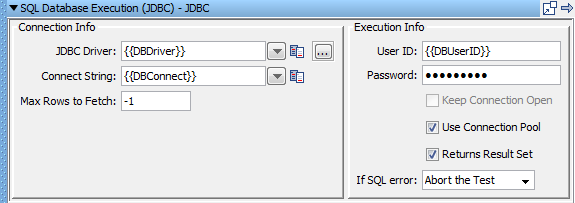
To provide the connection information, use the properties that you added to the project.config configuration.
Follow these steps:
- Enter the following values in the Connection Info and Execution Info areas of the step editor. Notice that when you enter the password, the value is masked.
- JDBC Driver
-
{{DBDriver}}
- Connect String
-
{{DBConnect}}
- User ID
-
{{DBUserID}}
- Password
-
{{DBPwd}}
- Click the Test Connection button at the bottom of the step editor.
A message indicates that the connection is valid.
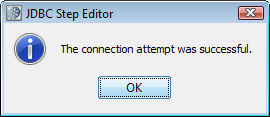
- Click OK.
Step 5 - Execute a SQL Query
Now specify and run a SQL statement that retrieves data from the Users table.
Follow these steps:
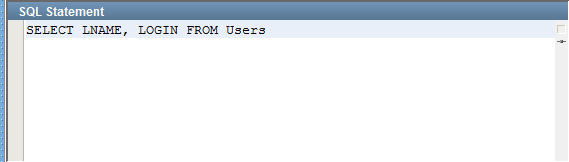
- In the SQL Statement pane, enter the following statement:
SELECT LNAME, LOGIN FROM Users
- Click the Test/Execute SQL button at the bottom of the step editor.
A message confirms a valid query and displays the number of rows returned.

- Click OK.
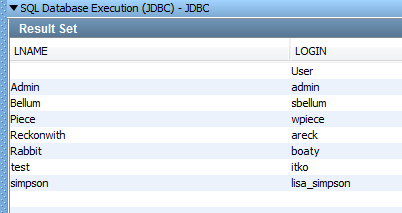
The Result Set tab is displayed.
Step 6 - Add an Assertion
Add an assertion that tests for the presence of a specific last name in the result set.
Follow these steps:
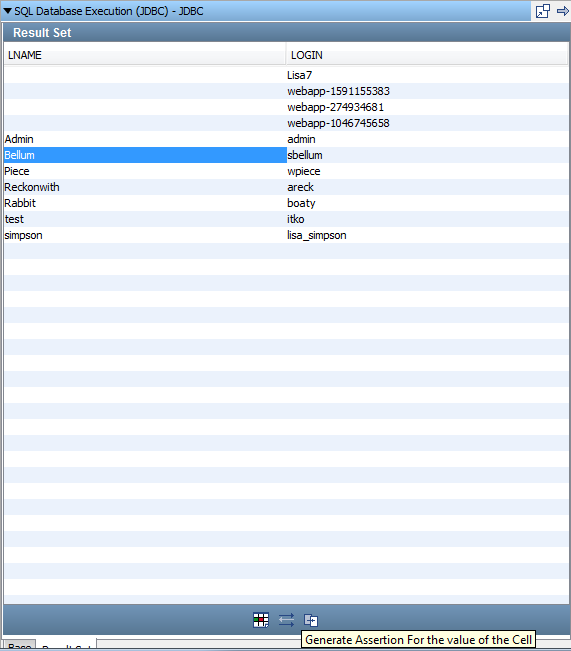
- In the Result Set tab, select a cell in the LNAME column.
- Click
 Generate Assertion for the Value of a Cell.
The Generate JDBC Result Set Value Assertion dialog opens.
- From the drop-down list, select the Fail the Test option.
If the last name that you selected is not found, then the test fails.
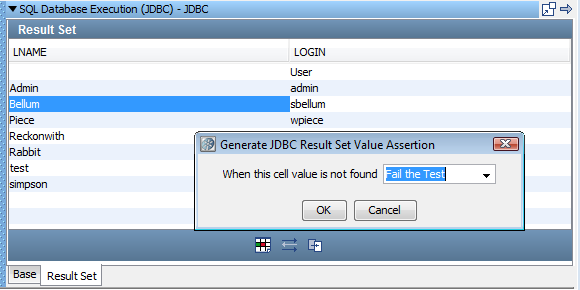
- Click OK.
- Click Save.
Step 7 - Run the Test Case
Follow these steps:
- From the toolbar, click
 Start ITR.
- Click
 Execute Next Step.
The test runs successfully. The result set is shown in the Response tab.
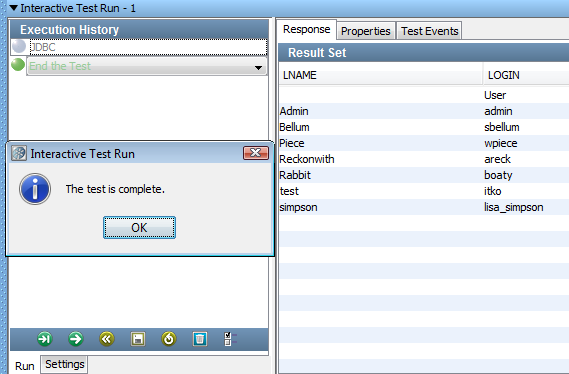
- Retract the ITR tray.
Step 8 - Change the Assertion
You now modify the assertion to cause the test to fail.
Follow these steps:
- In the model editor, click the JDBC SELECT Users test step.
- Open the Assertions tab in the Element Tree.
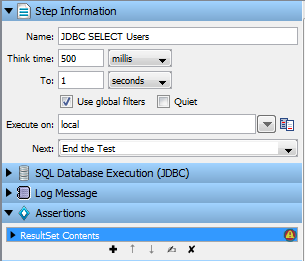
- Double-click the assertion that you created earlier.
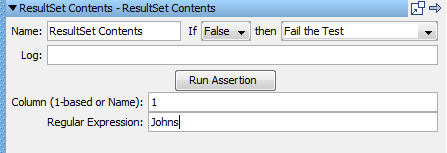
The assertion editor is opened. The lower portion indicates that the assertion checks the first column of the result set for the specified value.
- Change the value of the Regular Expression field to Johns.
- Start a new ITR and run the test case again.
The test fails.
- Retract the ITR tray.
Step 9 - Add a Filter
Add a database filter that captures the value in the first column and fourth row of the result set. The value is stored in a property.
Follow these steps:
- In the model editor, select the JDBC SELECT Users test step.
- Open the Filters tab in the Element Tree.
- Click
 Add.
Add.
- From the Database Filters submenu, select Extract Value from JDBC Result Set.
The filter editor opens.
- In the Column field, enter 1. Or, you can enter the actual column name, which is LNAME.
- In the Row field, enter 3.
This field is zero-based. Therefore, the value 3 refers to the fourth row.
- In the Property field, enter DBProperty.
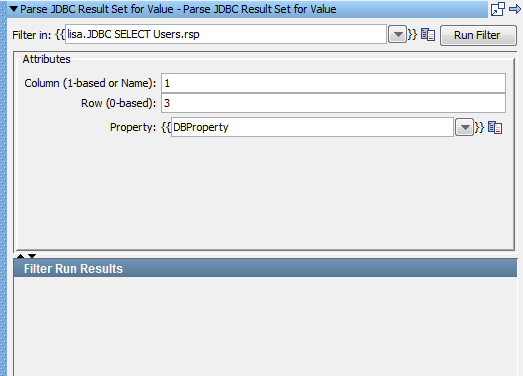
- Click Save.
Step 10 - Test the Filter and Assertion
Follow these steps:
- Start a new ITR and run the test case again.
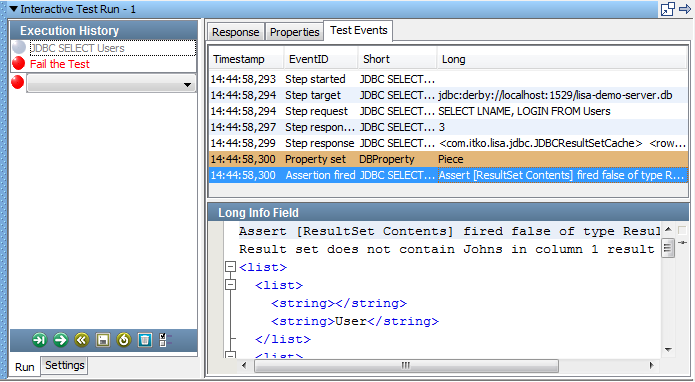
The test fails because Johns was not found in the result set.
- Click the Test Events tab.
- Click the Property set event.
Notice that DBProperty was set to the value specified by the filter.
- Click the Assertion fired event.
The Long Info Field area indicates that the assertion fired because the first column of the result set did not contain the value Johns.
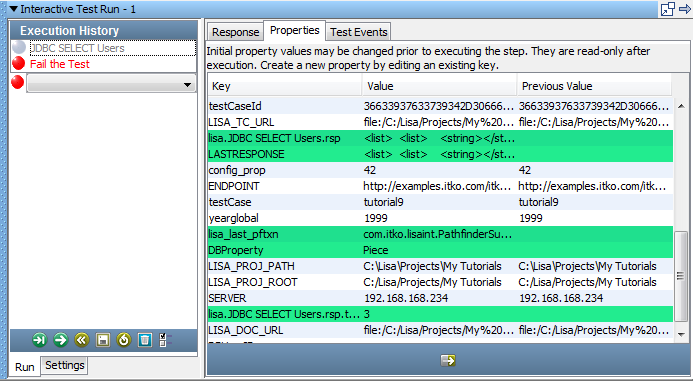
- Click the Properties tab.
- Locate and review the DBProperty row.
Tutorial 9 - Review
In this tutorial, you created a test case to query a database. You used the Users table from the Apache Derby database that accompanies the applications on the demo server. You learned how to:
- Connect to the database.
- Execute a SQL query against the database.
- Add assertions and filters.
Copyright © 2014 CA Technologies.
All rights reserved.
|
|