

Perform the jobs in this section before performing the steps in either the upgrade or new install sections. You can run these jobs multiple times for as many MUFs as needed.
The following steps are explained in this chapter:
|
Step |
Description |
Purpose |
|---|---|---|
|
0 |
Retrieve BDCUS00 from CABDSAMP perform changes as directed, and submit the JCL. Do not save this job in CABDSAMP! |
Copy the sample JCL from the target library into the INSTJCL library and copy the custom macro source members into the CUSMAC library. |
|
1 |
Retrieve BDRIM01 from INSTJCL, perform changes as directed, and submit the JCL. |
Load DB Program CALL (PC) using CAIRIM. CA Common Services CAMASTER is a prerequisite requirement to complete this task. |
|
2A |
Retrieve BDCUSNEW from INSTJCL, perform changes as directed, and submit the JCL. |
Perform CA Datacom product custom assemblies and links for a new install only. Do not run BDCUSUPG if new install is selected. |
|
OR |
|
|
|
2B |
Retrieve BDCUSUPG from INSTJCL, perform changes as directed, and submit the JCL. |
Performs CA Datacom product custom assemblies and links for upgrade install only. Do not run BDCUSNEW if upgrade is selected. VERY IMPORTANT: The upgrade procedure is intended to finish with a CA Datacom/DB MUF at Version 15.0 executing with the same Multi-User Startup Options as your current Version 14.0 MUF. To ensure this, you must modify the DBSYSID parameters in thithe CUSMAC library to match your current Version 14.0 DBSYSID. These would normally be found in the Version 14.0 CUSMAC library as DBSIDPR but may be elsewhere depending on your site standards. All other core product custom macros, such as DDSYSTBL and DQOPTLST, should also be reviewed and updated as needed. |
As a DBA in your mainframe environment, your responsibilities can include installing, maintaining, deploying, configuring, and customizing the database product. To complete your upgrade or install of CA Datacom, modify the CA Datacom configuration using the following procedures.
The following graphic shows the workflow for customizing CA Datacom:
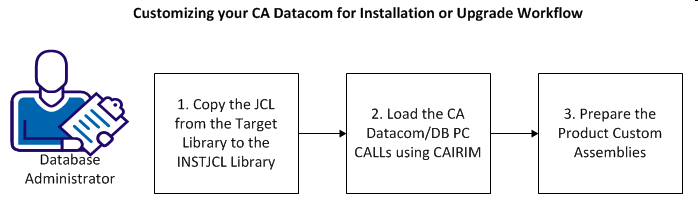
Do the following to customize CA Datacom for installation or upgrade:
Note: You can perform these steps multiple times for as many Multi-User Facilities as needed.
This procedure copies the new and upgrade JCL from the target library to the INSTJCL library.
Follow these steps:
Important! Do not save your edited BDCUS00 member in the CABDSAMP library so that you can use the original member to start over.
The JCL was copied successfully.
This procedure loads the CA Datacom/DB Program Call (PC) routines using CAIRIM. Ensure that CAMASTER is installed on the same LPAR where CAIRIM runs before performing this step. Verify that this step runs before attempting any of the new or upgrade jobs.
Follow these steps:
MODULES IN COMMON MEMORY          MODULE   REL    DATE     TIME   RMID    FMID        SIZE

CROSS MEMORY  PC=PROD  14.0       DBPCCPR  14.0   20131018 14.43  RO63772 CABDE00    4,346
PC XCF + RRS  PC=PROD  14.0       DBPCSPR  14.0   20130419 12.54  RO56818 CABDE00    2,984
CROSS MEMORY  PC=PROD  15.0       DBPCCPR  15.0   20121129 07.06          CABDF00    7,034
This report shows that the CA Datacom/DB PC routines are loaded.
Review, edit, execute, and complete this step before continuing.
For this version of CA Datacom, make certain that this job runs on any LPAR on which you want any CA Datacom work to run.
Batch jobs, CICS, Servers, or the Multi-User Facility (MUF) require this job to define the PC routines. Run the DBUTLTY function REPORT MEMORY=MVS to verify.
This procedure prepares the CA Datacom custom assemblies.
Use the BDCUSNEW custom assembly for a new installation. BDCUSNEW uses the Simplify feature for its install and uses naming standards that have CXXNAME as part of the data sets. Review the CA Datacom/DB Database and System Administration Guide for this feature. Using CXXNAME as part of the data set name for custom libraries, control data sets, and database areas is considered to a best practice for data set naming conventions. With this naming convention and the Simplify options being turned on in the BDSIDPR module, the Simplify feature helps to protect these data sets.
Note: Do not modify BDCUSUPG if you are doing a new installation. For more information about the BDNEW members, see the New Installation Phase topic.
Use the BDCUSUPG custom assembly for an upgrade installation. Be sure that the CXX name is not changed as part of this process. If you must change the CXX name, change it in Version 14.0 before the upgrade starts or in Version 15.0 after the upgrade is completed.
VERY IMPORTANT: The upgrade procedure is intended to finish with a CA Datacom/DB MUF at Version 15.0 executing with the same Multi-User Startup Options as your current Version 14.0 MUF. To ensure this, you must modify the DBSYSID parameters in this member to match your current Version 14.0 DBSYSID. These would normally be found in the Version 14.0 CUSMAC library as DBSIDPR but may be elsewhere depending on your site standards. All the other CUSMAC macro members, including URTs, should also be reviewed and updated as needed before submitting BDCUSUPG for execution.
The PDS assumes that either BDCUSNEW or BDCUSUPG is used but not both processes for a new install and upgrade.
Follow these steps:
Custom assemblies are prepared.
Custom assembly is now complete. You can start using CA Datacom/DB.
|
Copyright © 2014 CA.
All rights reserved.
|
|