

This section describes how to:
To set up the mapping, you configure the classification parameters. These parameters define how CCS file classifications map onto values of the FSRM classification property.
In the instructions below, you map the CCS 'Credit Card Number' classification to the 'High' value of the FSRM 'Personally Identifiable Information' classification property.
The following instructions briefly describe the minimum steps in File Server Resource Manager for Windows Server 2008 R2.
To create a local classification property
These instructions create a local classification property, 'Personally Identifiable Information'.
The Create Classification Property Definition dialog appears.
Set the property name to Personally_Identifiable_Information.
Set the type to 'Ordered List' and add classification values of High, Medium and Not PII. This setting allows FCI to assign a raw CCS file classification to one of these values.
Note: For a discussion of Multiple Choice List and Multi-String property types, refer to the Mapping Guidelines.
To create a classification rule
These instructions create a classification rule named 'Apply_CCS_Classifications_2'. The rule assigns CCS file classifications to the FSRM 'Personally Identifiable Information' classification property.
The Classification Rules Definition dialog appears.
Type a name for the rule, such as Apply_CCS_Classifications_2.
Specify the folders and volumes that you want to classify.
Select 'CA DataMinder Content Classifier' from the list. This mechanism causes FCI to use the CCS to classify files.
Select the property that gets assigned to files by this classification rule. For this example, select the 'Personally Identifiable Information' classification property. When FCI classifies a file, it writes the CCS classification to this property.
Note: You do not need to set a property value. The value is assigned to the classification property automatically by the classification mechanism.
The Advanced Rule Parameters dialog appears.
This setting forces FCI to reclassify files each time they get modified. If you clear this check box, FCI never reclassifies files which already have a classification.
FCI saves the new classification rule. Continue to the next section and map the CCS classifications onto the FSRM classification property.
To map CCS classifications onto an FSRM classification property
These instructions map raw CCS file classifications onto values of the FSRM 'Personally Identifiable Information' classification property.
The available classification rules are listed in the center pane.
The Classification Rules Definition dialog appears.
The Additional Rule Parameters dialog appears.
The Parameters section lists the name-value parameters that the classification mechanism recognizes.
The Name column lists the classifications returned by the current classification mechanism. For this rule, the classification mechanism is the CCS FCI plug-in.
The Value column lists values for the built-in FCI property.
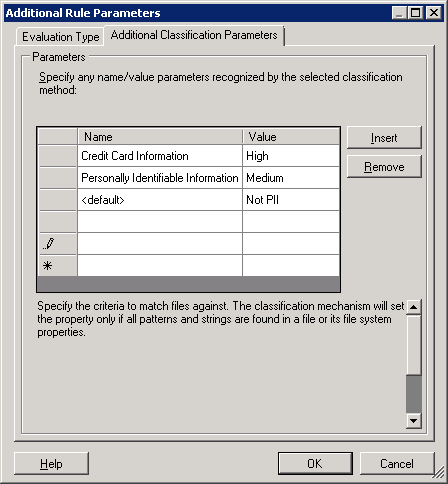
Additional Rule Parameters dialog
For example, enter 'Credit Card Information'. The next section, 'Mapping Guidelines', explains how this example mapping works.
Important! Enter the CCS classification name exactly as it is returned by the CCS. The full list is available in CCS Classifications.
For example, enter 'High'.
Now, when the CCS classifies a file as containing credit card numbers, FCI sets the file's classification property to 'Personally Identifiable Information: High'.
A '<default>' entry in the Name column equates to 'any CCS classification not listed elsewhere'. Enter '<default>' and 'Not PII' in the Name and Value columns respectively in the bottom row of the table.
Note: See the 'Mapping Guidelines' section for further information.
FCI now classifies all files in the specified folder. It calls the CCS to obtain classifications for each file. These CCS file classifications are saved as values of the FSRM classification property for each file.
|
Copyright © 2013 CA.
All rights reserved.
|
|